CT Style with Ryan & Kat Making Mediterranean Chicken Kabobs!
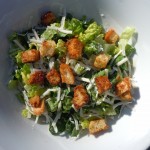
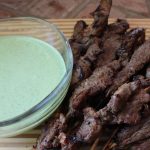
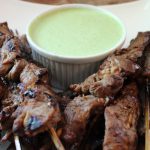
I’m always thrilled to be back on CT Style and that’s where I was this past Friday with Ryan Kristafer & Kat Cosley sharing one of my favorite recipes, Mediterranean Chicken Kabobs made with Greek yogurt. This recipe originated from a show I taped at a beach house right here in Madison two years ago with my friend Maria. It’s delicious on the grill outside and I show on easy it is to grill indoors using my “Lodge” reversible cast iron grill-pan.
I had a wonderful time in The Bender Kitchen meeting Kat Cosley, and as always, with Ryan Kristafer’s quick wit sense of humor he takes it up a notch! Having two little ones of her own Kat totally gets the convenience of being able to make different versions of these flavorful Mediterranean meals which can be made ahead for a busy family,
The Mediterranean Yogurt Chicken Kabobs are one of my all time favorites because it’s such a simple process and just so good for you! Marinate, skewer and BBQ…thats it! This recipe oringially came from Epicurious but as I always do, I tweaked it a bit when it was given to me adding in Spanish smoked paprika, a mild, sweet yet smokey spice thats gives a wonderful addition to the recipe.
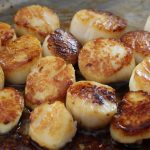
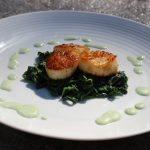
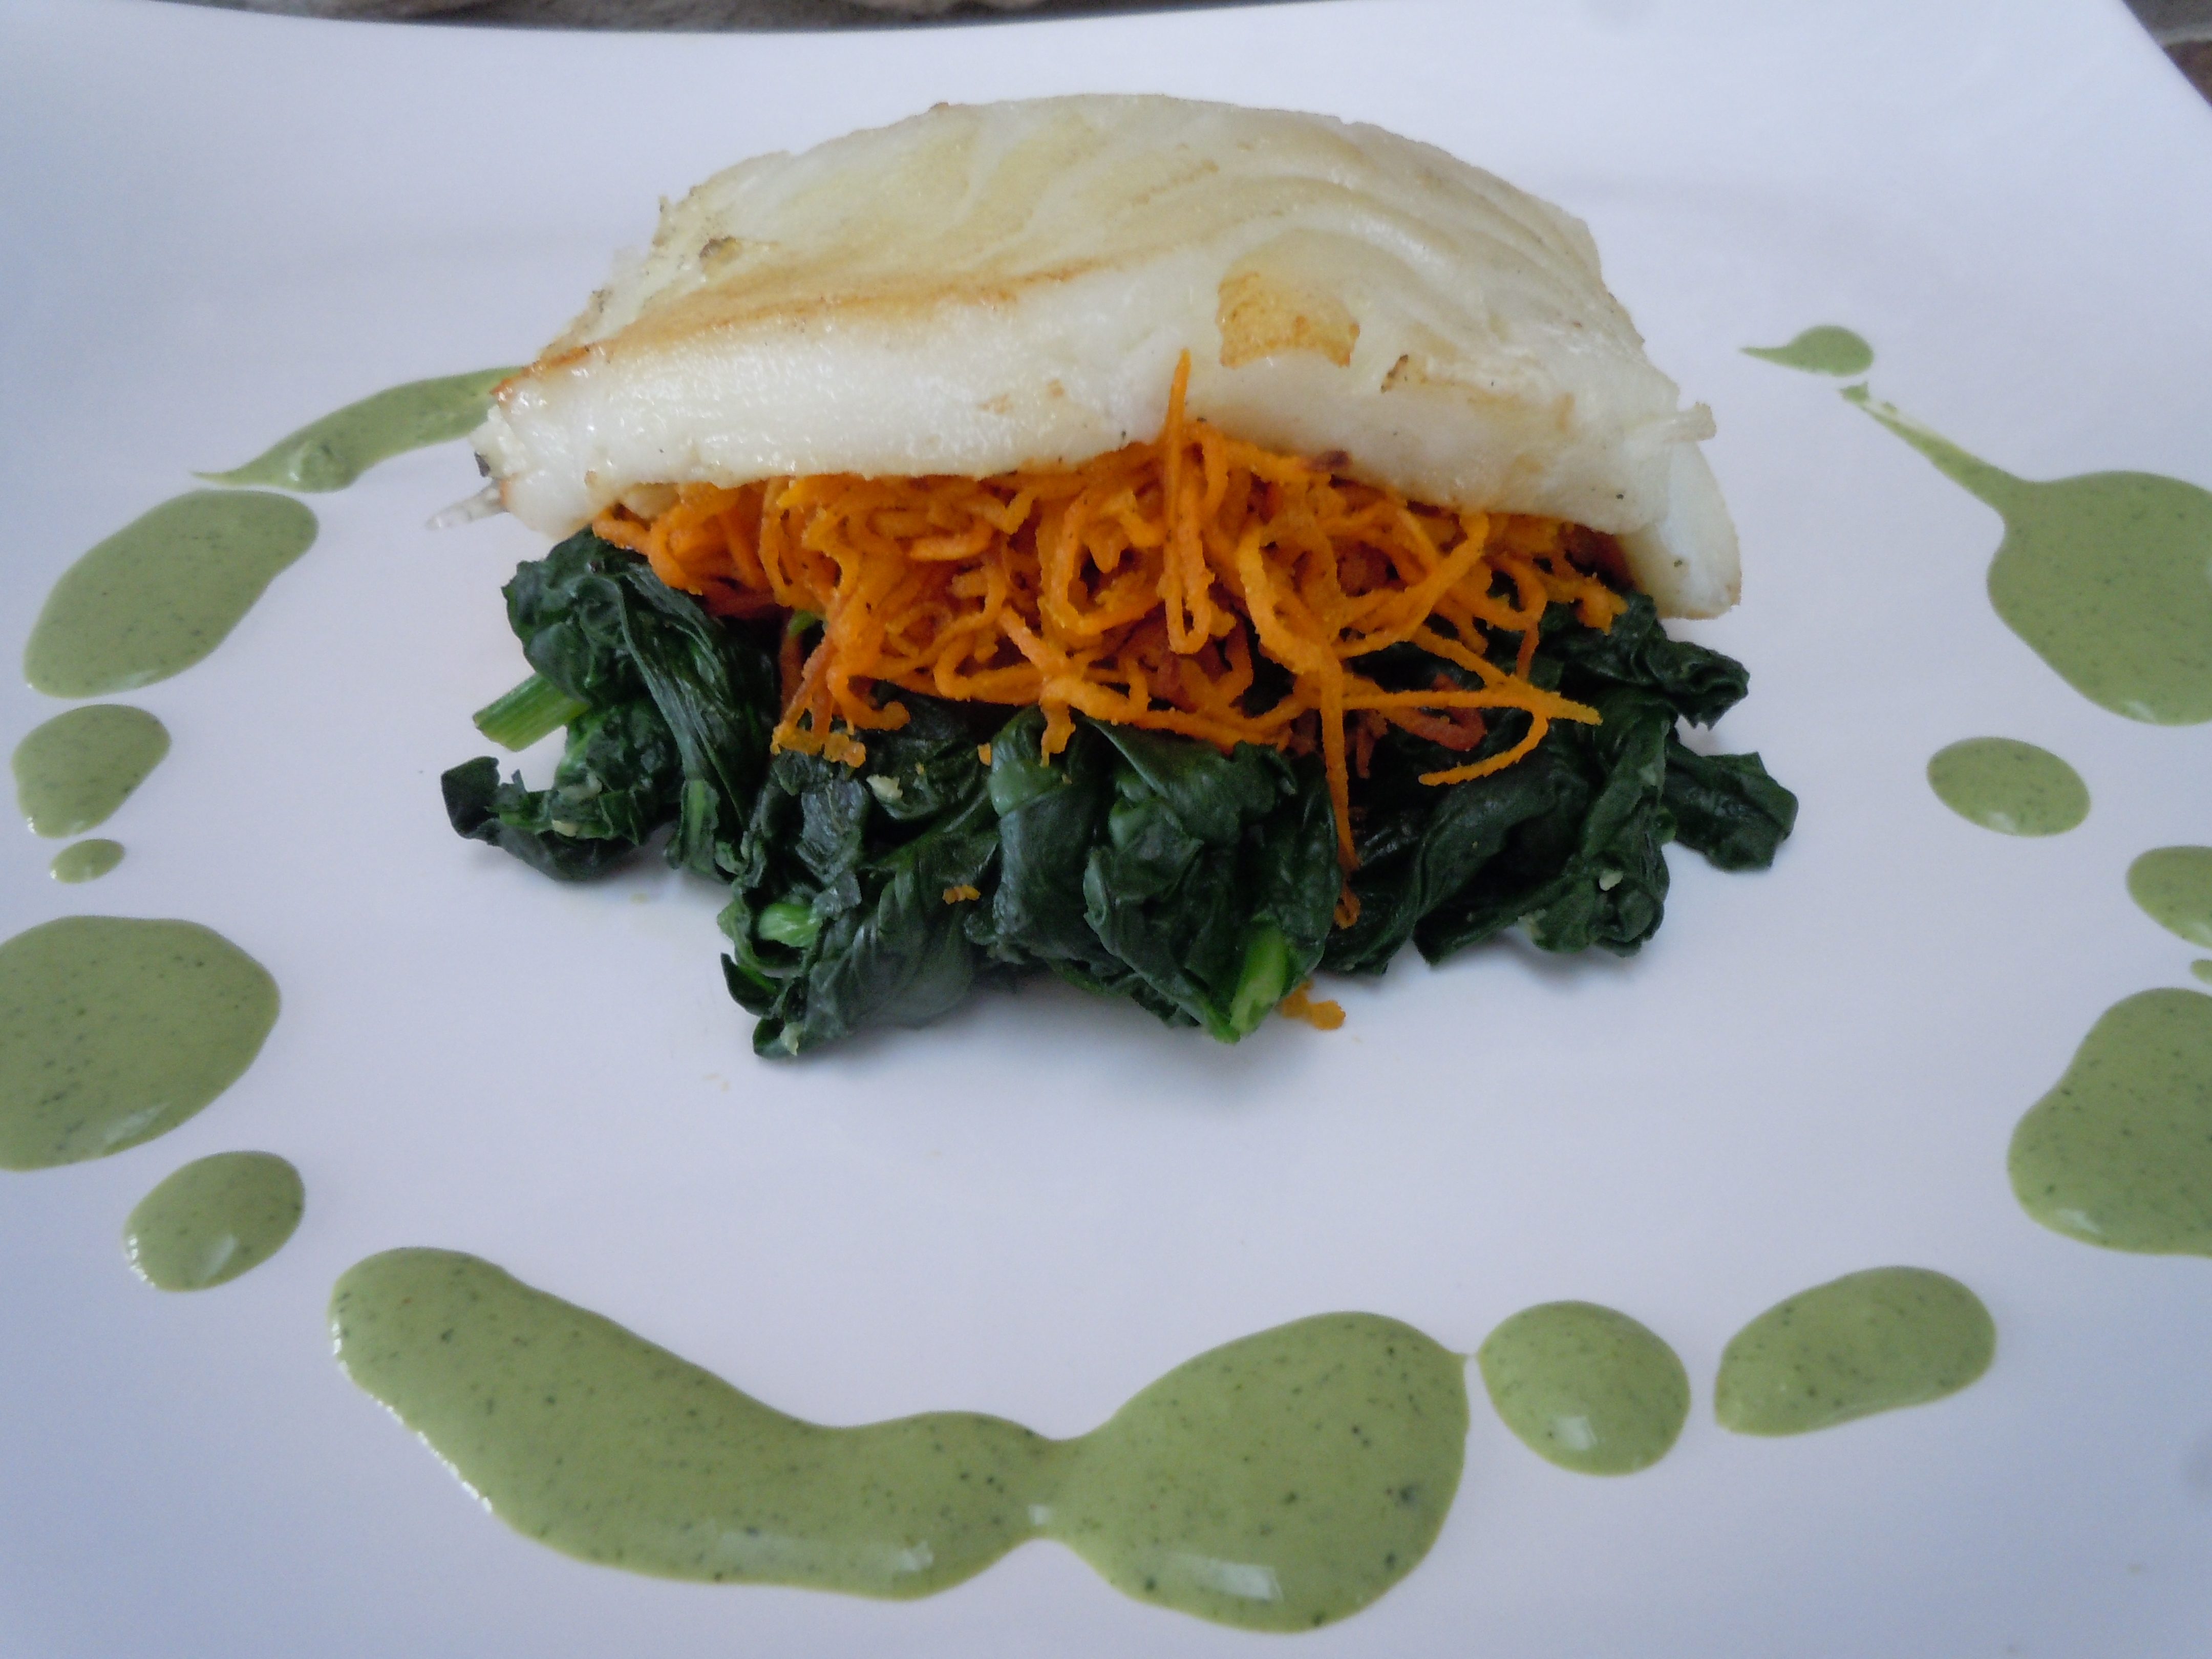
The sides that go with the kabobs, the homemade tzatziki, hummusand green goddess sauce can be a great compliment to grilled steaks, pork or veal chops, scallops or any fish! These flavors really brighten up any dish.
You can click on the links above to get to the recipe pages on my website that go with this live cooking segement on CT Style and they are also offered on the CT Style website as well.
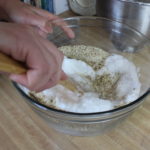
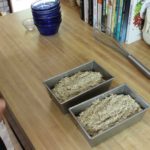
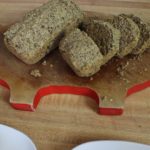
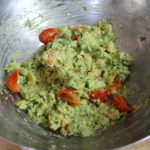
This energy boosting, super nutty seed bread topped with chic pea guacamole has both healthy fats and deliciousness…what more could you ask for!
It’s amazing how a hearty, healthy, homemade bread made from ground seeds can be this easy to make! The combination that April offers in her recipe by topping this moist bread with a creamy chic pea guacamole is a win win for me. The textures of the the two really compliment each other.
You really need to check out April’s beautiful website sweetsimpledelicious.com where she offers delicious, healthy recipes along with her wellness programs enrollment availabilty! It was so much fun taping this show with April. With our similar tastes and aspirations I know we’ll be working together to bring you more shows featuring healthy, scrumptious dishes!
CT Style Making Crab Balls with Ryan Kristafer & Teresa Dufour
With Teresa Dufour & Ryan Kristafer on CT STYLE Set
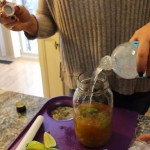
Showing you some fun and refreshing foods to make for your “Big Game” or Super Bowl party was the first thing that came to mind when I was deciding what to cook on “CT Style” this week. I went with my Crab Cake Balls with Homemade Thousand Island Dressing, Mango Salsa, and Honey Dripping Greek Baklava because they are all scrumptious make ahead dishes! The key words here being “make ahead” are a huge deal when throwing a party because it helps to take the pressure off, let’s you enjoy your guests and maybe have time to whip up some specailty cocktails like yummy Metaxa Mojito’s!
Metaxa Mojito’s
The crab cake balls are actually from my crab cake recipe. We are just forming the crab into 1 1/2″ balls instead of disc’s. It’s a no nonsense kind of recipe without all the vegetable fillers. Chunks of crab, some seasoning and a few binder ingredients is all that make up this appetizer. Letting the crab cake balls set in the frig for a couple hours or even overnight let’s those flavors meld and the shape to really form making it easy to sauté. Then you briefly sauté them in a little butter and olive oil until golden and crispy on the outside.
The Bender Kitchen
You saw how easy it was to make my homemade thousand island when I had Teresa whisk together all the ingredients in just a few seconds. The secret ingredient in my dressing is adding in creamy horseradish to compliment the crab, like a “crab Louie”!
Make sure to buy a few mangoes a week before game day so they have time to ripen fully on your kitchen counter and they will make an amazing mango salsa. While you are at it check out the avocado’s to see how ripe they are and you may want to pick up a couple of those to leave on the counter as well.
Selfie Ritual w/Benny – CT Style Camera Man
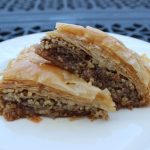
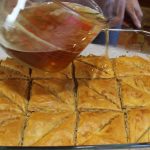
As for the authentic Honey Dripping Greek Baklava recipe that comes from my good friend Maria, it’s to die for! It make’s the perfect party dessert cause you cut them up into little triangles…it’s always a crowd pleaser and again you if make it the day before it’s ideal!
I know you’ll have as much fun making these party dishes as I did with Ryan Kristafer and Teresa Dufour on CT Style! Just click on the link above and it will take you to the exact recipe page’s! Enjoy and I hope your team wins!
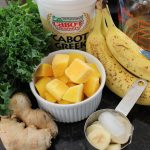
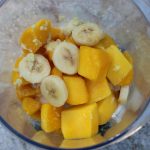
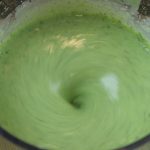
If you are wary of kale you won’t be after trying my scrumptious mango-kale smoothie! In fact, if you didn’t see that this mango-kale smoothie was green you would never know there was kale in it! It’s made from frozen mango chunks, fresh kale leaves, a pinch of banana and ginger, vanilla-bean Greek yogurt and light apple juice. The silky creaminess comes from using Cabot vanilla-bean Greek yogurt. And the “light” apple juice has the perfect amount of sweetness bringing it all together. The subtle flavors from the scant amounts of banana and ginger will have your guest’s trying to pinpoint exactly what they are. This most delicious concoction will have you licking your lips after the first sip!
My mango-kale smoothie is a real energy booster! I love that it’s super easy and convenient with store bought frozen mango chunks! My kitchen always has mangoes on the counter ripening for these mango-kale smoothie’s or my mango salsabut sometimes the timing isn’t right. That’s why I always have a bag of store bought frozen mango in my freezer. I can always depend on the the quality of the store bought frozen mango being deep orange in color offering a sweet mango flavor. Many times I cut up the ripened fresh mangoes using 1/2 cup fresh and 1 cup frozen in the mango-kale smoothie. Then I add any leftover fresh mango to the frozen mango bag and pop in back into the freezer for next time.
I make many different smoothies some of which you can find in my “Energy Smooties 101” but I think this is one of my fave’s because of the simpicity, delicious flavor and nutritional benefits. I add ginger in my mango-Kale smoothie for an immune system booster offering up anti-inflammatories and antioxidants. Kale is another antioxidant with more nutrients then spinach, if you can believe that one! It has calcium, potassium, vitamin C and B6 all helping to give you awesome looking skin & hair, and healthy bones & heart. Then there’s the mighty mango that’s known to help fight cancer with vitamin’s like A, C, E and B6!
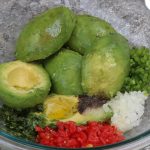
This Mango-Kale Smoothie energy drink should be part of your weekly regimen. It’s a win-win for all us busy bees who just don’t have time for ailments! Enjoy 🙂 Now that I have you on a health craze you have to try my easy fresh salsa 101 that you can make 12 months of the year, or BEST guacamoleever. Don’t forget the Seared Sea Scallops, Salmon BLT Slider’sand how about ending it with someRicotta Pie!
Ingredients for Mango-Kale Smoothie makes 8 small glasses:
1 1/2 cups frozen mango chunks (I love Stop & Shop brand -bag of frozen mango)
You can change up fruit and swap out 1/2 cup mango for pineapple
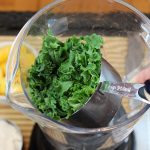
1 cup PACKED, about 5 lg fresh kale leaves with ribbing removed
3 1/2″ slices frozen banana, (fresh banana’s sliced, placed into baggies and freeze)
1 1/2 tsp fresh grated ginger
1 cup Cabot vanilla-bean Greek yogurt- “Cabot”
1 1/2 cup light or unsweetened apple juice…the perfect amount of sweet
NOTE: Make sure the liquid is 1″ down from top of fruit and kale level
1/2 cup water OR Muscle milk …..If you need more liquid you can just add water OR a protein powder like muscle milk -vanilla is my favorite
1/4 cup crushed ice …helps to purée the kale to a fine, smooth consistency
Directions:
Place the kale leaves into the blender first, followed by Greek yogurt, ice cube, frozen mango chunks and banana, zested fresh ginger and light apple juice
Purée for 1 minute til frothy and smooth
Pour into glasses and serve
NOTE: you can freeze any left over mango-kale smoothie in plastic container for future frozen “Italian ice” like snacks!
Add some vodka or rum to make delicious party cocktails!
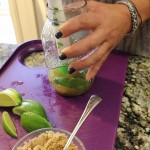
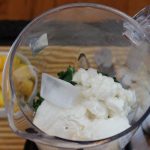
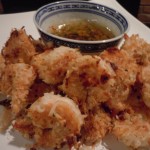
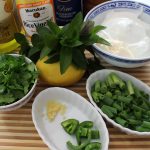
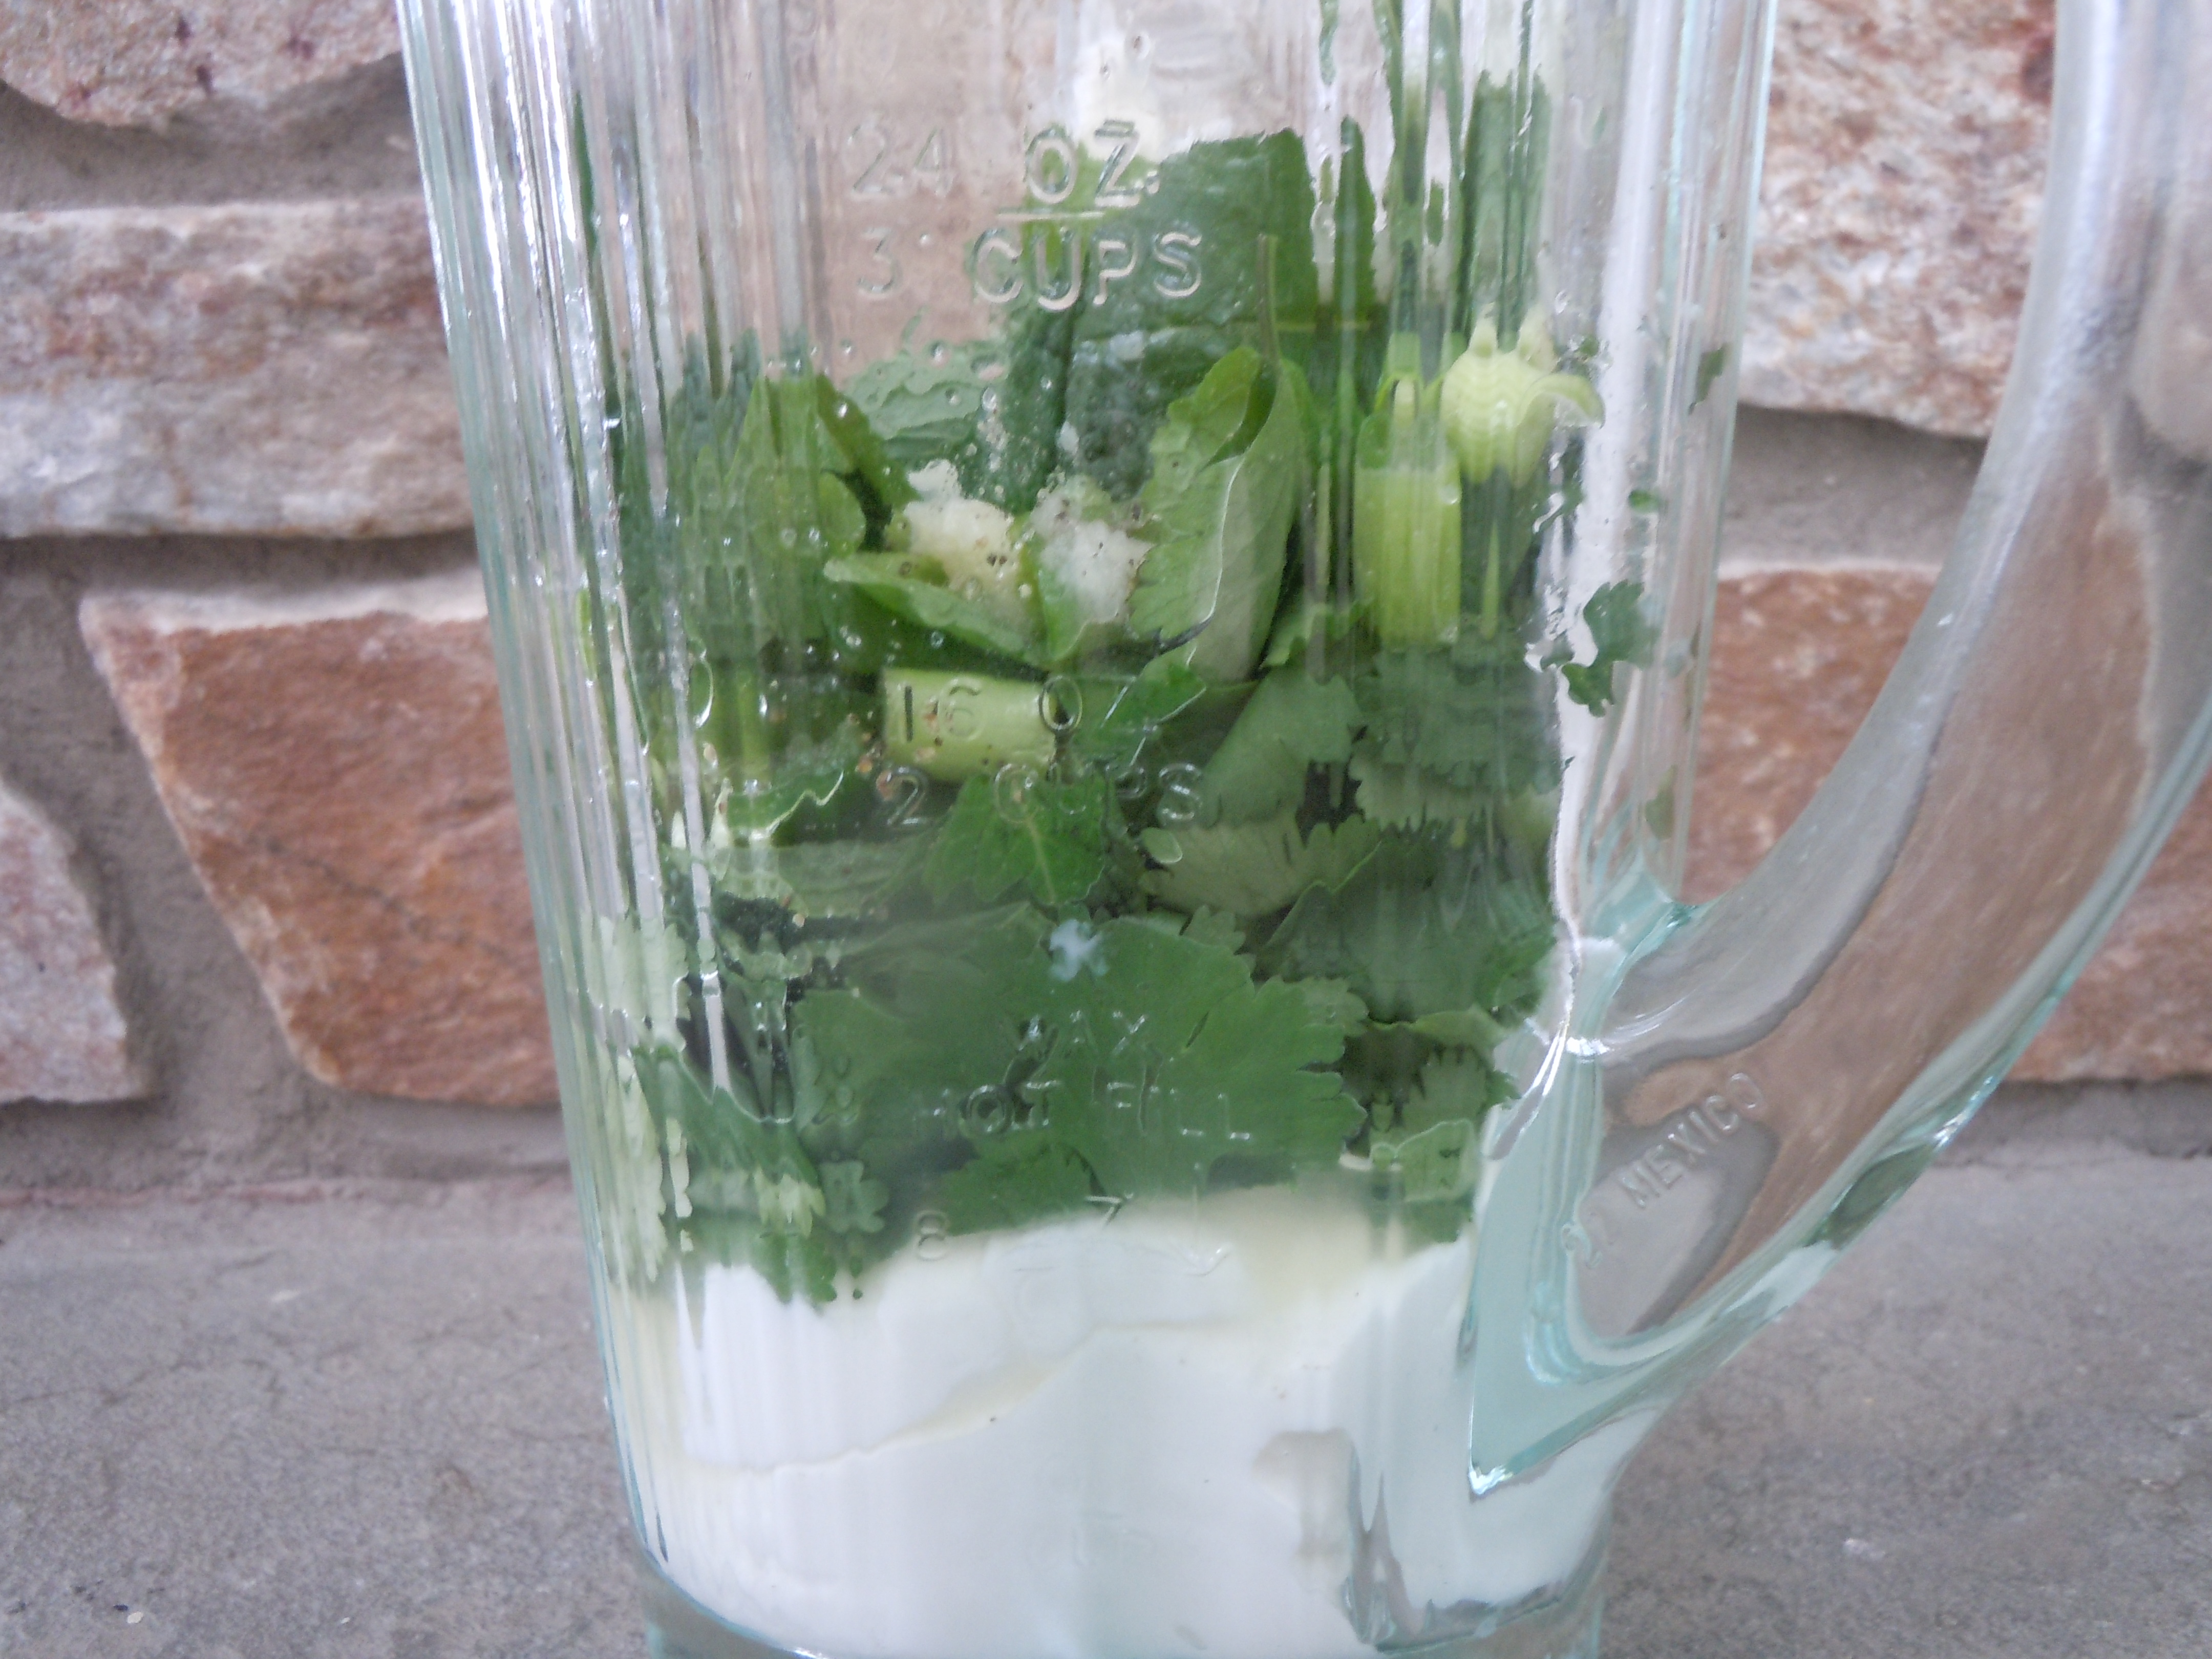
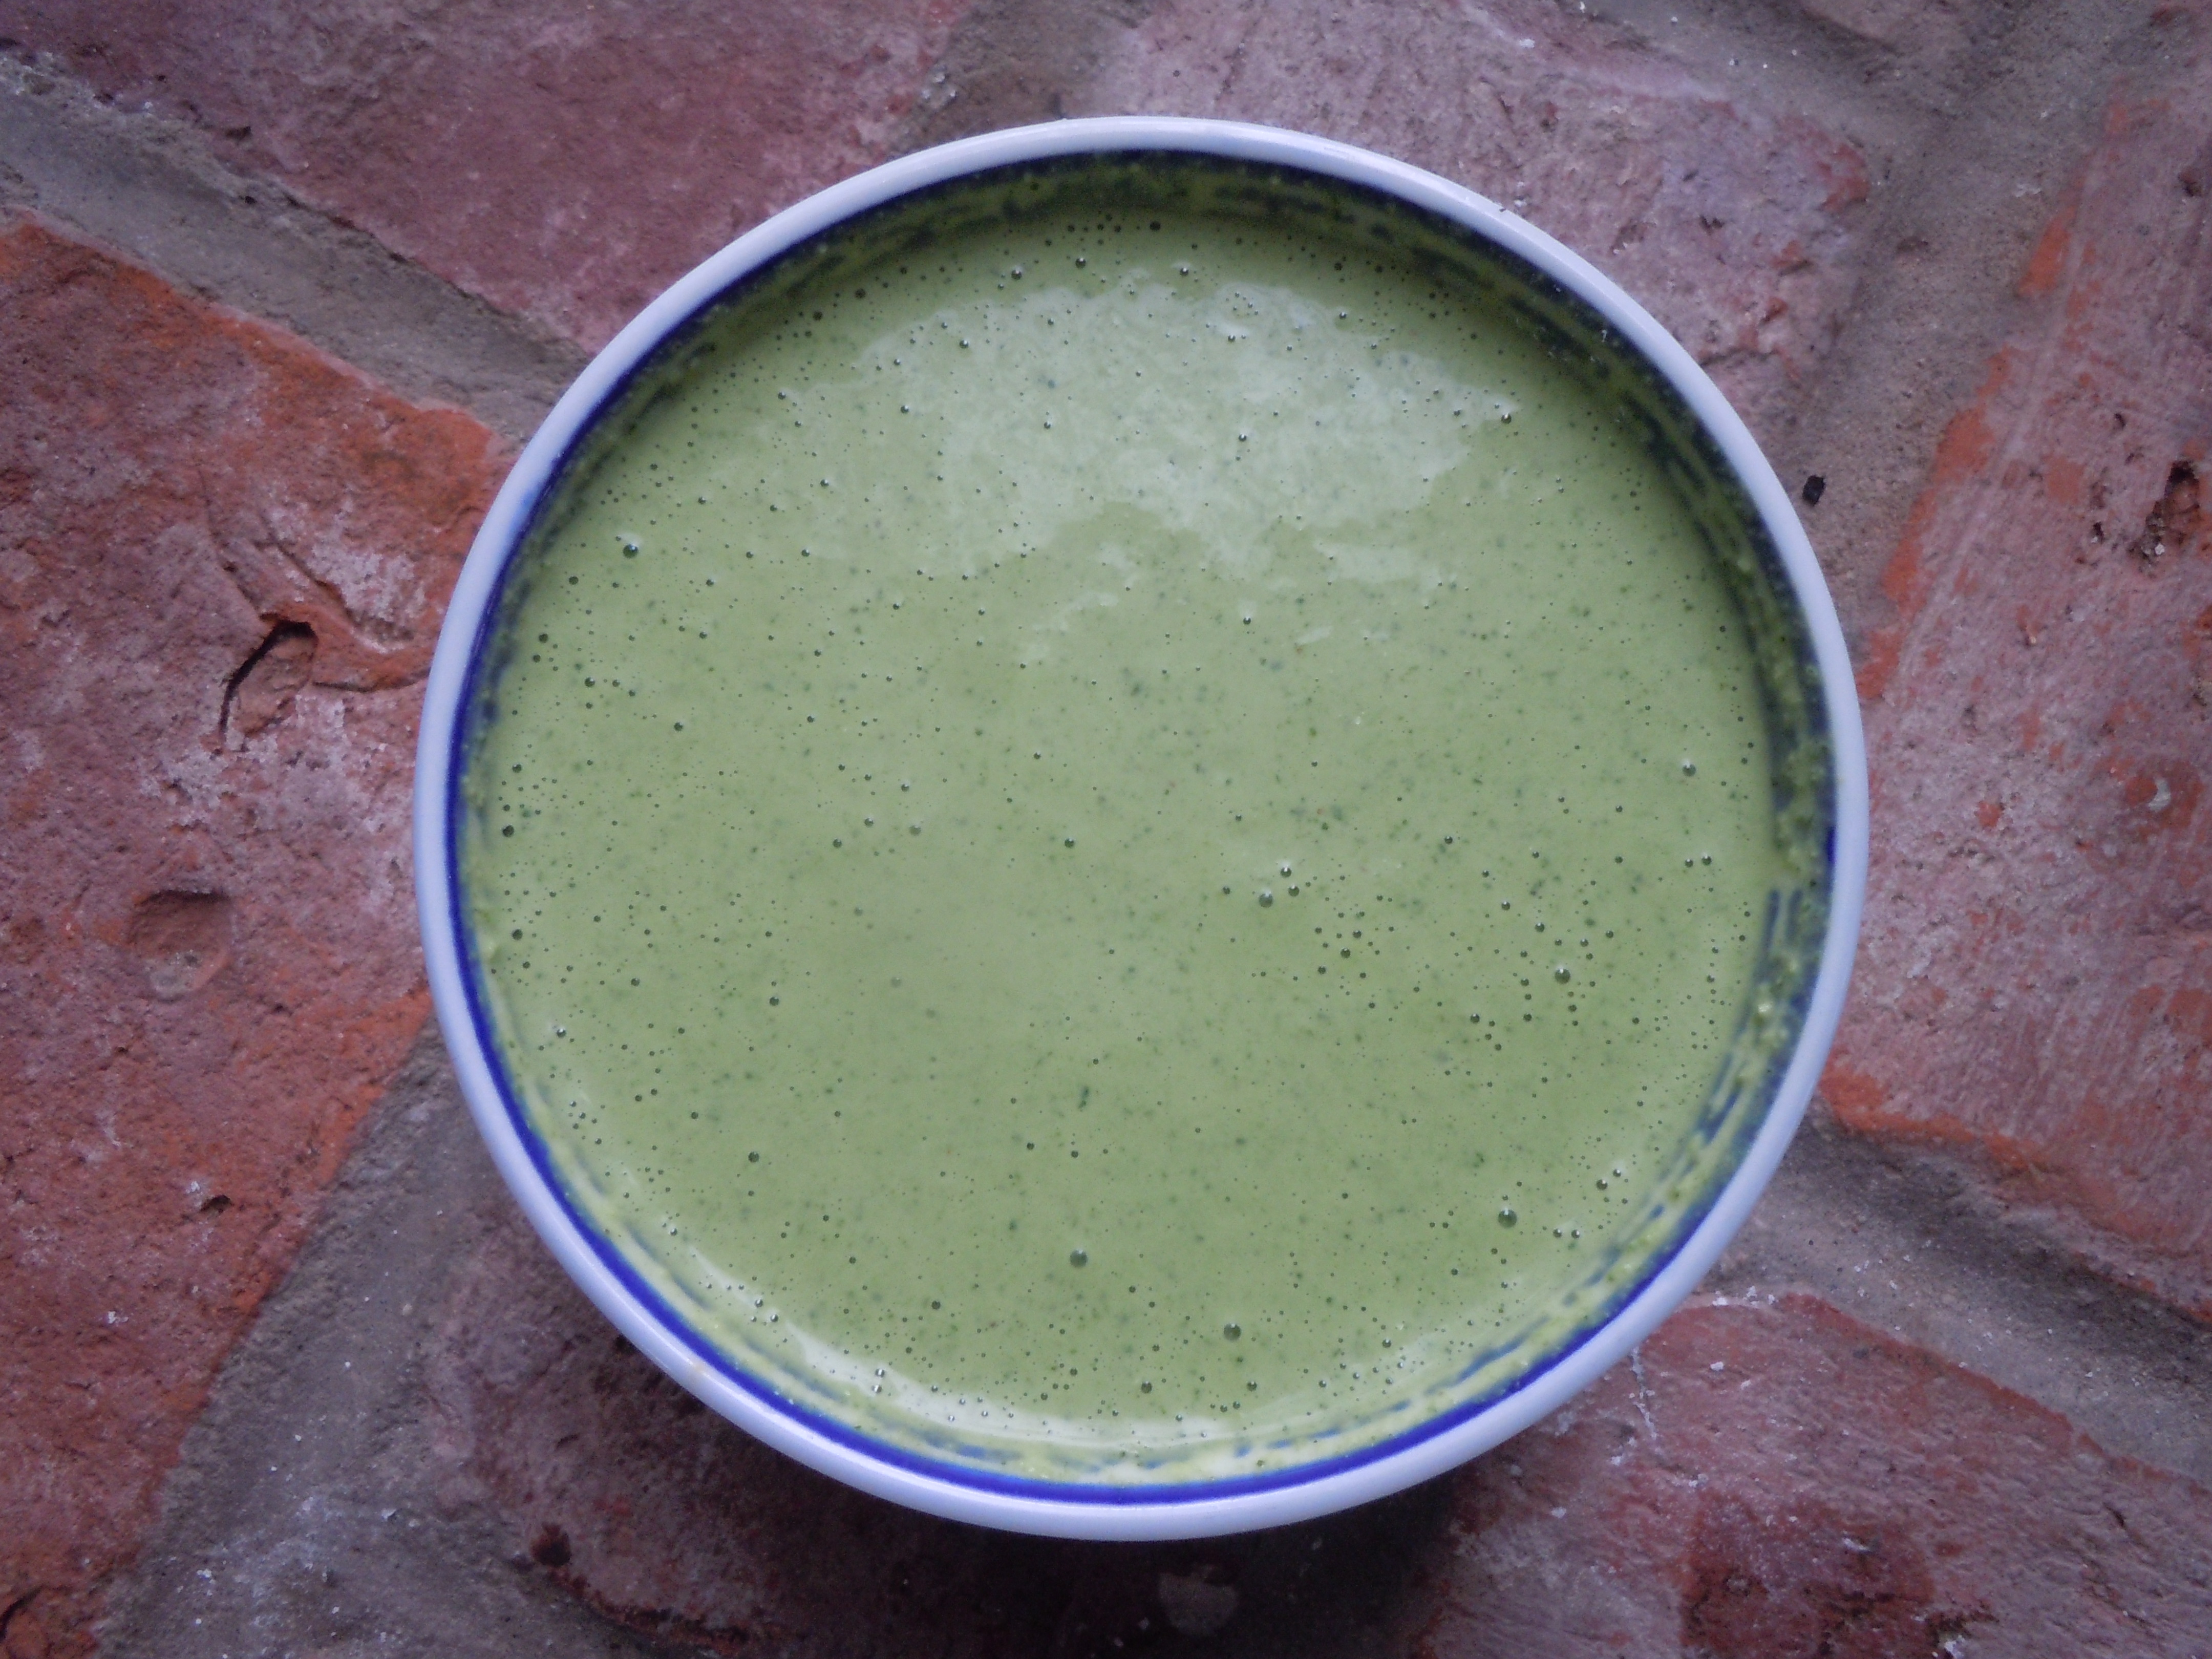
Having my green goddess sauce ll at your next party will be sure to turn heads. It’s kind of like wearing a new party dress! This green goddess sauce is made in mere minutes in a blender. It’s a blend of Greek yogurt, mayo, fresh mint leaves and cilantro, garlic, green onion, lemon juice, olive oil and rice wine vinegar. You don’t even have to waste time chopping finely because it all get puréed anyways!
Decorating your party plates with my green goddess sauce will make for a lovely presentation, a more formal one, but having a bowl or pouring cup of the sauce on the table will do the trick quite nicely! In fact, the latter might be better since there’s a good possibility your guest’s will be going back for seconds.
4 lg stalks, 6 small of green onion chopped coarsely
1 tbsp fresh lemon juice
1 tbsp extra virgin olive oil
1 Tbsp “seasoned” rice wine vinegar
1 tsp sugar – (NOTE: I forgot to add this in the show, but it really needs this for balance 🙂
s & p
If it’s not hot enough with the jalapeno add a dash of Siracha
Directions:
Place all of the ingredients into a blender an purée for 10 seconds…be patient – you may need to stop and stir everything to get it going but do NOT add any more liquid
Stop blender and scrap down sides to get the larger leaf pieces and blend for 5 more seconds and violà!
Taste here and add salt and pepper
Add a dash of Siracha – you need to taste the sauce first, sometimes a jalapeño can be super hot and other times it can be a mellow hot
This sauce gets even better if you can pop it into the fridge for an hour and let the flavors mingle, the sauce will thicken up a little too!
Make this ahead of time and keep sauce in a plastic container and refrigerate. It stays nicely for days in frig.
This green sauce is absolutely delicious on so many things…be creative.
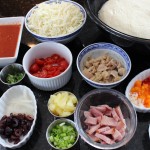
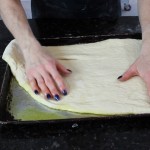
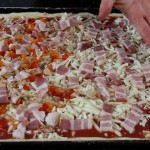
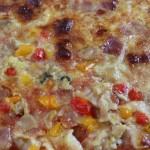
Homemade pan pizza made with different themed toppings from clams casino, to Hawaiian and Greek make for perfect party hors d’ oeuvres! Everyone seems to find their favorite flavors. When the sizzling pan pizza comes out of the oven heads turn especially when the aromas from the garlic, clams, bacon, onions and peppers fill the air!
The wonderful thing about all the different themed toppings for your pan pizza is you don’t need much in terms of quantity. The dough you make the day before, but if you forgot or didn’t have time it will still work if you make it the same day. If you make the dough the same day you don’t put it into the frig but let it proof for an hour and a half in a warm spot to develop some of that texture and flavor. The whole idea behind the “proofing in the refrigerator” is it let’s you do other things while the dough slowly rises developing a killer texture and flavor like in my delicious “Icebox Dinner Rolls”. So take advantage of this refrigerator method, you will be happy you did.
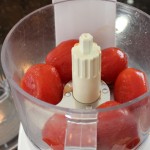
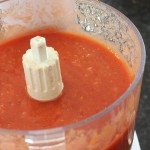
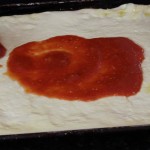
As for my pizza sauce, it couldn’t get any easier because it’s puréed only, not cooked. If you go into a pizza place and inquire about their sauce the majority will tell you the tomato sauce is raw. I know because I have done just this, but they don’t always like to give away their pizza secrets so easily. To the raw, whole peeled tomatoes I add a garlic clove that I put thru the press, salt, pepper and some Italian seasonings and then it’s puréed. Keeping the tomatoes raw really compliments all those other strong flavors from the toppings yet not seeping into the background still being a pertinent player in the pizza game!
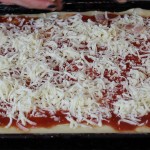
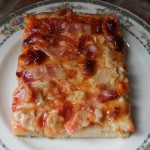
Have some fun with these pizza’s and customize those toppings on your homemade pan pizza! My favorite is the clams casino pizza because you have the best of both world’s, flavor’s and crispy, chewy edges. You can’t beat the garlic, clams, bacon and pepper combo. Drizzling on the extra clam juice not only makes it taste that much better but it let’s the crust get a little crispy while keeping the toppings moist enough so not to burn. With that in mind make sure to pour on any of the extra juices from what ever you are cutting up as when you are slicing up the cherry tomatoes. Another very important tip is to keep all the toppings, including the sauce and mozzarella, in the cold refrigerator until the last minute. This helps the toppings to cook properly giving the crust time to crisp up.
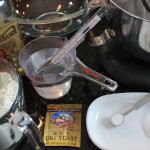
Ingredients for 1 Sheet Pan Pizza Dough – 12.5″ x 17.5″ x 1″ tray:
4 cups all purpose flour
1 1/2 cup warm water 105º-110º
1/2 tsp sugar
1 packet yeast or 2 1/4 tsp – not rapid rise
1 tbsp salt
3 tbsp extra virgin olive oil for the pizza dough
1/3 extra virgin olive oil for the sheet pan
Plus more olive oil to drizzle on top of the pizza’s before baking
My Pizza Sauce – Enough for 2 Sheet Pan Pizza’s:
1 can of whole peeled tomatoes (drained if the pulp is watery) pureed with 1 tsp salt, 1/2 finely ground Italian seasonings, 1/4 tsp pepper and 1 lg garlic clove put thru garlic press
Ingredients For The Toppings From The Show for 2 Trays of Pizza:
Clams Casino Pizza – (for 1/2 the pizza) 1-2 cans 1 cup of Snows canned clams drained except 3 tbsp of clam juice per can to drizzle over pizza, 1/4 cup of chopped peppers, 3/4 cup sliced thick cut bacon, 1 garlic clove thru press, 1 tsp chopped sweet onions
Greek Pizza – 3/4 cup sliced cheery tomatoes, 3/4 cup sheep’s milk feta, 1/4 cup sliced sweet onion, 1/2 cup sliced kalmata or canned black olives, 1/3 cup chiffonade basil
Bacon Pizza – 1 cup thick sliced bacon (for 1/2 of the pizza)
Hawaiian Pizza – 1 cup sliced ham, 1/2 cup chopped pineapple, 1/2 cup sliced green onions with whites too
Directions – (Pre-heat the oven to 450º right before the pizza dough has it’s final proof and make sure the rack is in the lowest possible position):
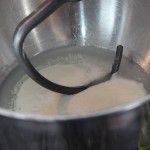
Warm the stainless steel mixing bowl with warm water for 5 minutes
Empty out warm water and add packet of yeast to mixing bowl
Add in 1 1/2 cups of water at 105º-110º to the yeast
Add in 1/2 tsp sugar and let the yeast proof for 10 nminutes
Tour on knead hook and begin to add in 3 tbsp olive oil, flour and salt
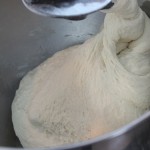
Keep mixing and knead with hook after it forms a dough ball for 10 minutes
Take dough off of hook and onto a floured counter
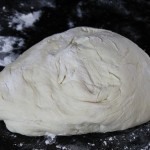
Knead by hand for 2 minutes and place into a large oiled bowl
Cover with saran wrap and refrigerate for 18-24 hrs.
When you are ready to make the pizza make sure to take out of the frig and let the cold dough sit for approx. 2 hrs. – this will make it easier to work with
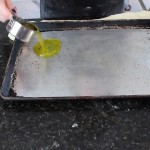
When the dough has sat for 2 hrs. turn out onto floured surface and begin to roll out and stretch to the size of the cookie tray
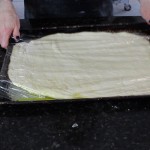
Pour 1/3 cup of olive oil onto cookie tray and place the rolled out pizza dough onto olive oil
Cover with plastic wrap and let sit 30 minutes
Remove plastic wrap and stretch the dough if needed to the edges of the pan and using your thumb press the egde of the dough into the edges of the cookie tray to form a crust – this will become a crispy and chewy egde that you will love!
Spoon pureed tomatoes onto the dough and sprinkle mozzarella
Add you desired topping and give a drizzle of olive oil across the top of the pizza and put into a 450º oven for 16-20 minutes.
Definitely check at the 15 minute mark as all oven are different
You want the edges dark golden and the middle is sizzling
Take out and let sit for 5 minutes
Using a large spatula remove the pizza in one piece to a large cutting board and slice, or slice in the cookie tray
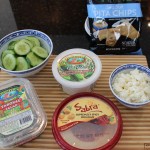
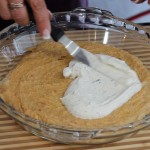
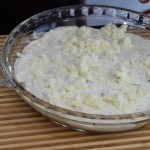
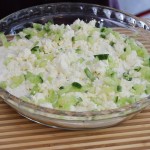
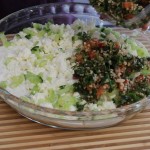
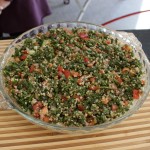
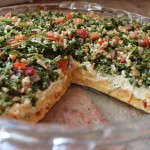
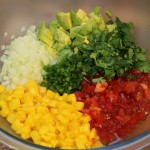
Mediterranean layered dip is one of those dishes that you will love to have up your sleeve. It’s super easy, literally takes all of five minutes to make and tastes amazing! All you have to do is layer these wonderful Mediterranean ingredients in a clear serving dish. The reason it’s so quick to make is because you’re using prepared products from the market. It will not only wow your guests with the presentation but with the fresh flavors too!
This Mediterranean dip starts off with a layer of hummus, and continue’s on with layer’s of Tzatziki, crumbled sheep’s milk feta, chopped up European cucumber’s, and finally a layer of Tabouleh. Scoop up this delicious dip with cucumber slice’s, and, or pita chip’s. Granted, if you have a little extra time on your hands you could make one or two of the layers that go into the dip homemade like my best hummus ever, orTzatziki sauce. Since I’m such a big cheese head I definitely suggest getting decent feta from your local cheese shop, Madison Cheese. The creaminess of a good sheep’s milk feta really add’s a nice touch to the dip.
The first time I had this Mediterranean layered dip was three months ago at a friends tennis party celebrating our kids going to Nationals in South Carolina. My friend, Lisa, brought this Mediterranean layered dip to the party along with a buffalo chicken dip. Boy, did I make out like a bandit! I featured Lisa’s buffalo chicken dip recipe on my show not too long after the party and it has been a big hit, calling it“Best Buffalo Chicken Dip Ever!”. What can I say, I love a good dip!
I then phoned Lisa excited about having her come on my show to share the Mediterranean dip with all of you. Lisa was going to do the show but there was one caveat, she wanted her friend Christine to come too. You see this Mediterranean layered dip recipe wasn’t her recipe. She borrowed it from Christine. So we went directly to the source and had Christine come over to do the show also!
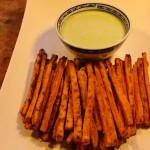
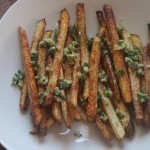
What fun we had making the Mediterranean layered dip. You can’t go wrong here especially when you have other things to make for your get together. As Lisa say’s in the show, she keeps the ingredients to the dip unopened in her refrigerator at all time’s, just in case! I hope you enjoy this dip many times over. If you need another easy appetizer you should make my baked sweet potato fries & Green Goddess Dip or just go straight to the desserts and try my chocolate crackle cookies, chocolate avocado moouse, perfectly chocolate chocolate cake or an applesauce-caramel sundae that will knock your socks off!
Ingredients:
1 container of prepared hummus OR my homemade best hummus ever – You can get the “spicy” BUT it’s very spicy in the prepared hummus so I like it better with the reg. hummus
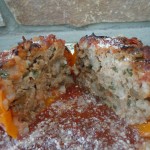
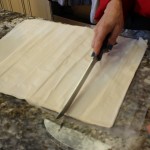
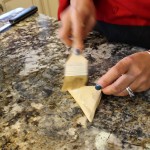
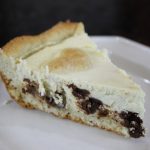
When you bite into the buttery, flaky pastry layers with the creamy sheep’s milk feta and ricotta-spinach filling you’ll agree that Spanakopita, a classic Greek dish, is so worth the effort. We neatly fold this delicate pastry dough, with a tablespoon of this amazing spinach mixture, into triangles for the perfect little appetizer shape that just melts in your mouth. The #4 fillo pastry dough becomes this delicate shell making for an elegant nibble.
This recipe came from my good friend, Dana, who happens to be a wonderful chef. In fact, Dana and her husband are opening up a restaurant in early spring at The Goodwin Golf Course called Birdie Cafe. Dana is half Greek and half Italian so this was family tradition for her growing up making these with her mother. My great grandmother was born in Crete making me one eighth Greek. So with a hint of Greek lineage in my blood I’m thinking that’s what drives my palate towards these Mediterranean flavors that I adore so much.
Spending the day in Dana’s kitchen with our other college friend, Lynn, making these spanakopita was ideal considering we were having so much fun it didn’t seem like work at all. We didn’t even realize how much we were accomplishing. Lynn, who manage’s Sam The Clam Pub & Grub in Southington, CT introduced us to a Greek Mojito with Metaxa, a Greek liquer, that was very delicious.
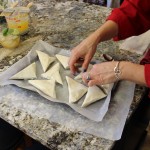
The fact that you can easily make these spanakopita triangles ahead of time which freeze so nicely for future dates is ideal for parties. So start making this spanakopita now for your Super Bowl get together! Invite over a few friends to make the spanakopita and the task goes really quickly and it’s a lot of fun. Add in our Greek Metaxa Mojito’s and I think you have yourself a pre-party to the party just like the one at Dana’s.
To cut down on the time and effort and not forgo making this delectable dish you could make one big tray of the spanakopita. In a 9 x 13 x 3 (or similar size) baking dish lay down 9 full sheets of phyllo pastry dough brushing in between each layer with butter of course. Next, lay in the entire bowl of spinach filling, then 9 more buttered layers of phyllo with a finishing buttered coating right on the top. If you are baking this one tray be sure to refrigerate the the spanakopita for twenty minutes before baking it. This will firm up the pastry dough so you can run a knife through the top layers of dough cutting in only about 1/4″ to give you pre-cut lines in the serving sizes you’ll want. It makes cutting the spanakopita much easier after it comes out of the oven. Of course, a tray this size will need to bake for about 55-60 on 350º instead of the 20 minutes the triangles take. The phyllo pastry dough is very forgiving. If your sheets are larger then the pan giving you extra dough on the sides when lining the baking dish just fold them over. You won’t notice that the sides may be folded over after it’s baked because it will be all flaky and puffed anyways and still taste incredible.
INGREDIENTS FOR Spanakopita – will make approx. 30 spankopita triangles :
1 pkg. #4 Phyllo Pastry dough or Fillo pastry dough put into frig over night if frozen
1 cup (1 pkg) thawed and fully drained (squeezed) frozen chopped spinach
2 cup whole milk ricotta
1 cup sheep’s milk feta cheese
1 lb. melted butter
3 scallions finely chopped white and green parts OR 2 tbsp finely chopped shallots
2 tbsp each chopped parsley and fresh chopped dill
1/4 tsp each nutmeg and black pepper
DIRECTIONS FOR Spanakopita:
Pre-heat oven to 350º
Take Phyllo dough out of the frig to bring to room temperature but still in the box
Drain and squeeze ALL the water from chopped thawed spinach
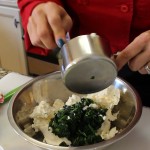
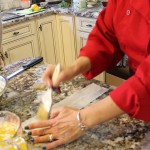
In a large bowl add 2 cup ricotta, 1 cup drained spinach, 1 cup sheep’s feta, scallions or shallots, parsley, dill, nutmeg and pepper – stir gently to mix and set aside
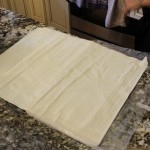
Unroll Phyllo on counter top
Cut the 15″ long pastry dough with a sharp knife into 3 3/4″ pieces getting 4 across
Start to lay out the strips 4 across a work surface – always keep a layer of saran wrap and a damp dish towel on top of the layers you’re not using
Brush thin coat of butter in between each layer til you have 3 layers down in each of the 4 rows
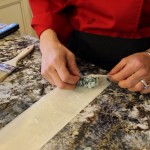
Put 1 tbsp of ricotta-spinach mixture in the right bottom corner of the phyllo sheet – you can use a sm. cookie dough scoop to help keep the tbsp all the same size – this will help you to move along quicker
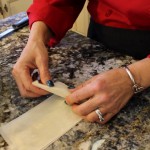
Fold right corner over so the bottom edge lines up with the left side, like you are folding a flag
Continue on up until you are at the top and used up all the pastry dough – brush a little butter on the last fold to seal it
Put filled phyllo triangles onto a baking tray about 9 per tray
Bake each tray of spanakopita triangles for 20 minutes on 350º until golden
Be sure to let the spsankopita cool a little – the filling will be hot 🙂
You may have 1/2-3/4 cup of filling leftovers so freeze it, roll up in pounded-out chicken breasts, stuff bone-in chicken breasts under the skin with the filling and bake or just buy extra phyllo…enjoy 🙂
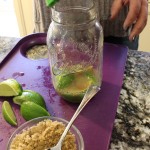
INGREDIENTS for the METAXA MOJITO’S:
1 cup Metaxa Greek Liquer
1 1/2 cups soda water
1 fresh lime cut into wedges
1 fresh lemon juiced = 1/4 cup lemon juice
2 tbsp light brown sugar
4 mint leaves or basil leaves
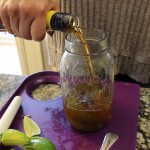
DIRECTIONS for making the Metaxa Mojito’s:
Mint leaves muddled with fresh lime wedges and light brown sugar in a glass cocktail mixer
Add fresh lemon juice, Metaxa, soda water and ice, shake and serve with mint or basil garnish…enjoy 🙂

 I’m always thrilled to be back on CT Style and that’s where I was this past Friday with Ryan Kristafer & Kat Cosley sharing one of my favorite recipes, Mediterranean Chicken Kabobs made with Greek yogurt. This recipe originated from a show I taped at a beach house right here in Madison two years ago with my friend Maria. It’s delicious on the grill outside and I show on easy it is to grill indoors using my “Lodge” reversible cast iron grill-pan.
 Mediterranean meals which can be made ahead for a busy family,
 and green goddess sauce can be a great compliment to grilled steaks, pork or veal chops, scallops or any fish! These flavors really brighten up any dish.


 This Mediterranean dip starts off with a layer of hummus, and continue’s on with layer’s of Tzatziki, crumbled sheep’s milk feta, chopped up European cucumber’s, and finally a layer of Tabouleh. Scoop up this delicious dip with cucumber slice’s, and, or pita chip’s. Granted, if you have a little extra time on your hands you could make one or two of the layers that go into the dip
 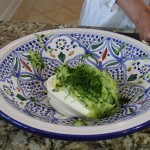 homemade like my