


It was a great response for the launch of the “Curbside Dinner” last Friday with a sell out! To make it easier for you there is now a new “category” at the top of the website in the menu bar so you can access the new menu posted every Monday for that coming Friday night. This Friday nights dinner menu consists of Chicken Piccata, Creamed Spinach, 2X Baked Mashed Yukon Potatoes, Salad with Homemade Blue Cheese Dressing and Chocolate Cake!
Wednesday will remain the order cut off. I’m sorry for those of you who weren’t aware of this last week and tried to put in an order after that.
There is some great news for next weeks menu, I have ordered fresh morel mushrooms and they will be incorporated in the dish for that week. I will let you know exactly what the dinner will feature on that Monday, 6/22!
Hope you are all feeling a little better durng our covid quaratine days. I’m really enjoying being able to cook for all of you again! Stay safe and healthy!
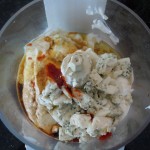
For all you amazing home cooks you may want to try your hand at Salsa 101, Gazpacho, Zucchini Torta, Caesar Salad or Easy Homemade Blue Cheese Dressing!


 The Traveling Epicurean is now offering FRIDAY dinners every week with curbside pickup! Order by Wednesday and pick up on Friday.
After receiving many requests for this service since the covid outbreak I am excited to be cooking up a storm again for you. These pandemic days have been difficult times for most of us and putting a little spice into your life may be just what the doctor ordered! All the recipes on the menus are available on the website.
The dinners are set up for a family of 4 for $74.50 but can accommodate more. Add $17.50 for each additional person. A NEW menu will be posted every Monday and will be displayed on the website and on Facebook. Text or Call 203-231-8841 by Wednesday to get your order in for pickup that Friday.
You can pay thru Venmo or Zelle and it will be curbside pickup, masks required, please. If you have any questions don’t hesitate to text or call.
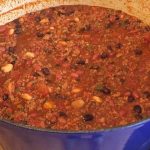
I am thrilled that so many of you have doing a lot cooking over the past few month! Here are some recipes you may want to try out like New England Clam Chowder, Buffalo Chicken Dip, Turkey Chili, Panzanella or Pavlova!


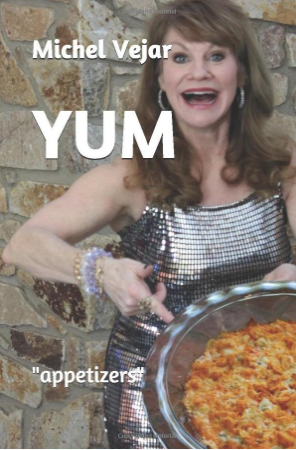 A collection of appetizers so YUM they are worthy of an entire meal!
This Corona pandemic has been a scary and diffucult time in our lives. I don’t think anyone can ever prepare for what a person goes through mentally and physically when a “shelter-in-place” goes into effect. The loneliness and uncertainty that glooms can be exhausting yet so many people have found ways to stay together showing kindness and love through different mediums, it brings tears to my eyes! Seeing all the cooking and baking you all are doing during this “stay at home” quarantine just warms my heart! “It all starts with the food”, brings people together from all over the world.
With all this cooking going on during the pandemic I want thank followers and friends for the support you’ve given me over the last 7 years and am thrilled that I’ve finally figured out a way to give back with my first paperback cookbook, YUM! Ever since I was encouraged to design a food website 7 years ago where people could access my written recipes there was an even bigger push for me to make a cookbook available! Being able to feature Yum on Amazon has been very exciting. Although, the formatting can be difficult at times it’s made your request for getting the website and YouTube recipes down on paper achievable.
Some days the work was almost grueling working 12-18 hours between food & design prep for demos and live tv, cooking, catering, blogging, fixing IT issues, book formatting and being a single mom to 2 amazing teens, I just kept reminding myself I am doing what I love.
It’s been incredible taping cooking shows with amazing chefs and home cooks over these last 7 years for my YouTube channel and Public Access TV aired 47 towns in Connecticut. I have also been very fortunate to be cooking on live TV over the last 3 years on “CT Style” at WTNH Channel 8 with Teresa Dufour, Ryan Kristafer, Sarah Cody, Scott McDonnell, Laura Hutchinson, Jocelyn Maminta and Kat Cosley. Working with all these professionals has been a privilege! . The live TV platform is a passion that truly drives me.
 CLICK HERE to buy my appetizers cookbook, Yum, featuring recipes from my website, YouTube channel, Page Hardware & Appliance demos and CT Style live tv cooking segments (shown to the left). You’ll have them all right at your finger tips in your own kitchen!
Just to let you guys know, I am already working on my next paperback cookbook called “Feast, dinners and sides”! Authentic family favorites all in one cookbook for Sunday dinners or your next soiree! There will be quick and easy reicpes like  cold cucumber soup with seared sea scallops, Napolitan manicotti crepes (my secret family’s recipe revealed) to pulled pork while you sleep, sides, salads & sauces to boot! Your go to dinner planner!
Please stay safe and healthy during this difficult time and know there is always someone there to talk to. A huge thank you to all the amazing healthcare workers, first responders and all the  people who are working in the public eye selflessly putting themselves out there making our lives easier!
And thank you for supporting The Traveling Epicirean through you purchase of Yum! xo
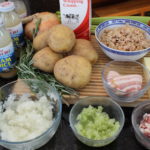
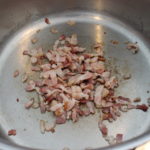
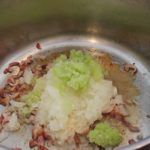
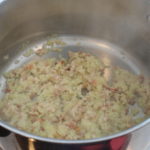
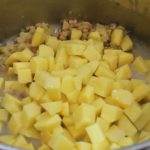
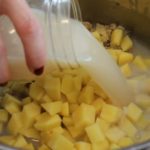
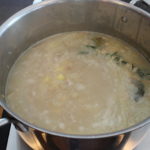
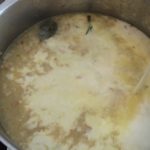
There’s nothing comforting than your house filling with aromas of a sweet and smoky ham simmering in chicken stock with sautéed veggies on a cold rainy day! The prep for this pea soup is done in mere minutes! The only real work involved with this recipe is cutting up the veggies and now that I think of it you could always just grate them.
After a holiday we are usually left with either a turkey carcass or a ham bone and the ham bone is what brings this yellow split pea soup to a new level of flavor. If you haven’t ever tried developing a soup base this way you need to give it a try.
We all have a little extra time on our hands with this Corona Virus pandemic so making a comforting dish that is healthy and soothing will help to put you on the right track with all your home projects.
There’s always a sweet tooth in the house so don’t for get about Chocolate Meringue Pie, Crepes with Fruit & Whipped Cream, Girl Scout Thin Mint Chocolate Mousse Pie, Berries in a Dreamy Fluff & Cream Cheese Sauce or Eileen’s Famous Chocolate Chip Cookies! Wow…Enjoy! Please be safe and stay well!


Don’t forget to BUY my “appetizers” paperback called YUM, available on AMAZON!!
This collection of recipes is worthy of an entire meal!

Every month I look forward to cooking on CT Style! I get the opportunity to do live cooking segments with Teresa Dufour, show you all how much fun cooking can be, and gather together with my WTNH friends to eat and catch up afterwards. You see “it all starts with the food”, gatherings and friendships that last a life time, not to be cliché, but it’s priceless.
Yesterday, I featured my New England Clam Chowder recipe highlighting a couple of secret ingredients, Amontillado Medium Cream Sherry and Wondra Quick Desolving Flour. It’s a chowder packed full of flavor that you can make 12 month of the year.
 It was so nice to have my friends, Carolyn, Chris and their son, Jonathan, as guests in the channel 8 studio. Teresa, sweetheart that she is, asked if I wanted to invite Jonathan on camera for the last 20 seconds of the cooking segment and Jonathan jumped at the chance. He did a great job up there, he was a natural!
There’s actually three important ingredients I can’t live with out in my in my New England chowder, the Amontillado Sherry, Wondra Quick Dissolve Flour and a bouquet garni. Adding the sherry goes without saying bringing in tons of beautiful, subtle flavor. The Wondra Quick Dissolve Flour creates a silky texture with out making the chowder glumpy or pasty. I sprinkle in 3 tbsp of Wondra right when the cream begins to simmer. I use this Wondra flour in stead of making a roux at the beginning letting you control the consistency better. The bouquet garni consists of sprigs of rosemary and thyme tied up with string for easy removal when it’s done infusing all that lovely flavor into the soup!
This New England Clam Chowder is perfect during thsese cold winter days! Here are some other comfort foods you may want try like Eggplant Balls, Guiness Braised Short Ribs, Oysters in Pernod Sauce, Pasta Fagioli or maybe a Chocolate Pecan Pie for dessert!


Ingredients (NOTE- Quantities can easily be halfed OR quartered …it’s still delicious!):
Directions:
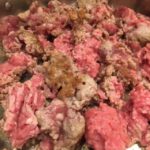
 This week I was excited to show you how to make an easy and delicious dish on CT Style for the new year! The marinade for this Korean Beef Bulgogi recipe is so versatile you’ll find yourself going back to it over and over for these luscious flavors.
Cooking with Teresa Dufour on CT Style couldn’t be more fun! She is such a professional in her field, all awhile being her natural down to earth self! When we are going live for the camera’s it feels as though we are just hanging out in one anothers kitchen, laughing and cooking it up.
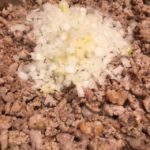
 The marinade for this Beef Bulgogi is delicious on any meat, scrumptious chicken and pork. Really easy to bring these wonderful flavors of the soy, toasted sesame oil, garlic and green onion to whole pieces of chicken breasts and thighs, beef london broil and ribeye, and pork tenderloin with out all the prep of slicing.
Let’s not forget the sugar in this marinade, a key player working hard as a natural tenderizer! In Korean cooking, sometime’s you’ll find grated asian pear in the ingredient list. An enzyeme in the asian pear called calpain naturally tenderizes the meat while giving it a hint of  sweetness.
This marinade alone will make a great addition to your cooking repertoire! Below are a few of my high viewing recipe shows on my YouTube channel that you should check out. Some are even into the 100,000’s viewing range. Remember to SUBSCRIBE to my YouTube Channel too. Enjoy and lets make this 2020 the best year ever!
BEST Buffalo Chicken Dip at 144,000 views, my Chewy Chocolate Chip Cookies at 80,000 views, my Braciole at 34,000 views and a recent release already at 14,000 views is my BEST New England Chowder!


INGREDIENTS For Beef Bulgogi
DIRECTIONS:
 Wow, what a spectacular holiday show at WTNH, Channel 8 on CT Style last Friday! I can’t even begin to tell you how special it was doing my cooking segment with this talented crew at Channel 8. Not to mention, Santa was there making the rounds!
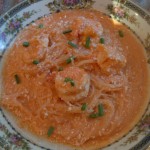
I was excited to show you how easy it is to make this vodka sauce for your holiday cooking. In my recipe I add in coconut cream along with heavy cream giving this vodka sauce that extra special something. You can make this with rice noodles and omit the heavy cream all together if you prefer. On CT Style I did both coconut cream and heavy cream giving it a nice balance.  Like everything in life finding a balance is important.
This Vodka Sauce with Coconut Cream would make a perfect party dish because it can totally be made the night before. Then you add in the raw shrimp on the day of the party right as you are re-heating the sauce while your pasta is cooking, minutes before you serve it!
I love tradition so I made my homemade potato gnocchi again this year for the CT Style cooking segment. Last year I showed you how to make my bolognese sauce which I served up with the homemade gnocchi.
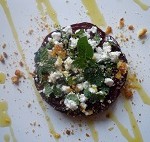
Other festive salads you may want to serve up for your holiday celebration might be a nice Caesar Salad, a Roasted Beet, Feta & Mint Salad or even a Candied Bacon, Iceberg Lettuce & Roasted Blue Cheese Dressing Salad!
Enjoy, be safe and have a Happy New Year!


Ingredients:
Directions:
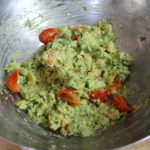
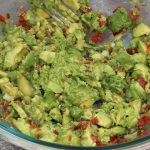
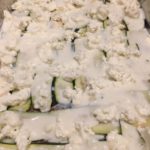
I love preparing for my live cooking segments and being a part of this incredible “CT Style” family on WTNH Channel 8! It’s wonderful cooking with Teresa Dufour and Sarah Cody, so natural and as always we are full of giggles and everything seems to fall into place. All my spooky food decorations from the ghost face on the lasagna, bloody almond sugar cookie fingers, spiderweb Boston Cream Pie top, and the homemade guacamole coming out of the carved pumkin came together with the smoky dry ice effect.
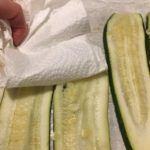
Having a holiday to base my theme on totally helps you to get creative with the food. I wanted to show you how to serve some healthy dishes for this holiday on CT Style and still keep a spooky allure to it. Zucchini lasagna came to mind! I used a gluten-free flour to make the bechamel and substituted the pasta sheets with zucchini strips. The most important task here is to extract as much moisture out of the zucchini as possible so it’s not watery in the end. You can see how I do this in the written recipe below. Hope you enjoy the show and have a Happy Halloween!
Here are some other dishes you could make for halloween like my Spooky Chocolate Cake, Eilieen’s Famous Chocolate Chip Cookies, Chic Pea Guacamole, My Guacamole (featured on CT Style), Or My Homemade Salsa 101!


Ingredients:
Directions:
What fun on the CT Style set today with Teresa Dufour and Scott McDonnell making an Italian family favorite, Pasta  Fagioli! Plus, it was our beloved producer, Joyce Ogirri’s birthday, so I made her a celebratory key lime pie. After the live segment we had a cheerful get together eating and catching up, my favorite part! It was so nice to have Gil joining in on the festivities too.
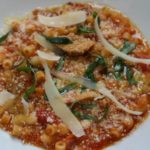
Pasta Fagioli is a traditional Italian soup where the recipe differs from family to family and region to region, gourmet couldn’t get any easier. My favorite part of the soup is dunking the crusty Italian bread…mmmm!
This Key Lime Pie is super easy in effort and time, you just can’t go wrong here! I forgot how much I love this dessert, it’s back to being one of my favorites. You can view the recipe below.
 In addition to all the cooking segment excitement, Mark Deaton from Madison Lyrics Stage Company was there talking about his up and coming show, Hansel & Gretel! This is one of the most engaging venues I have ever been to. It’s an immersive opera that takes place at the Deacon John Grave House right here in Madison, CT. We are so fortunate to have such a display of talent in our own back yard. You should really check this out and seats are limited so don’t wait to purchase your tickets!
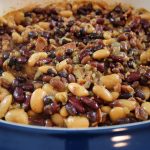
Here are some other comforts food you may want to try like my Turkey Chili, Pulled Pork While You Sleep, Homemade Baked Beans, or Ricotta Gnocchi! …Enjoy


INGREDIENTS For Pasta Fagioli:
DIRECTIONS:

Ingredients for Key Lime Pie:
-Graham Cracker Crust Ingredients:
-Directions for Crust:
-Filling Ingredients:
-Directions for Filling: