The Traveling Epicurean

Homemade Chocolate Pecan Pie at Barbara’s

Homemade Chocolate Pecan Pie at Barbara’s

barbarapie
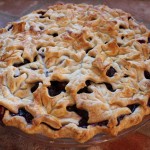
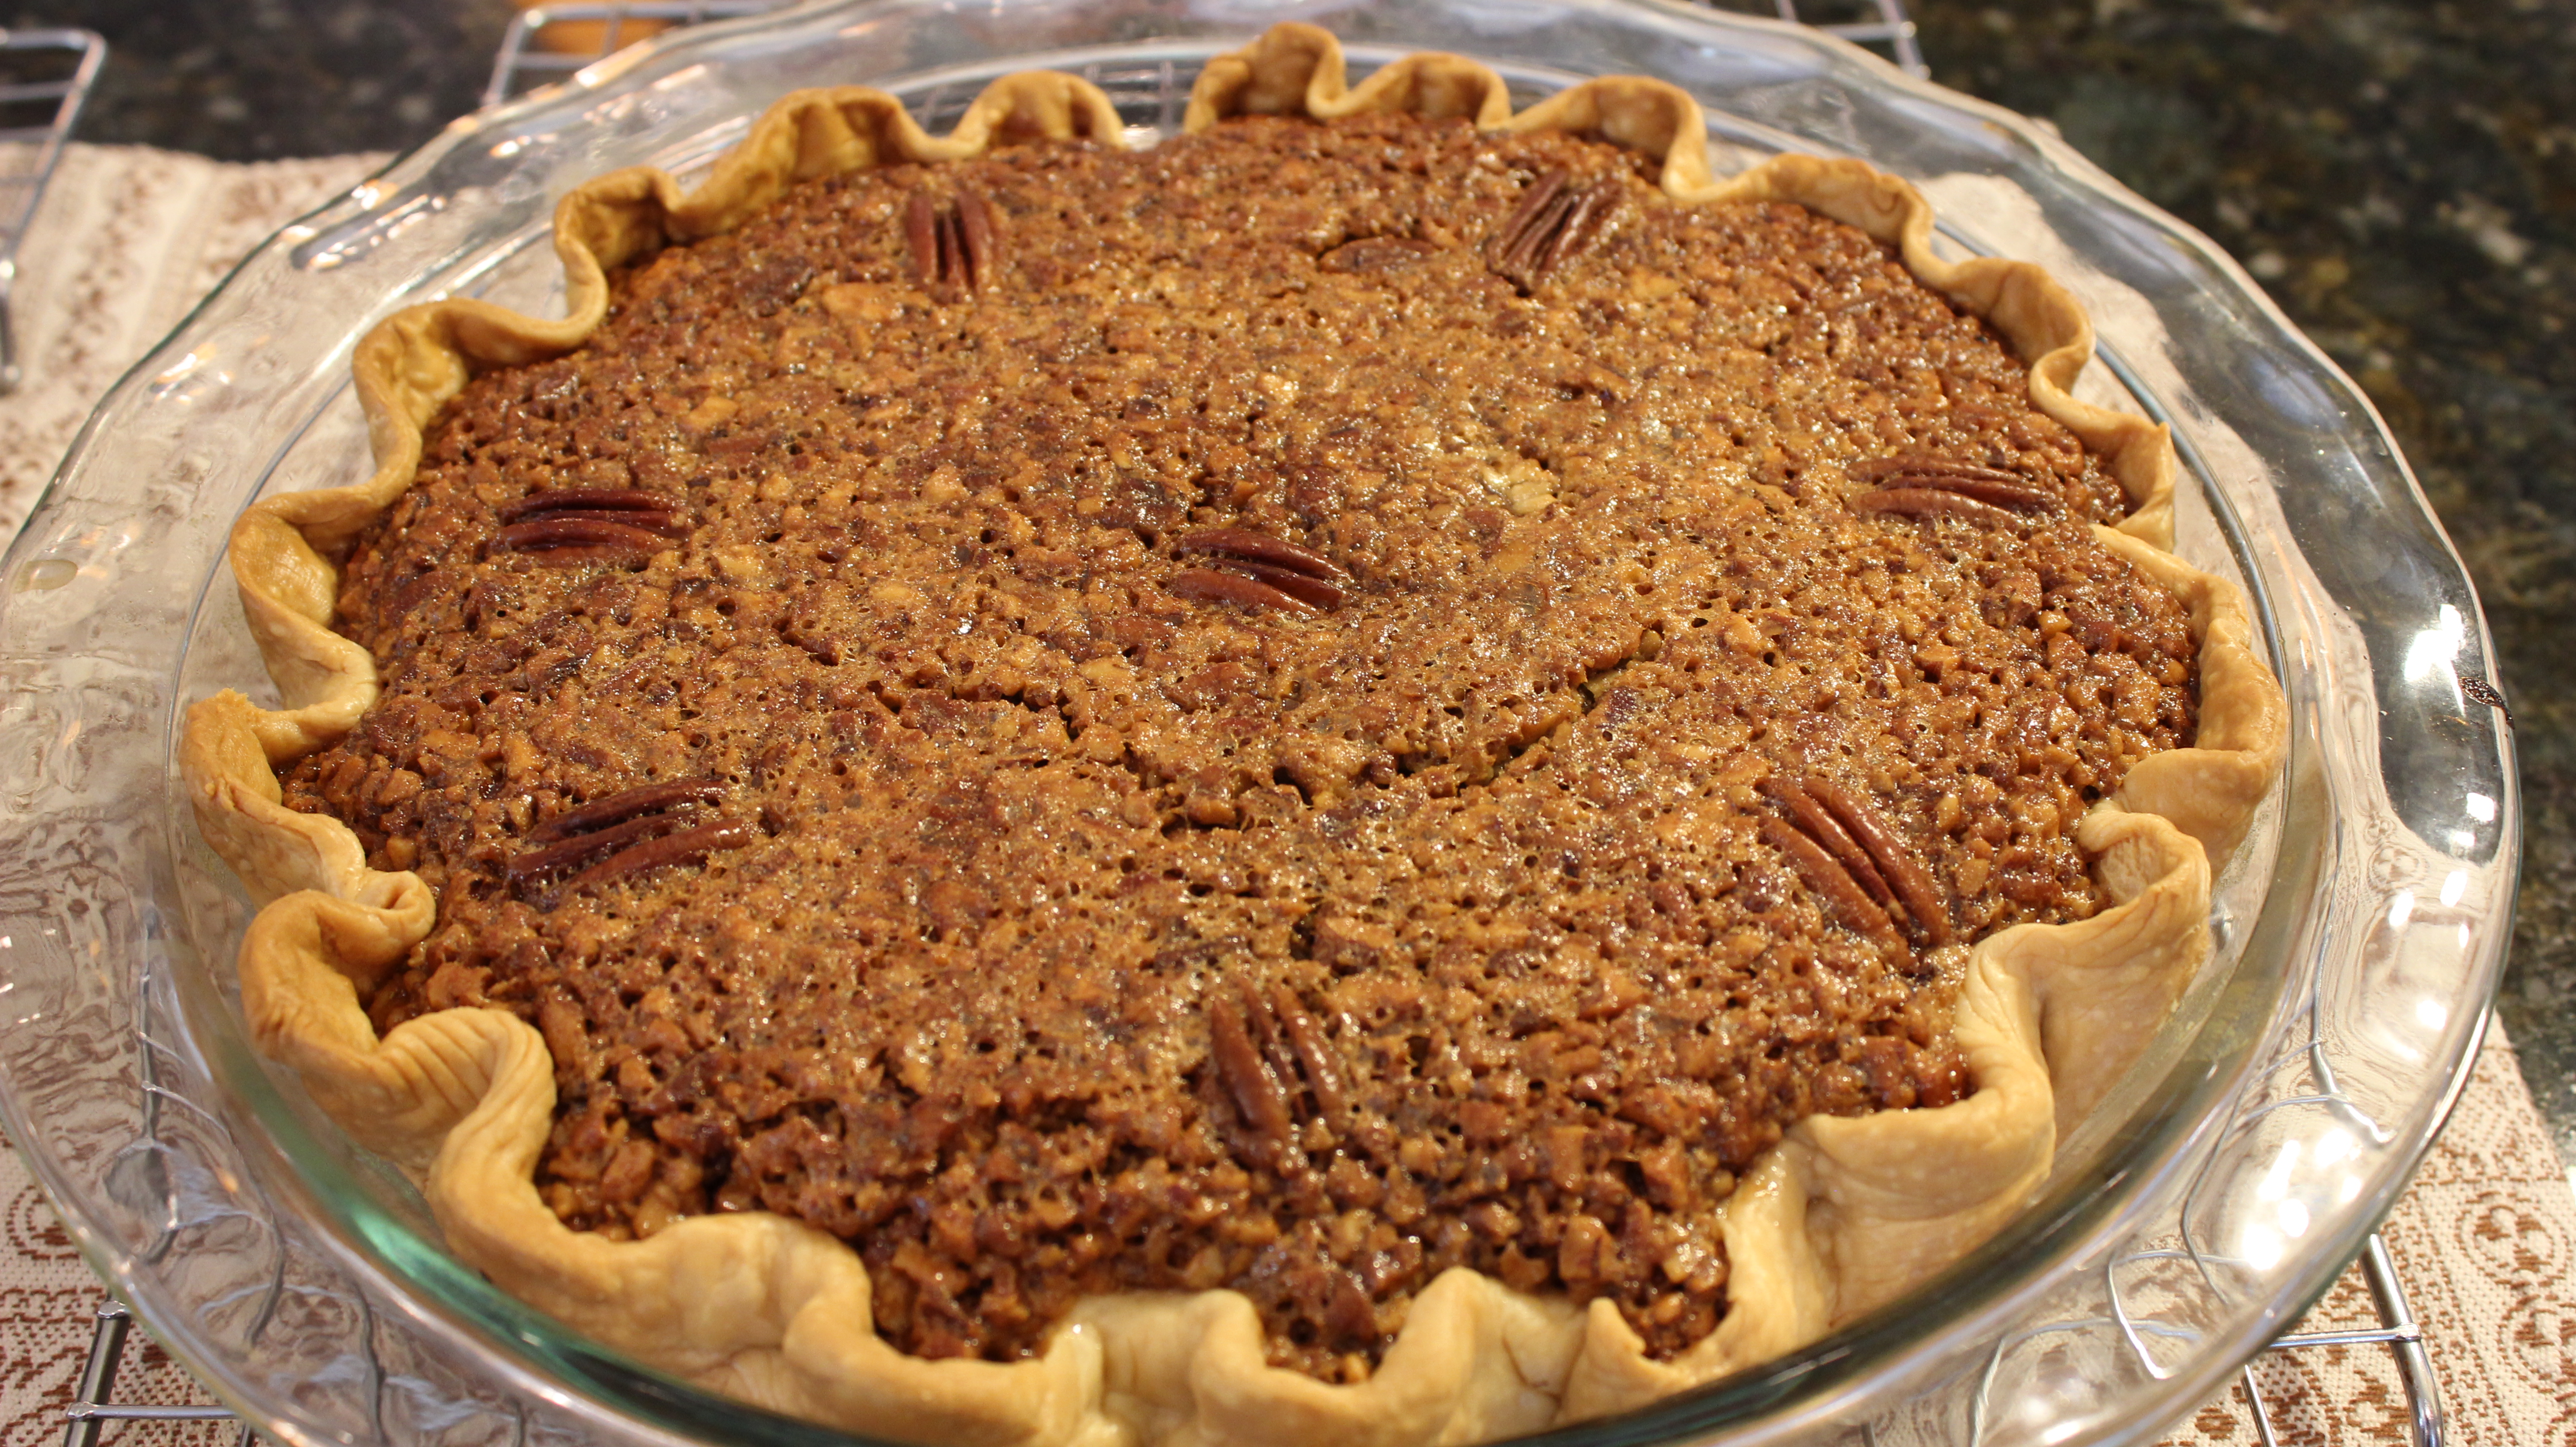
Barbara’s homemade chocolate pecan pie is like nothing you’ve had before. Not only do you get that gooey texture with a hint of nutty caramel because it’s a pecan pie but a chocolaty finish slides right on in and makes you say wow! Gooey, nutty, caramel, chocolate …need I say MORE?  In fact, it is plenty chocolaty so if you wanted to nibble on those “special dark” Hershey’s chocolate chips while you are making the pie feel free it wouldn’t make the pie any less delicious.

When Barbara first delivered her scrumptious homemade pecan pie to my house I was beside myself. I just couldn’t believe my eyes and with an invitation to her Christmas Eve party to top it off which she also cooks for. I later found out that she makes seventy pies that get hand delivered with the invite to her party. It all began fifteen years ago at a surprise party her husband Peter threw for her where stories evolved of first meetings with Barbara and her gifts of homemade chocolate pecan pie. From that point on the pie numbers grew and it now totals out at around 72 pies.

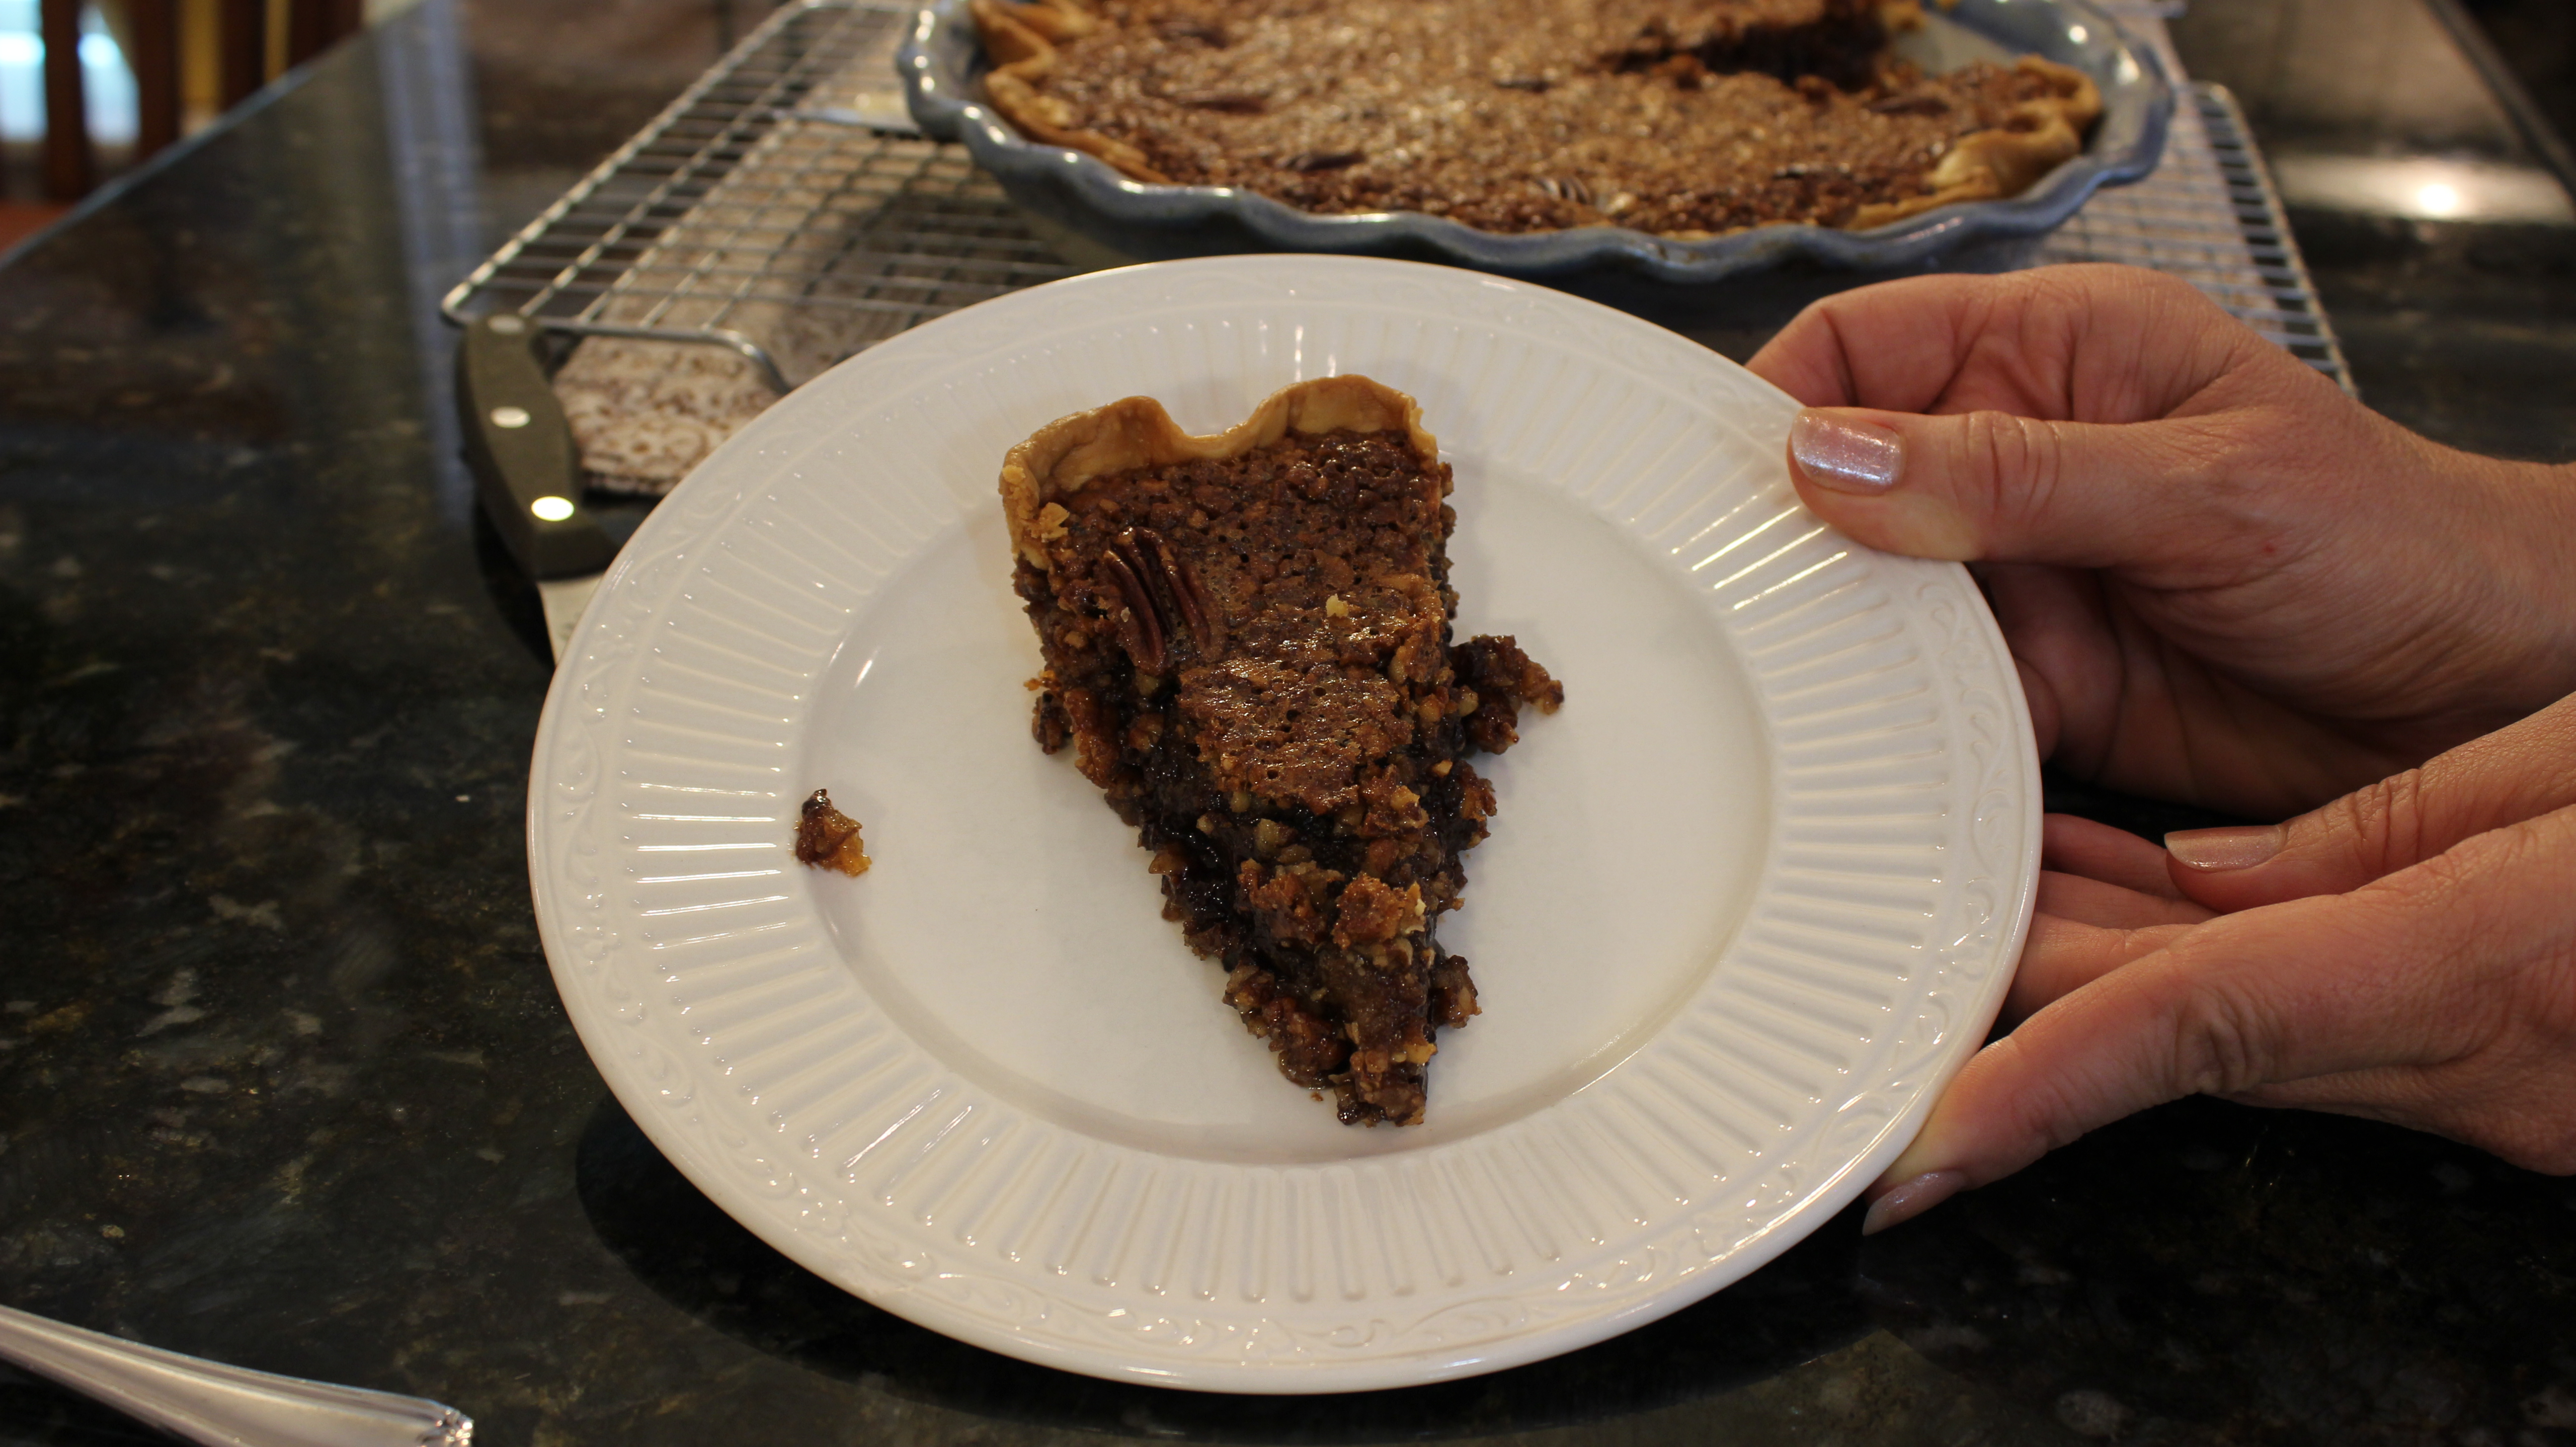
This gourmet chocolate pecan pie of Barbara’s has become a tradition for many of the families on her pie list that wait in anticipation of her delivery in order to take the pie to their relatives on Christmas Day. This pie freezes extremely well and slicing it before freezing making for easy removal without having to thaw the whole pie is ideal. I must say though eating my slice right out of the freezer before it thaws is my new favorite way…wait til you try it!

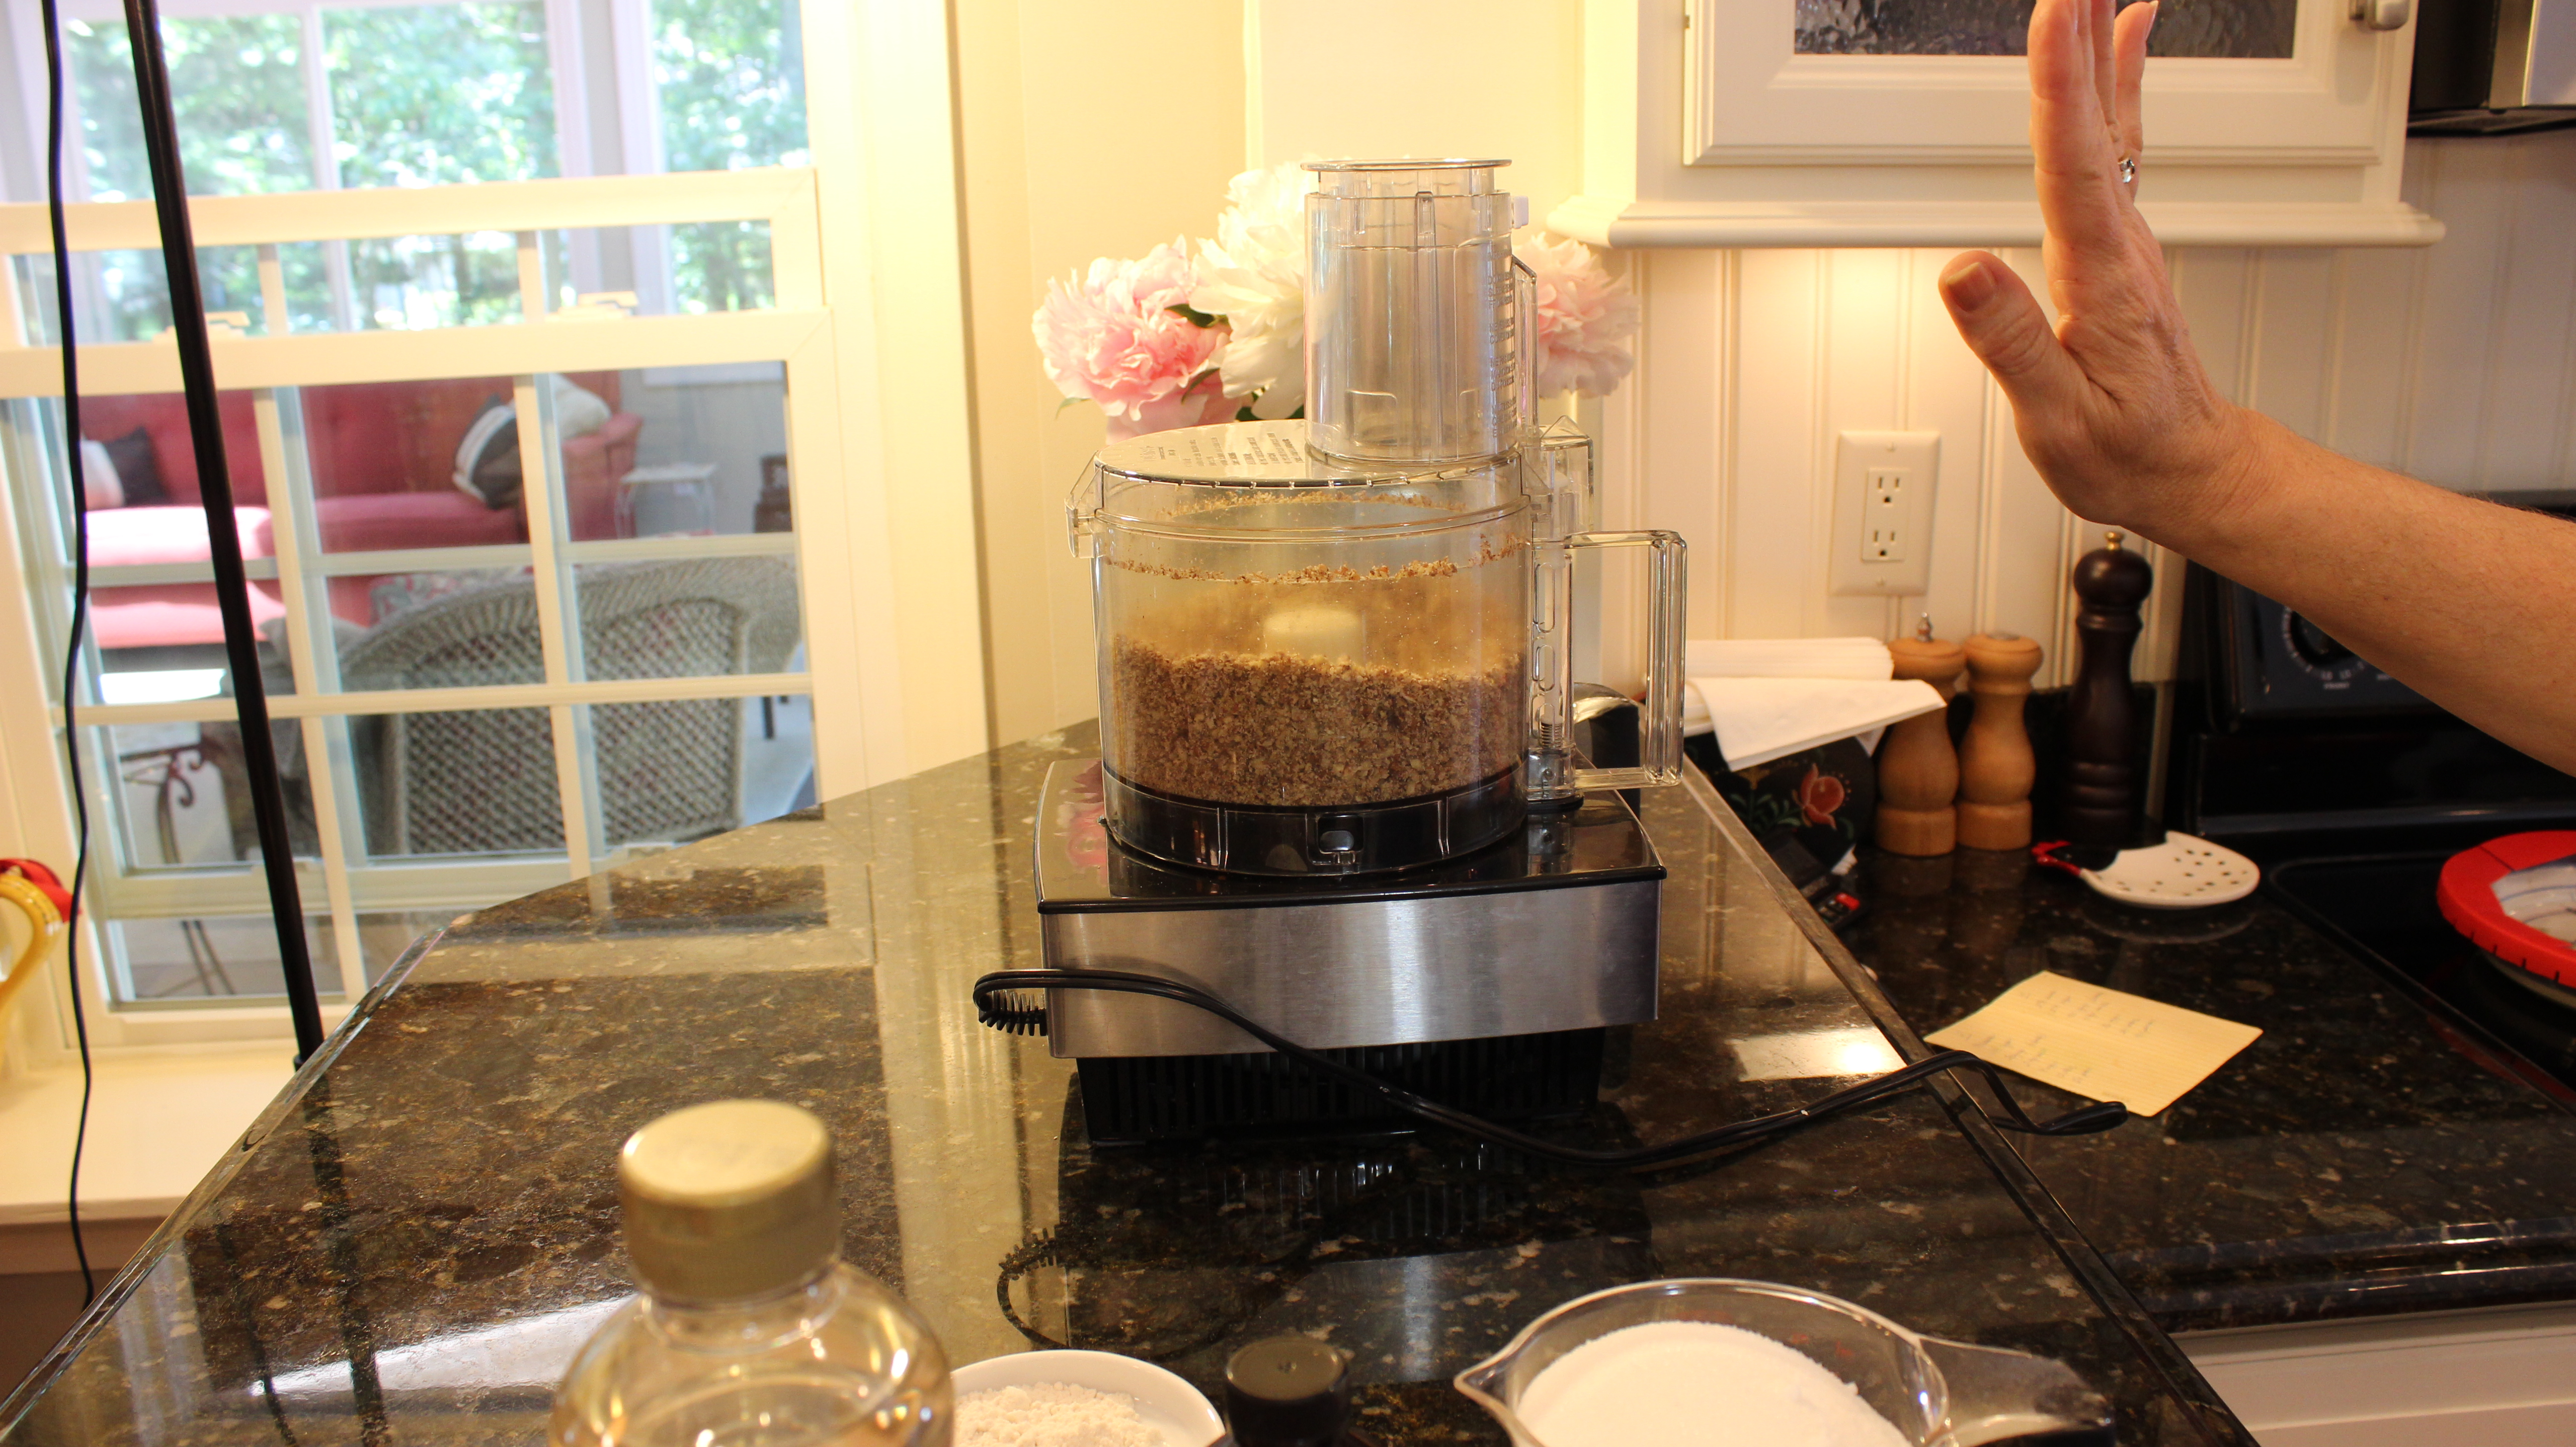
Barbara is very busy in the month of December when all the pies get baked and delivered. She does get things going back in September though putting in an order for a twenty-two pound box of pecans from Georgia which arrive around Thanksgiving time. Then the whole process takes off from the chopping of the pecans in the food processor,  measuring exact amounts placed into baggies and stored in the frig , to purchasing large bottles of Karo syrup that are shelved until needed and so on until December is upon her and the baking begins.

IMG_4416This truly is a labor of love for Barbara and I’m very grateful to have become a part of this amazing tradition and see first hand how inspirational she is. You can see for yourself and hear some of the extremely funny stories that go along with Barbara’s pie making in my “Homemade Chocolate Pecan Pie Show” above. I hope you enjoy the show and now you too can make this blueberrypie
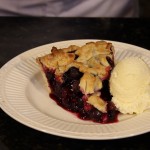
homemade chocolate pecan pie part of your family tradition. If you have the time and are only making a pie or two you can check out my “Perfect Pie Crust In 5 Minutes Recipe” or even myBest Blueberry Pie!recipe if you are looking to have a second pie 😉

IMG_2058

IMG_2062

IMG_2080

IMG_2077

IMG_2083


IMG_2086

IMG_2095

IMG_2106


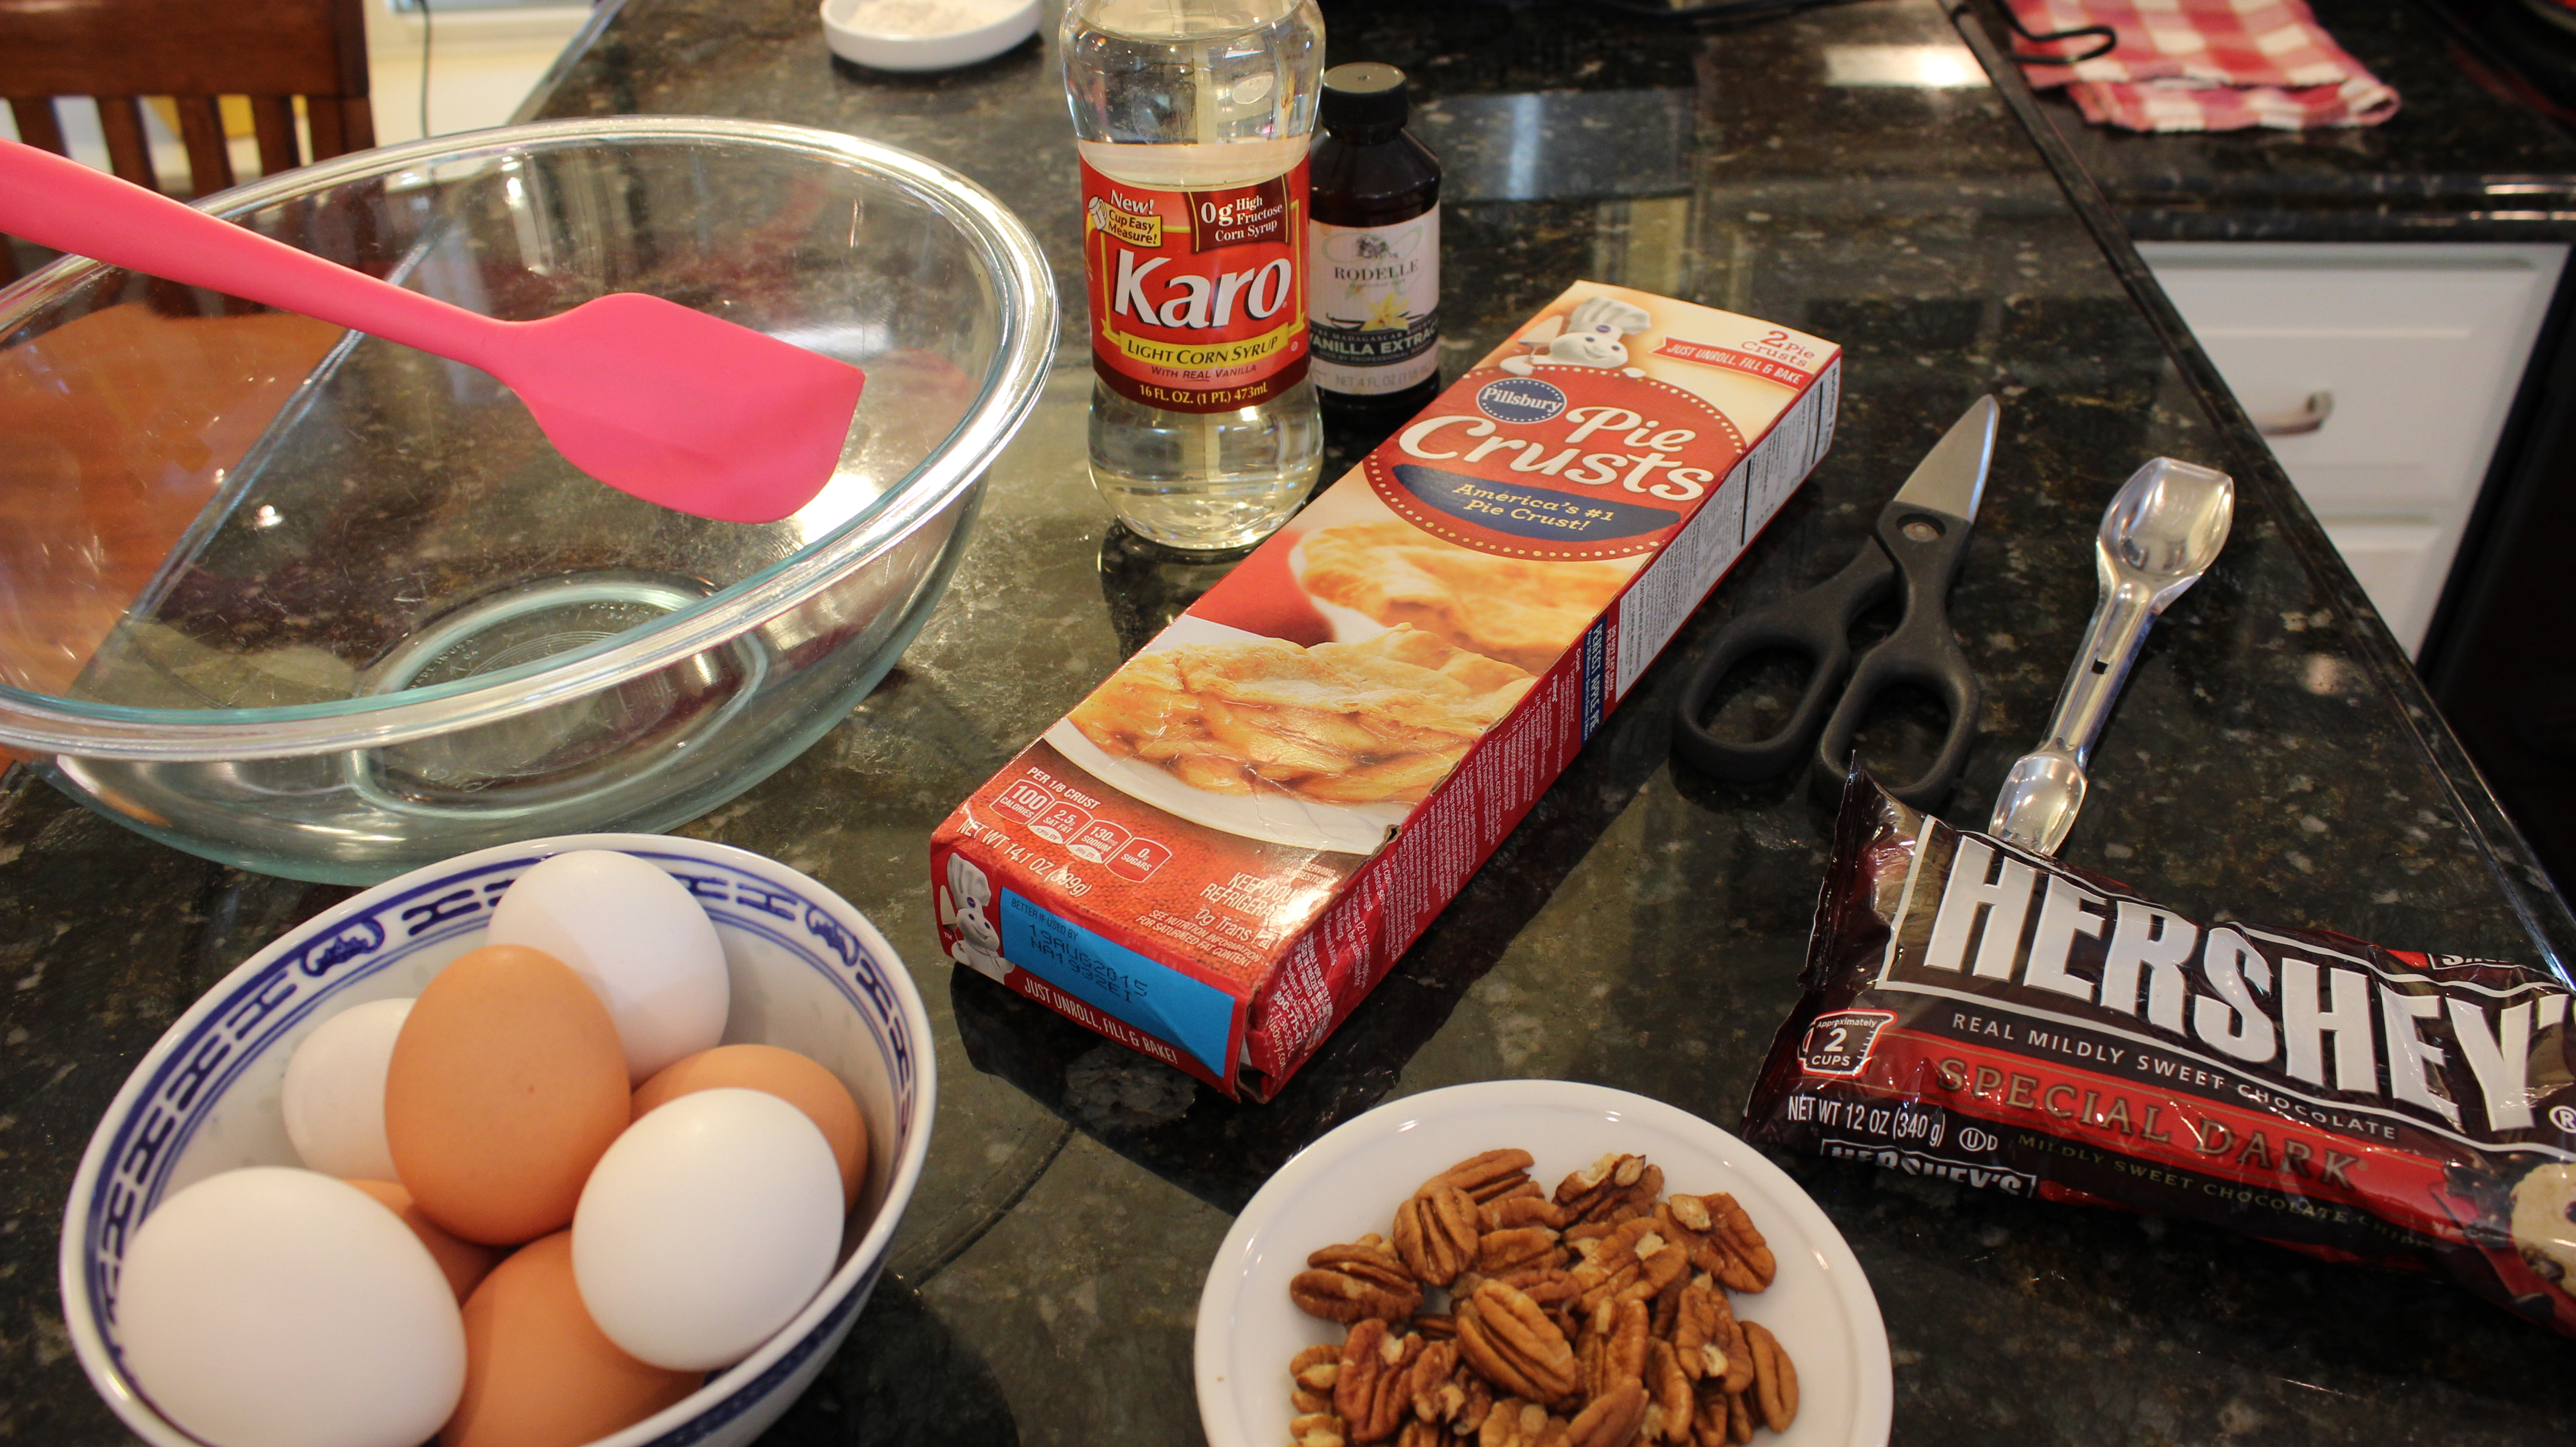
Ingredients – Pre-Heat oven to 375º:

  • 1 cup coarsely chopped pecans (on the finer side but NOT a powder)
  • handful pecan halves for decoration
  • 6 oz. HERSHEY’S Special Dark chocolate chips (full bag for 2 pies)
  • 1 cup light Karo corn syrup -NOTE: Spraying the inside of measuring cup with Pam vegetable or coconut oil will help the Karo syrup ease out (full bottle of Karo for 2 pies)
  • 2/3 cup sugar
  • 2/3 cup melted butter and cooled to ROOM TEMPERATURE or LUKE WARM
  • 1 1/2 Tsp pure vanilla
  • 4 lg eggs lightly beaten (WITHOUT any frothiness occurring)
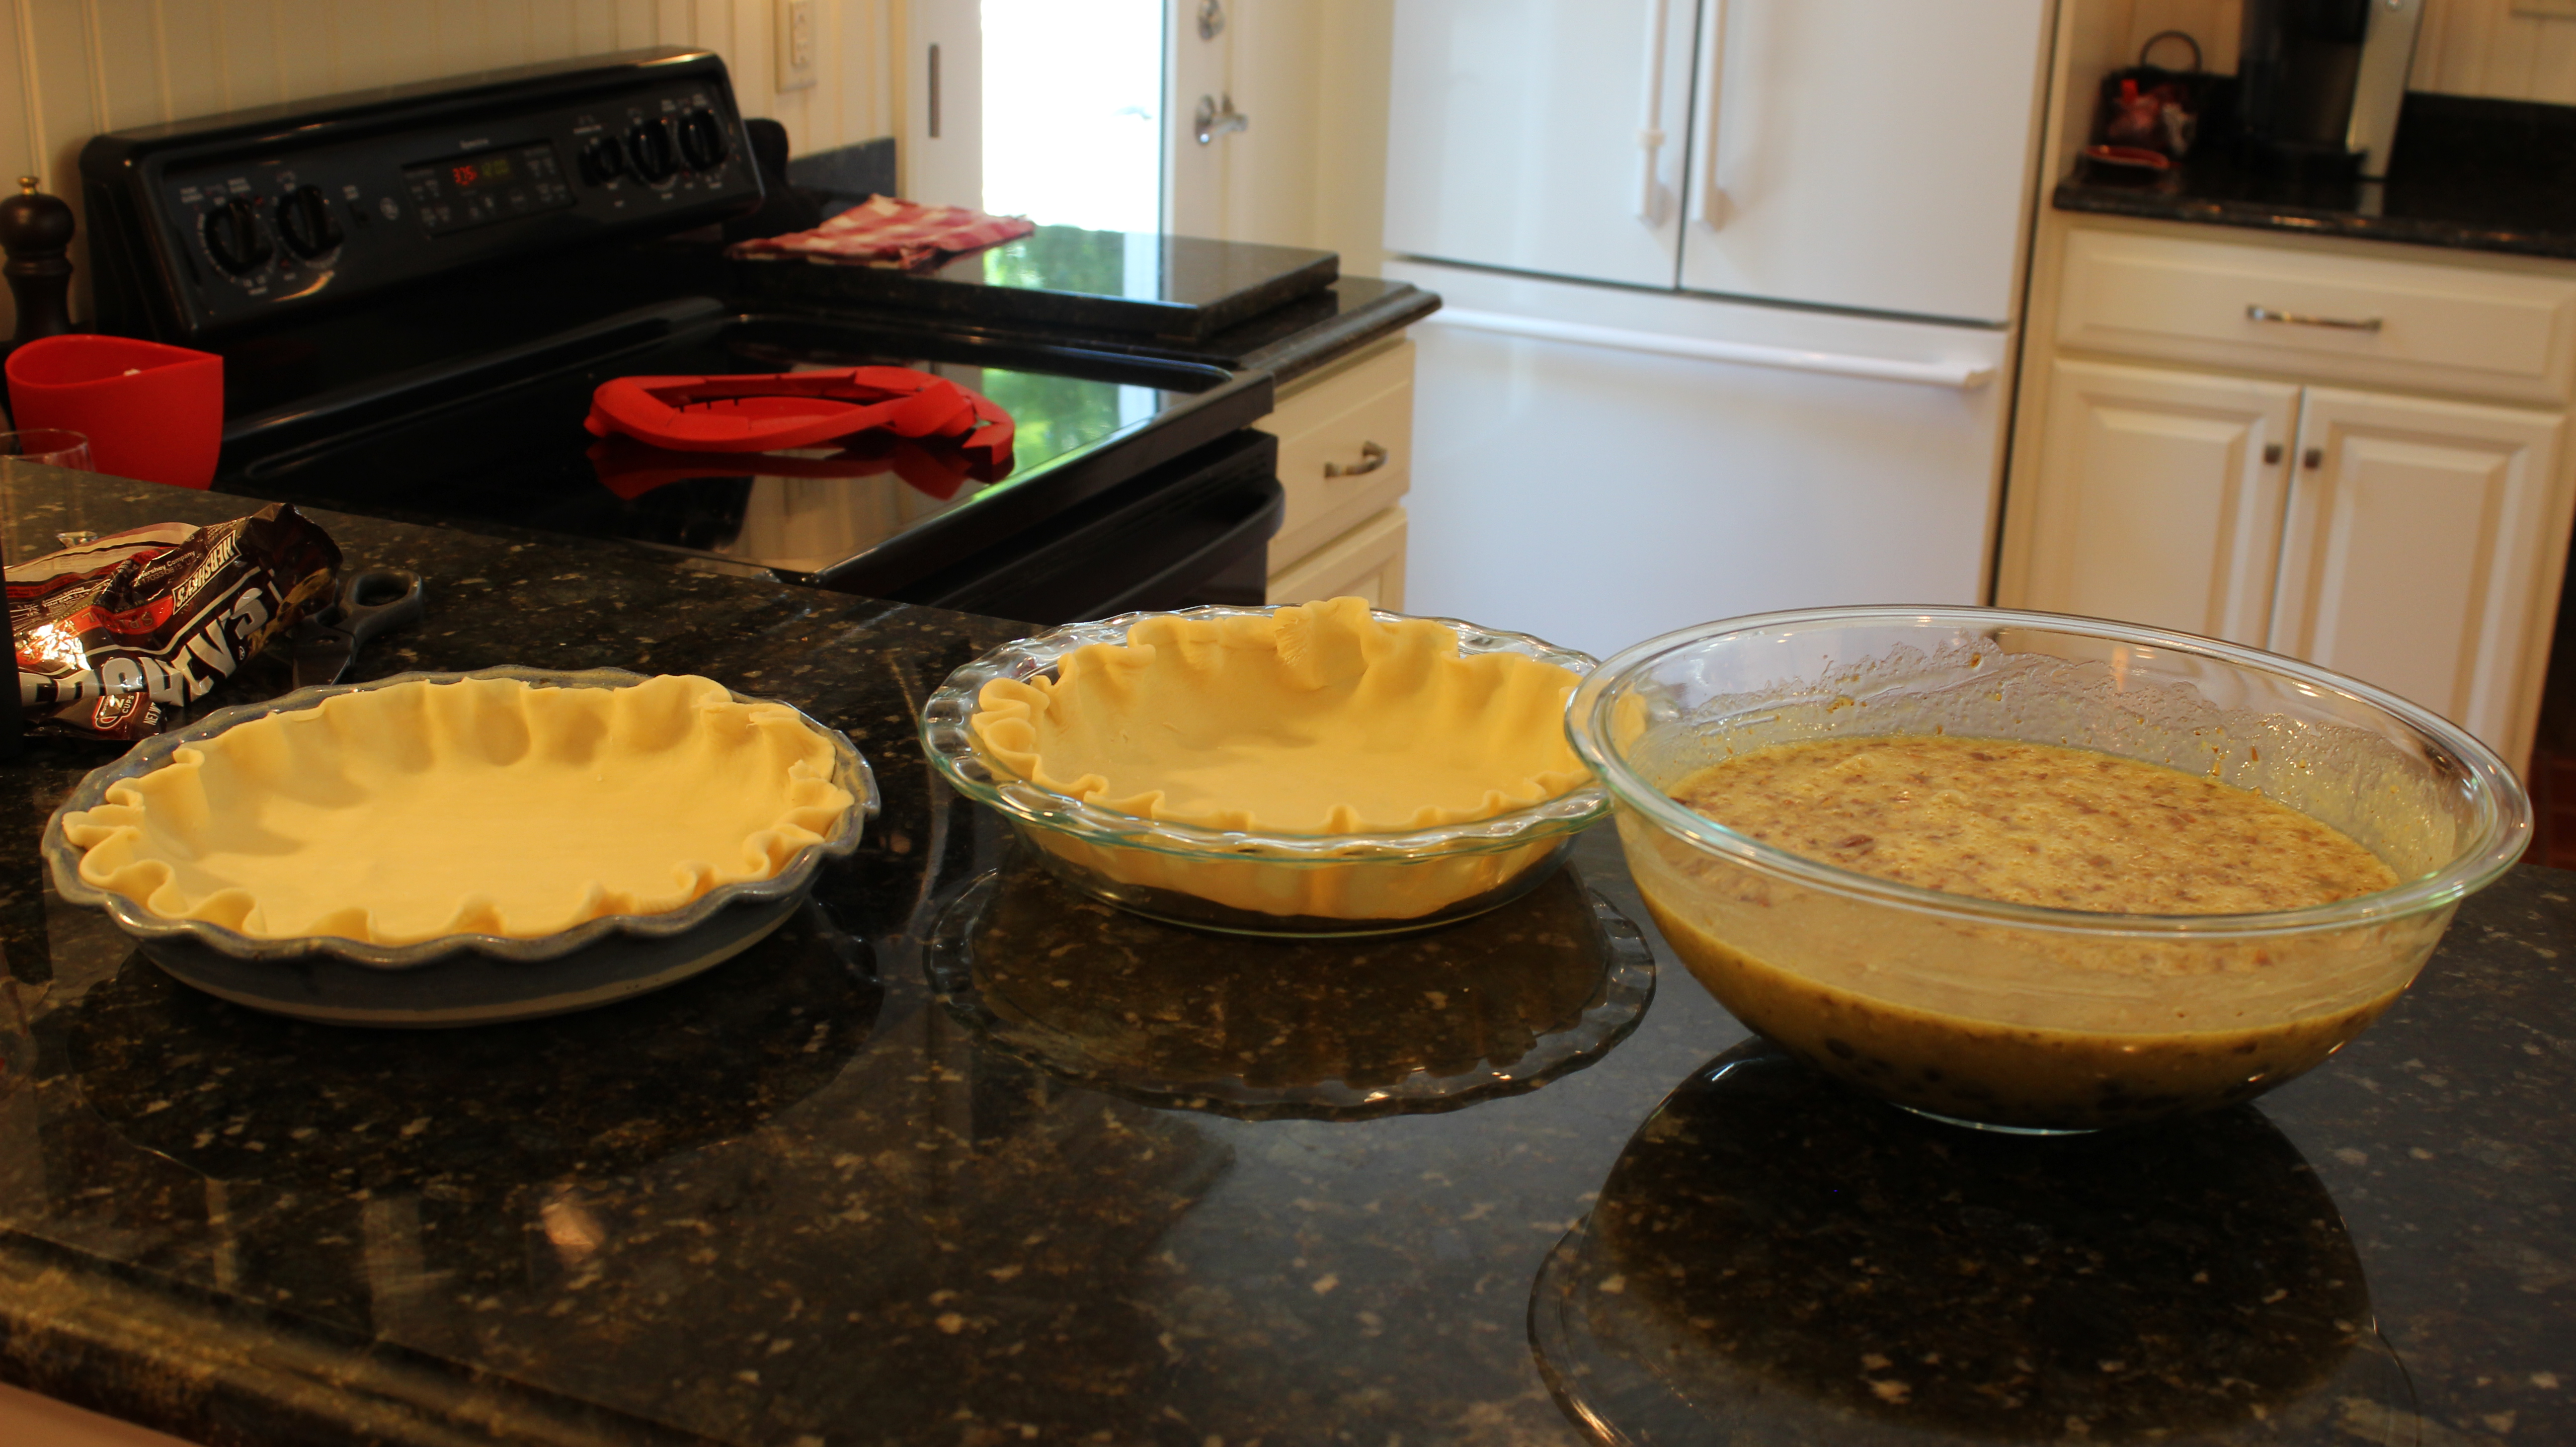
  • 1 pkg. Pillsbury Prepared Pie Crusts ROOM TEMPERATURE@ (2 crusts inside)
  • 1 tsp all purpose flour
  • 1 – 9″ deep dish pie plate

Directions:

  1. Pre-heat oven to 375º
  2. Place out rolled out pie crust in the deep dish pie plate
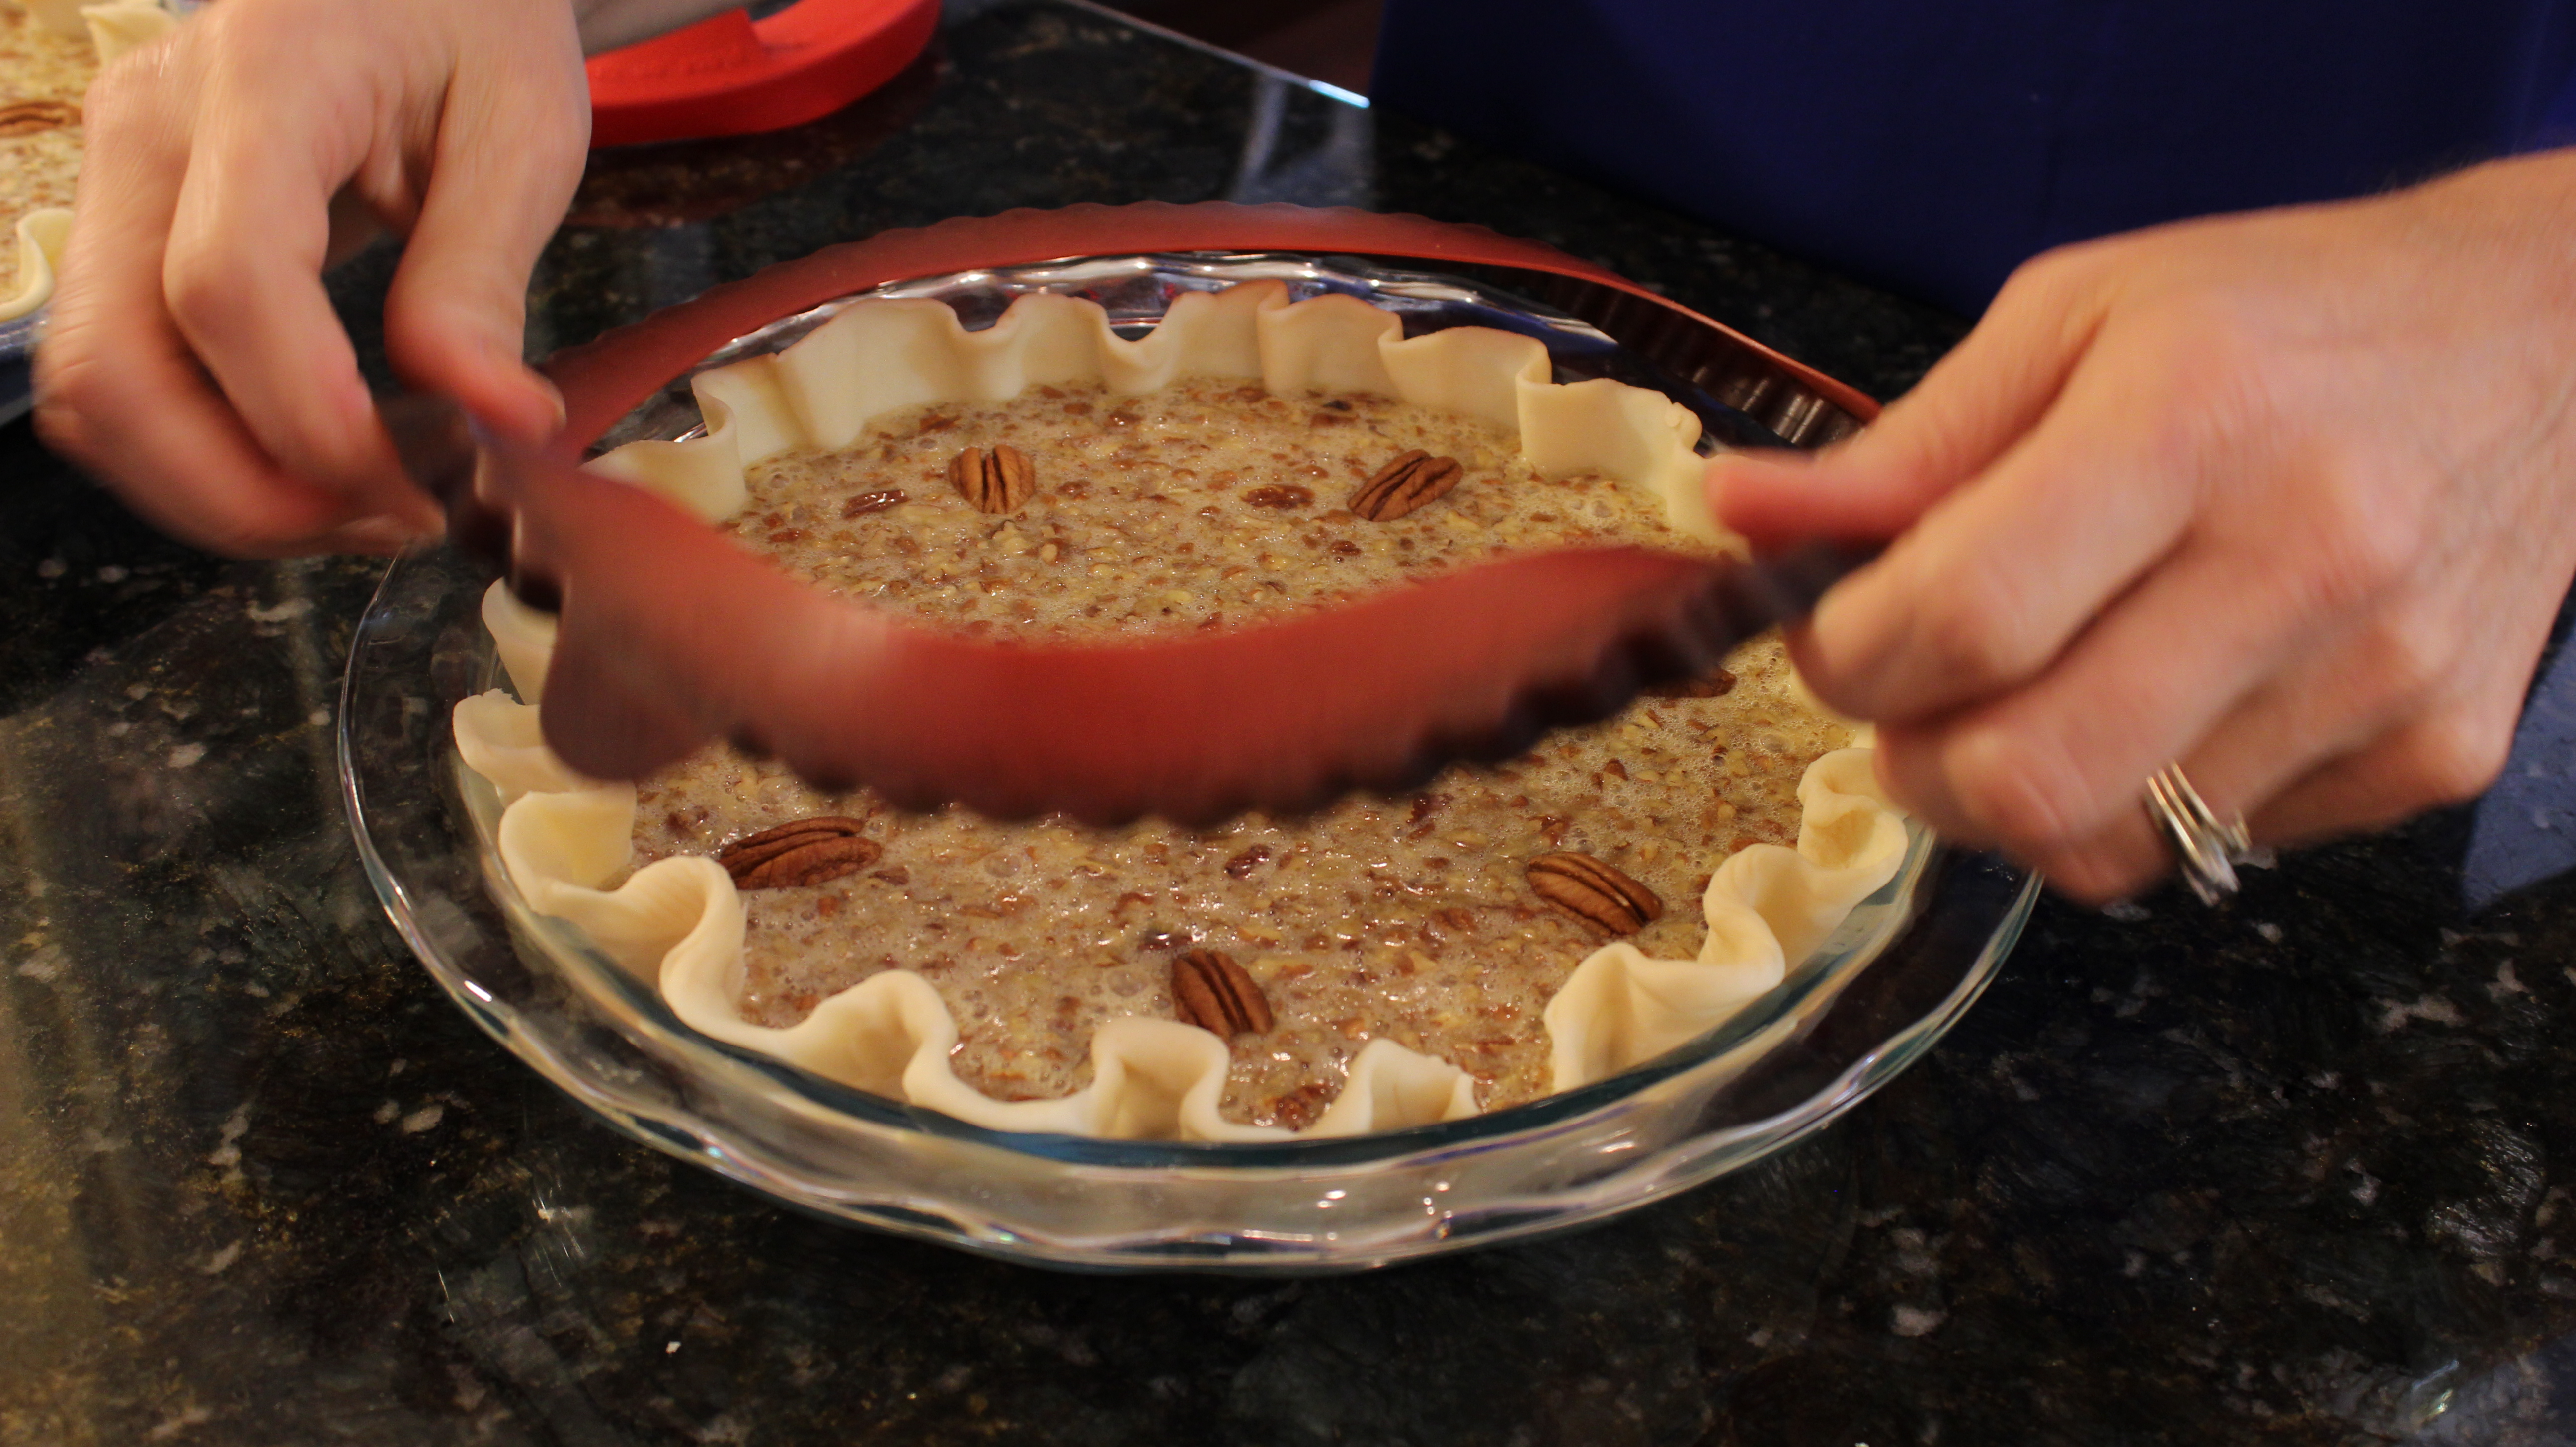
  3. Form edges like a scallop shell as shown in show above, then put into the refrigerator until its needed
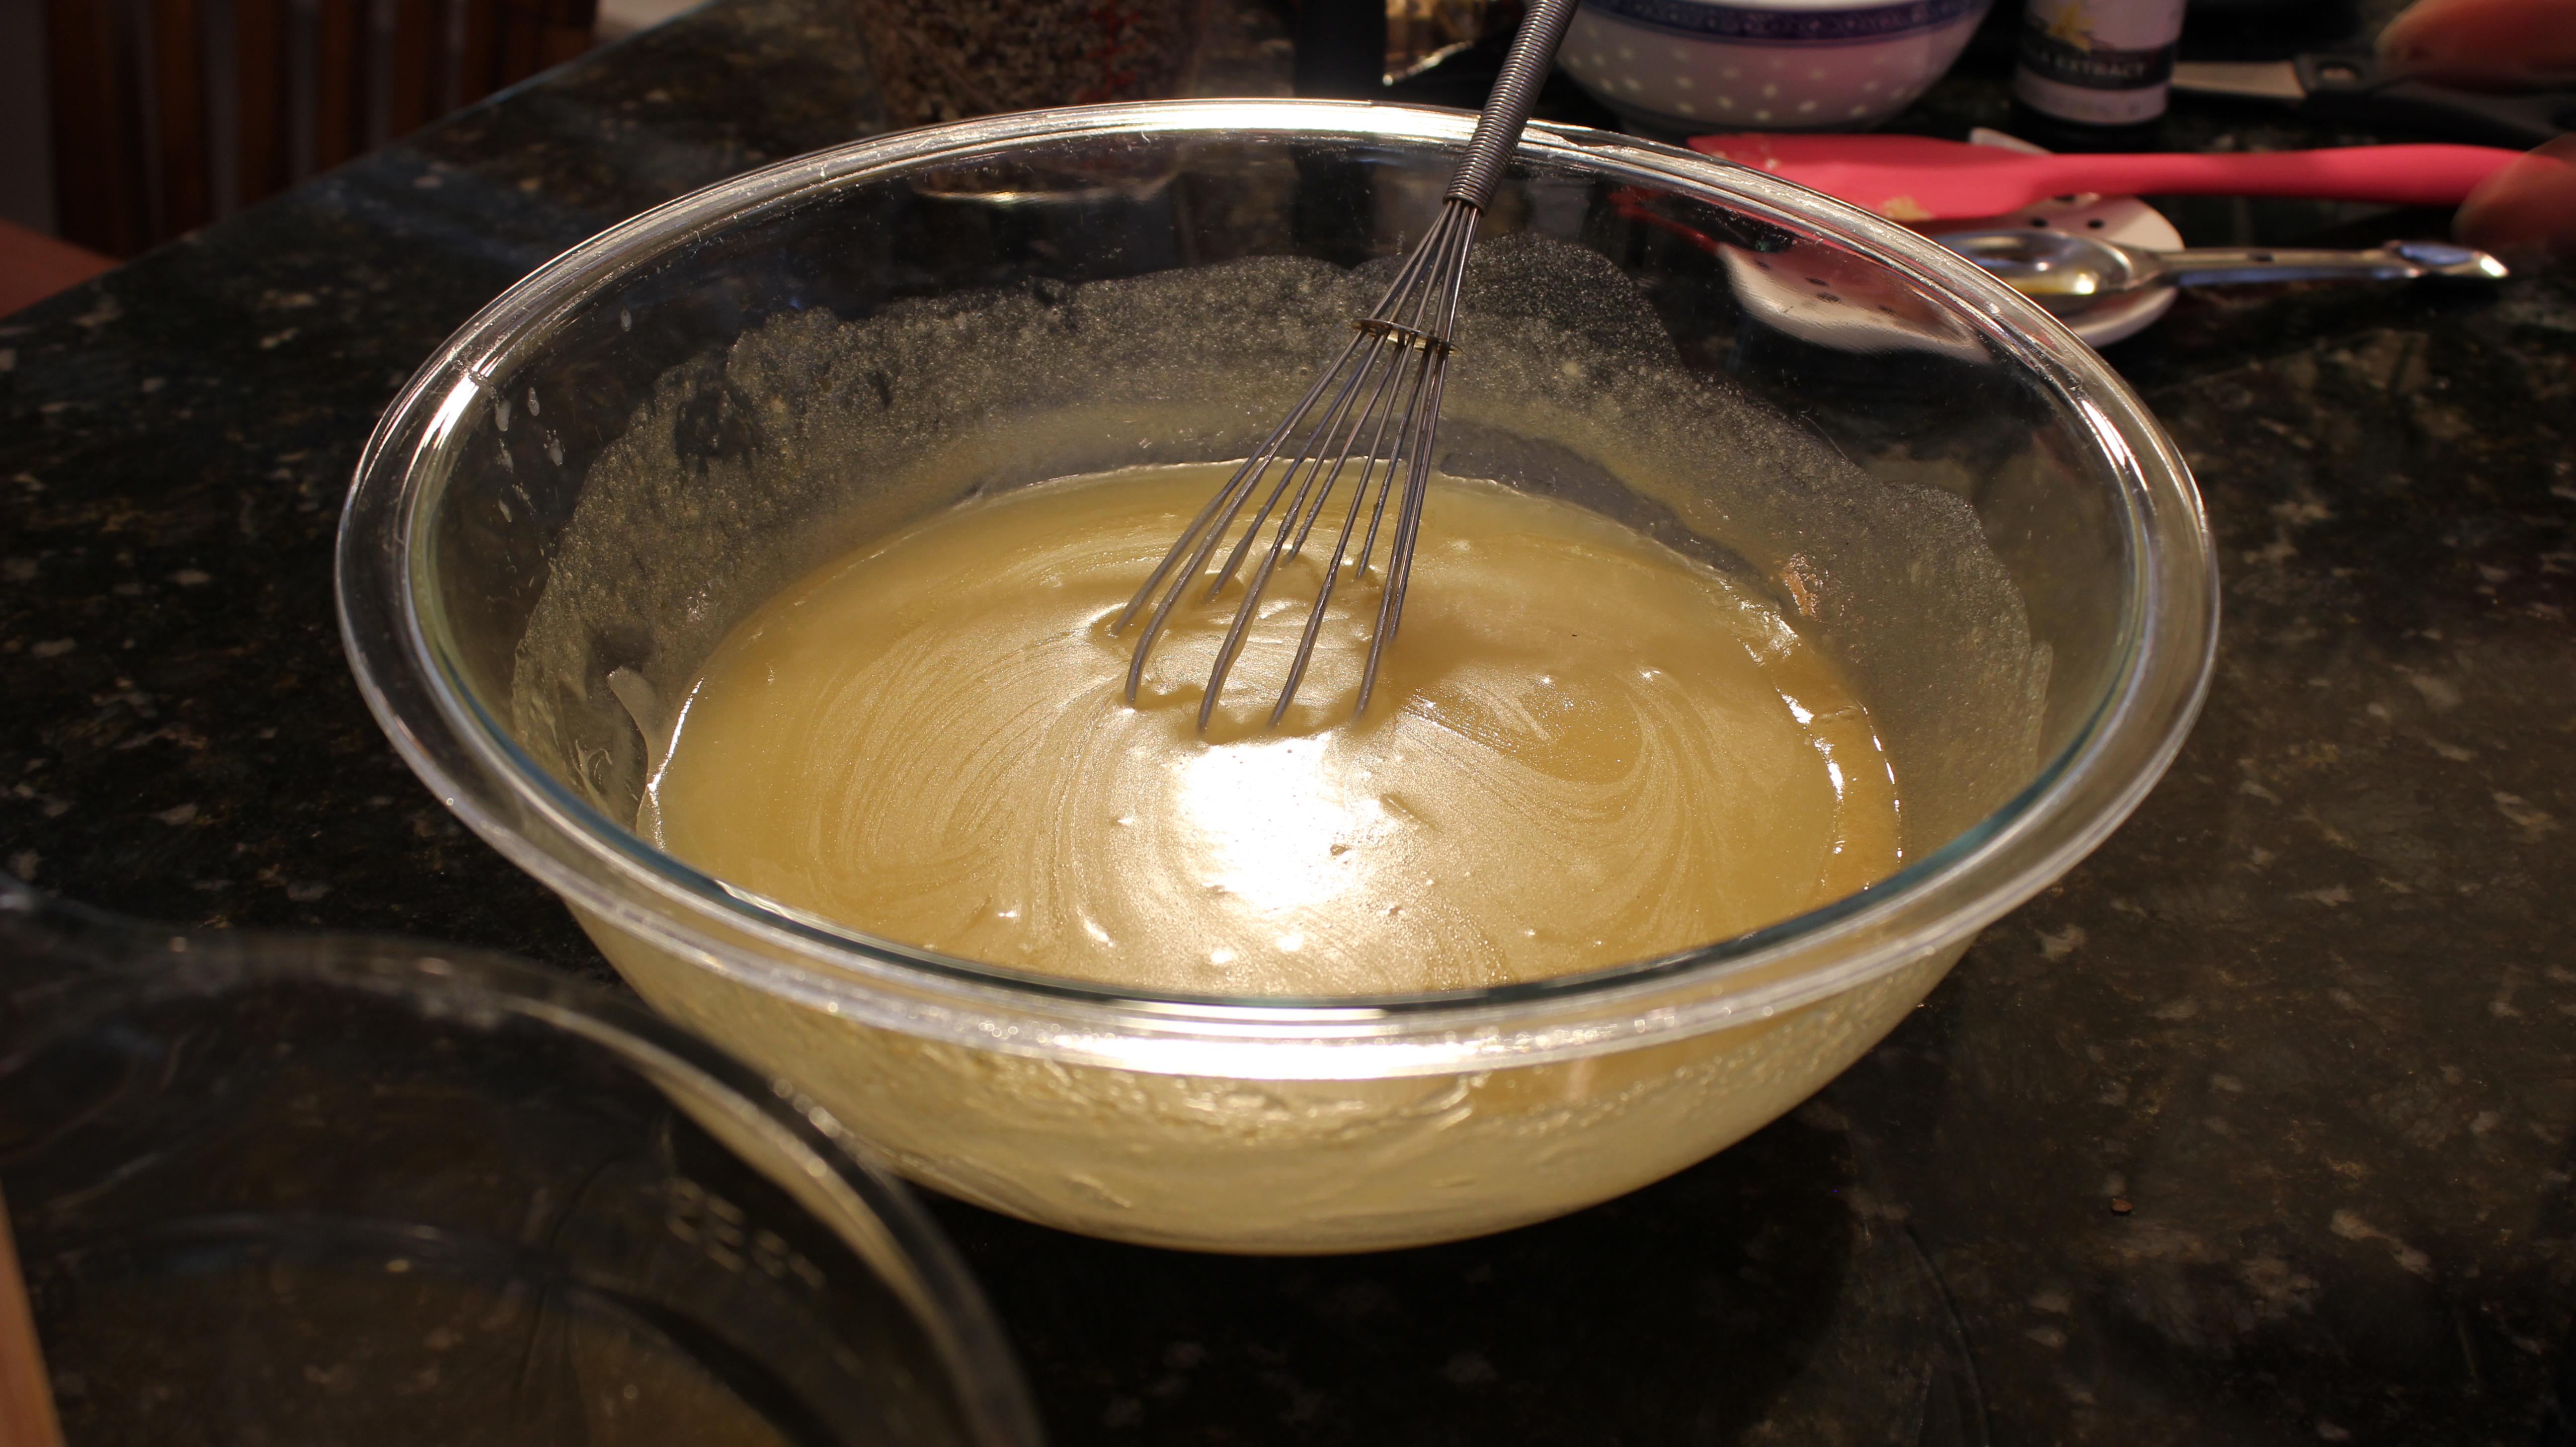
  4. In a large bowl mix cooled-melted butter & sugar with a spatula, you are NOT CREAMING the two just stir to combine
  5. Add in Karo Syrup and stir
  6. Then add in vanilla and whisked eggs, don’t want froth so just stir to combine
  7. Mix in chocolate chips, stir
  8. Then add in ground pecans, mix with a spatula
  9. Pour into pie shell
  10. Decorate the top of the pie with pecan halves
  11. Add rim covering on top of pie so crust does not burn if using A Prepared Pie Crust from the store
  12. NOTE: No need to cover my HOMEMADE PIE CRUST with rim covering because it won’t burn
  13. In a 375º pre-heated oven, place the chocolate pecan pie on the lowest rack so the top doesn’t burn and if the top begins to get too dark towards the end place a piece of foil over the pie for the duration
  14. Let cool slightly, slice and serve with bourbon, scotch, wine, coffee or milk…oh and also great with whipped cream or vanilla ice cream 😉
  15. Freezes incredibly well- make sure to cut into slices before you freeze for easy removal. In fact, I love the texture of having the chocolate pecan pie right out of the freezer without thawing! – you should try it this way 🙂


Easy Gourmet Pesto

Easy Gourmet Pesto

This easy gourmet pesto will definitely put a smile on your face when you see how quickly you can make it! You may never go out and buy the jar stuff again when you taste your own homemade either. There’s just no comparison when you make your own pesto. Now that I show you in my new show how to make it simply in a food processor you have no excuse but to get going and create some incredibly delicious dishes with my homemade pesto recipe.

There’s making pesto by means of mortar and pestle and I admit I have spent many a day making it this way, but there’s another way which I will show you here that saves you time and energy which we all seem to run low on by the end of the day.  If it’s the weekend and you have some time on your hands then be my guest and knock yourself out with the mortar and pestle.  It is truly is a lovely way to make this paste, and useful in so many other ways like grinding spices for instance not to mention being therapeutic.

Back to reality, being able to use my food processor to make my homemade gourmet pesto is a wonderful thing!  The pesto tastes the same and you still put all the love into it using good ingredients.  You can play with this recipe also when it comes to amounts like adding a little more Parmesan if it’s too thin or drizzling in a tad more olive oil if it’s too thick.  Making pesto is a very forgiving process…. just trust yourself and be sure to taste as you go along to see if you need to add a sprinkle more of salt and or pepper.

iphone pictures 472 iphone pictures 473 iphone pictures 477

IMG_2008 IMG_1959 IMG_1956

iphone pictures 479 iphone pictures 484 iphone pictures 478

iphone pictures 483 iphone pictures 1722 iphone pictures 1837

Ingredients for Pesto:

  • 1 pkg. 2-3 cups of fresh basil leaves
  • 1/2-3/4 cup grated Reggiano Parmesan
  • 1 lg. garlic clove put thru garlic press
  • 1/4 cup extra virgin olive oil
  • salt & pepper
  • dash of Siracha

Directions for Pesto: 

  1. Take the basil leaves off of the stems and place them into the food processor with the pressed garlic.
  2. Begin to pulse while drizzling in all of the olive oil thru the top opening of the food processor.
  3. Once you finish adding the oil you may need to stop and scrape the sides with a spatula if you see large pieces of basil leaves.
  4. Pulse once more, then add the parmesan.
  5. Pulse a couple more times to blend, taste and add salt and pepper and tabasco if you want a little kick to it.
  6. Pulse once more to combine.
  7. The pesto is ready to use.
  8. If you want to save the pesto put it into a plastic container and drizzle about 1 Tbsp of olive oil right on top, lay a piece of Saran wrap right on top of the new layer of olive oil so there isn’t any air touching (This will keep the basil from oxidizing and turning brown).
  9. At this point you can either keep in the refrigerator for up to 2 days or put it into the freezer.
  10. When you are ready to use the frozen pesto take it out the night before and let it thaw in the refrigerator.
  11. Now that you have this delicous pesto you can easily make the Crostinis with Fresh Mozzarella, Pesto and Roasted Tomato appetizer.

Ingredients for Roasted Tomatoes:

  • 1 lb. grape or cherry tomatoes
  • 2-3 tbsp olive oil
  • s&p to taste

Directions for Roasted Tomatoes:

  1. Slice tomatoes in half, drizzle on olive oil and S&P and roast in a 400º oven for 15-20 minutes

Yogurt Chicken Kabobs, Tzatziki & Toum at Maria’s

Yogurt Chicken Kabobs, Tzatziki & Toum At Maria’s

Wow, this gourmet yogurt marinated chicken kabob recipe is the most scrumptious marinade I have ever had on chicken. It will be my new favorite marinade for summer grilling! There is really nothing to putting together this marinade and the results are outstanding. The grilling goes really quickly here too because you cube up the chicken into small pieces so it only takes about 7-8 minutes for each side on high heat.  I know I will be baking my chicken with this marinade over the winter months. Maria got this yogurt-marinated chicken kabob recipe from epicurious.com and of course making a couple of adjustments as I go through my own test kitchen adding in the fresh ground coriander and the “smoked” Spanish paprika giving it that hint of something extra that I was looking for.

The combination of these three gourmet recipes together are packed full of flavor! My favorite is actually having  this dynamic combo on some warmed or toasted naan adding in a chewy soft texture to this heavenly dish. Using the toum, the garlic Lebanese sauce as a baster for the breads and vegetables when you are grilling in a no brainer.

This homemade gourmet sauce called toum is such an unusual sauce because it’s hard to initially imagine how such a thick and creamy texture can come about from peeled garlic cloves and vegetable oil! You must be patient with this recipe as the slow drizzling of the vegetable oil is crucial in the emulsification of this garlic-oil combo but the efforts are well worth it. Watching the show to see how I get the sauce thick and foamy I hope will help clarify the “how to’s” of it. This toum sauce will last up to 2-3 weeks in your frig and who’s better than you with this little hidden gem just waiting to put a flavor punch of silky garlic on your sauteed veggies, garlic breads, meats, fish, chicken… the options are really endless.

Maria’s homemade tzatziki sauce is a recipe I’m sure you will love and want to add to your go to recipes for summer. The way she has you drain the whole fat Greek Yogurt makes this sauce even creamier and gives your mouth a smooth silky texture yet refreshing at the same time with the grated cucumber, and vinegars and fresh lemon juice. This sauce can easily be used as an amazing dip with pita chips. It’s similar to my cucumber & Vadalia onion salad but definitely different. So nice to have a couple different styles to choose from.

This Mediterranean night of exotic spices and flavorful recipes will not be easily forgotten. You just may start to crave these homemade dishes sooner than you think. I hope you enjoy the show and the gourmet yogurt marinated chicken kaobs, tzatziki and toum recipes.

IMG_1789  IMG_1787  IMG_1817

IMG_1897  IMG_1768  IMG_1778

IMG_1780  IMG_1826  IMG_1831

IMG_1832  IMG_1851  IMG_1898

IMG_1802  IMG_1890  IMG_1879

IMG_1809  IMG_1794  IMG_1911

INGREDIENTS for Yogurt Chicken Kabobs:

  • 1 tsp ground red pepper flakes
  • 1 tsp (Spanish) smoked paprika
  • 1 tsp (Hungarian) sweet paprika
  • 2 tsp coarse kosher salt
  • 1 tsp fine ground black pepper
  • 2 tbsp tomato paste
  • 6 garlic cloves peeled and smashed
  • 2 whole lemons thinly sliced
  • 2 tbsp red wine vinegar
  • 3 tbsp olive oil
  • 1 cup whole milk Greek Yogurt
  • 2 1/2 lbs. chicken thighs
  • 1 package extra-long wooden skewers
  • 1 package cherry or grape tomatoes
  • 1 or Vadalia sweet onion sliced into 1″ pieces

Mediterranean Yogurt Chicken Kabobs DIRECTIONS:

  1. Take first 11 ingredients in above list and add to large mixing bowl
  2. Mix everything with a spatula then add in chicken pieces and toss to coat
  3. Cover with saran and pop into the frig for 24 hours
  4. Cover 2 cookie tray with foil and begin to place pieces of marinated chicken
  5. Place chicken thigh pieces on BROIL for 10 nminutes, then flip & broil 10 minutes more
  6. Be sure to keep an eye on them so as not to burn
  7. Remove tray and let cool to touch while broiling other tray of chicken thigh pieces
  8. When all chicken can be handled place 3 cooked pieces onto each wooden skewer
  9. OR you can grill…
  10. OPTIONAL: Skewer cherry tomatoes and onion alternating pieces
  11. You can also alternate chicken, tomato, onion, chicken and repeat
  12. Grill on high for 7-8 minutes on each side (even with veggies in the mix)
  13. Serve grilled chicken and tomato/onion on naan or pita bread with tzatziki, and hummus or rice ….YUM!

INGREDIENTS for Tzatziki Sauce:

  • 1 16 oz. container of whole fat Greek yogurt
  • 1 English cucumber
  • 1 garlic clove put thru garlic press
  • 1/2 cup chopped fresh dill
  • 2 tbsp rice wine vinegar
  • 1 tbsp red wine vinegar
  • 1 tsp salt
  • 1/4 tsp pepper
  • 1/2 tsp cumin
  • juice from 1/2 fresh lemon
  • 2 tbsp good extra virgin olive oil in sauce and some to drizzle on top at the end

DIRECTIONS for Tzatziki:

  1. Slice cucumber in half-length wise, then in half crosswise
  2. Scoop out middle seeds and discard
  3. Grate cucumber halves into a large bowl
  4. Put cucumber gratings into a Ziploc baggie and add 1/2 tsp salt, let sit for 1 hour or over night
  5. Unseal a small corner of the Ziploc & drain water from baggie squeezing the grated cucumber
  6. Add grated cucumber to a medium bowl, and pat dry with paper towels to remove any excess water
  7. Add fresh dill, garlic, s&p, cumin, lemon juice and Greek yogurt to grated cucumber, mix til creamy texture
  8. Drizzle 2 tbsp good extra virgin olive oil on top and voilà you have tzatziki

INGREDIENTS for TOUM – Lebanese Garlic Sauce:

  • 1 cup peeled white garlic
  • 2 1/2 cups vegetable oil
  • 1/4 tsp salt
  • 1/2 cup fresh lemon juice

DIRECTIONS for Toum: Approx Time 12 minutes

  1. Add 1 cup peeled garlic and salt to food processor and pulse 3 times
  2. Scrape down sides
  3. Begin the garlic-vegetable oil emulsion by SLOWLY beginning to drizzle in the oil – This will take about 12 minutes to slowly drizzle in all of the oil
  4. When you have reached adding in 1/2 cup of oil you will need to stop and scrap sides one last time then start up processor again and resume adding in oil, at about 1 cup of oil mark begin to add 2 tsp of lemon juice – KEEP food processor going the WHOLE TIME
  5. Go back and forth from oil to lemon juice until it’s finished (I begin to add 3 tbsp of lemon juice at a time after about 1 1/2 cup of oil mark)
  6. You should see the volume doubling then quadrupling
  7. At this point the toum will be thick and foamy
  8. Since the food processor has been running for a while now you will need to let it COOL and put into a container but DO NOT seal at this point because any condensation will ruin the texture of the toum and all your hard work
  9. Just loosely cover with a paper towel til COMPLETELY COOLED
  10. At this point you can seal with a top
  11. It will last in the frig for a couple of weeks
  12. Serve with the yogurt marinated chicken kabobs, sauté vegetables, brush on grill items, naan, pita bread, ciabatta for garlic bread … the options are endless ENJOY 🙂