CT Style Making Asian Shrimp & Rice Noodle Salad with Ryan & Teresa!
Back on CT Style this week with Ryan Kristafer and Teresa Dufour making the perfect summer picnic dish, Asian Shrimp & Rice Noodle Salad, never gets dull with those two! I thoroughly enjoy every second on the WTNH set at Channel 8. There were several groups going on camera this week making it even more exciting then usual, if that’s at all possible.
Not only do I try to offer appropriate seasonal recipes but its important for me to find out what recipes my followers and friends want to see so please feel free to make suggestions always. That’s how I came up with this Asian Shrimp & Noodle Salad… it was the #1 request, a picnic-beach salad that won’t spoil.
You can find the wriiten recipe for this Asian Shrimp & Rice Noodle Salad and how I originally got it from my big foodie friends Karen and Ken from Andover, MA by clicking on the hyper-link.
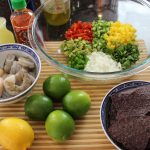
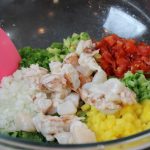
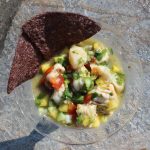
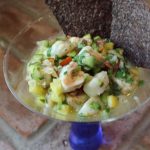
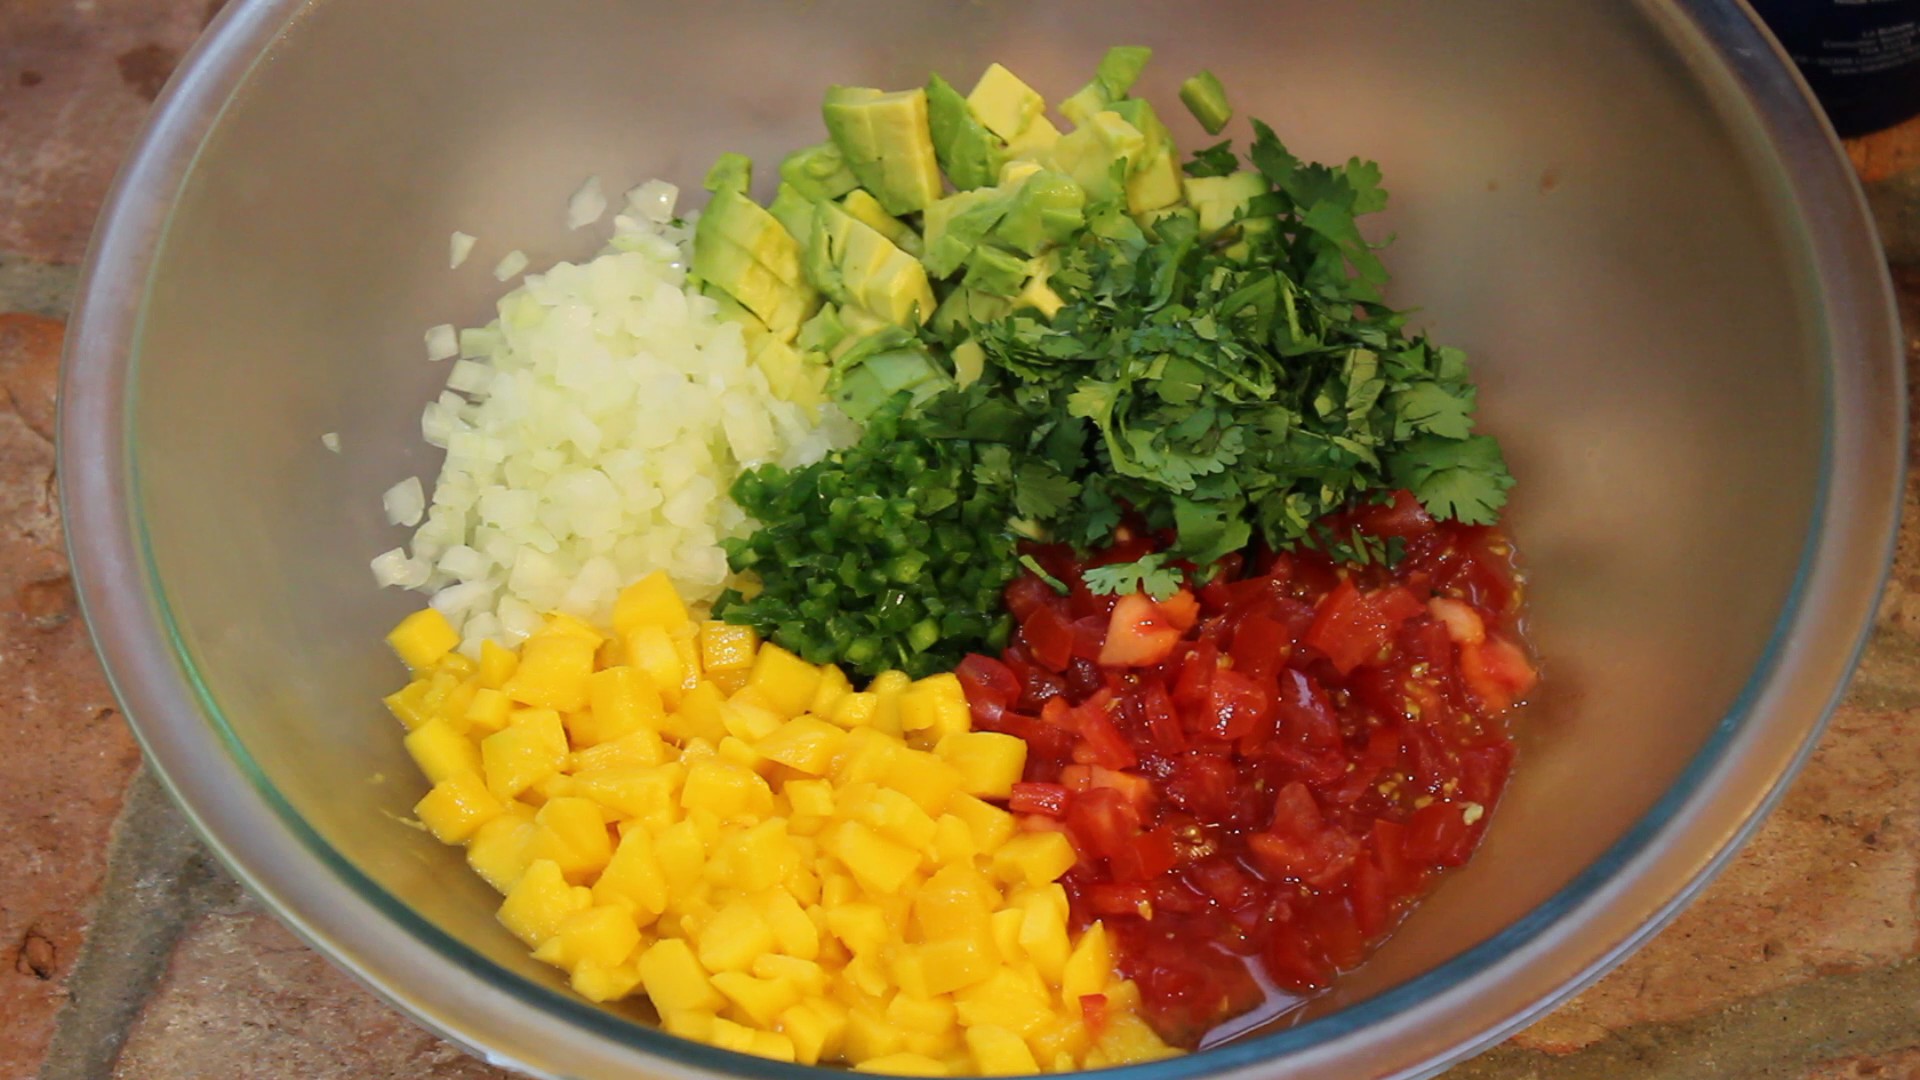
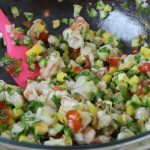
Making shrimp & scallop ceviche really can’t get an easier then this! Ceviche is a South American dish that’s usually served as an appetizer. The fish cures/cooks in citrus juice for an hour or two while you get all your salsa ingredients in order. The citrus curing juices are drained from the fish, leaving a tender shrimp & scallops to be tossed with salsa and voilà. The base of the shrimp and scallop ceviche here is my mango salsa recipe.
When I thought of making ceviche this week, sombrero popped into my head! I went to several store’s, costume store’s included which don’t exist anymore, and was out of luck. I then called my dear friend Maria who to my surprise had an authentic sombrero for me to borrow that her parents had picked up on a cruise to Cozumel, Mexico. I have to say it is a very cool hat, not to mention really beautiful. Although it has some weight to it so your neck gets a bit of a work out and you have to be careful not to knock into the walls because depth perception can be deceiving.
When I make this shrimp & scallop ceviche. or any ceviche for that matter, I like to cure my fish in lime juice and then drain that juice before adding the fish to my salsa ingredients. In my opinion, the flavors stay fresher that way. By draining the fish juice that’s released from the shrimp and scallops in the curing process it keep’s a better balance between fish and salsa. There are some recipe’s that have you toss everything into one bowl but I feel it taste’s better when you drain the curing fish juices prior to adding the fish into the salsa.
Since the texture’s of shrimp & scallops are a little different I have you cut the shrimp in 1/2 horizontally, and then dice, so the needed curing/cooking time between the two is closer. You could always change up the fish in this recipe to and go with all scallops or another favorite flaky fish. It’s all about being creative and using what’s freshest at the market!
1/2 lb. lg shrimp, peeled and deveined, 1/3″ diced
1/4 lb of sea scallops, 1/3″ diced
1/2 cup diced sweet mango
1/2 cup sweet onion – Vidalia onion -finely chopped
1/2 cup mini cucumber diced 1/3 cup cherry tomatoes finely chopped
1/2 cup cilantro chopped (1/2 cup after it’s chopped)
1/3 cup finely diced cherry tomato
1/3 cup finely diced avocado
1 jalapeno finely chopped without the seeds
juice from 1 lime – for the final ceviche
1 tbsp fresh lemon juice – for the final ceviche
2 tbsp extra virgin olive oil
2 tbsp rice wine vinegar – (“seasoned”)
juice from 4 limes for the shrimp/scallop for the curing marinade
salt and pepper to taste
dash of Tabasco
Bag of blue corn chips (optional)
Directions:
Wash and devein the shrimp
Wash the sea scallops and remove little fibrous side muscle that’s attached to the scallop
Pat the shrimp and scallops dry on paper towels
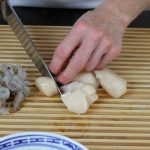
Cut up the shrimp in 1/2 horizontally and then into 1/4″ pieces
Slice up the scallops in 1/2 horzintally and then into 1/2″ pieces
Put them into the same bowl… a non-reactive bowl like a glass bowl
Roll the limes to soften them up
Squeeze the lime juice over the shrimp and scallops
Make sure there is enough juice so all the shrimp and scallop pieces are submersed in the lime juice and place into the frig until they are opaque…and place into the frig for 1- 2 hours
NOTE: you should check the fish at 30 minutes intervals to see how it’s curing/cooking …depending on the coldness of the fish, kind and size it wil be ready at different time’s but it’s EASY – if it’s opaque then it’s done!
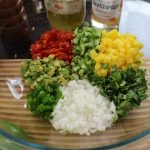
Finely chop the tomatoes, jalapeno, sweet onion, cucumbers, mango and cilantro and set aside in a large bowl
Drain all the liquid out from the shrimp and scallops and discard
Add the shrimp and scallops to the large bowl with the salsa, add in juice of 1 tbsp lemon juice, juice from 1 lime, 2 Tbsp olive oil, 2 Tbsp rice wine vinegar, dash of Siracha, salt and pepper to taste
Put back into the fridge for 15 minutes for flavors to marry
The creation of these MasterChef sauces. a spicy, sweet and sour mango and a ginger-peanut sesame sauce, all began while surfing the net a few weeks ago, I accidentally ran into the MasterChef homepage advertising “Casting calls are coming soon to a city near you”. My kids, Reilly and Bella were there at the time and enthusiastically shouted, “you should do it”! I think what sealed the deal was reading the “Come and meet the MasterChef casting team for your chance to be on the show!” The excitement started to seep in and I began to seriously consider going to the New York City MasterChef open call. If anything, I knew it would be a step in the right direction and a great learning experience let alone the adrenaline of it all!
After sending in their required online pre-registration form and printing out the nine page hard copy form to be submitted at the casting call I thought it would be a good idea to look over the FAQ page. The FAQ’s certainly had a list of what to do and what not to do. The “to do’s” started off like this: First, bring one prepared dish to serve to their food judges. Second, we would be given 3 minutes to plate our dish at their casting call location and for some reason I had initially thought I had 5 minutes to plate so that was a bit of an eye opener! Third, there wouldn’t be a kitchen to cook or warm our dish up so we were to come prepared! Fourth, we are to supply our own dishes, utensils, etc.
The “do not do’s went like this: no air mattresses, no alcoholic beverages, no animals (unless health related), no candles, no cans or bottles (except water bottles), no chairs that do not fold (i.e. lawn chairs, chaise lounges, molded plastic chairs), no digital or still cameras, no fireworks, no hair dryers, no illegal drugs, no tents, no video, cameras or camcorders of any kind, no weapons of any kind, no children under the age of 13 years are allowed at the audition venues. There you have it!
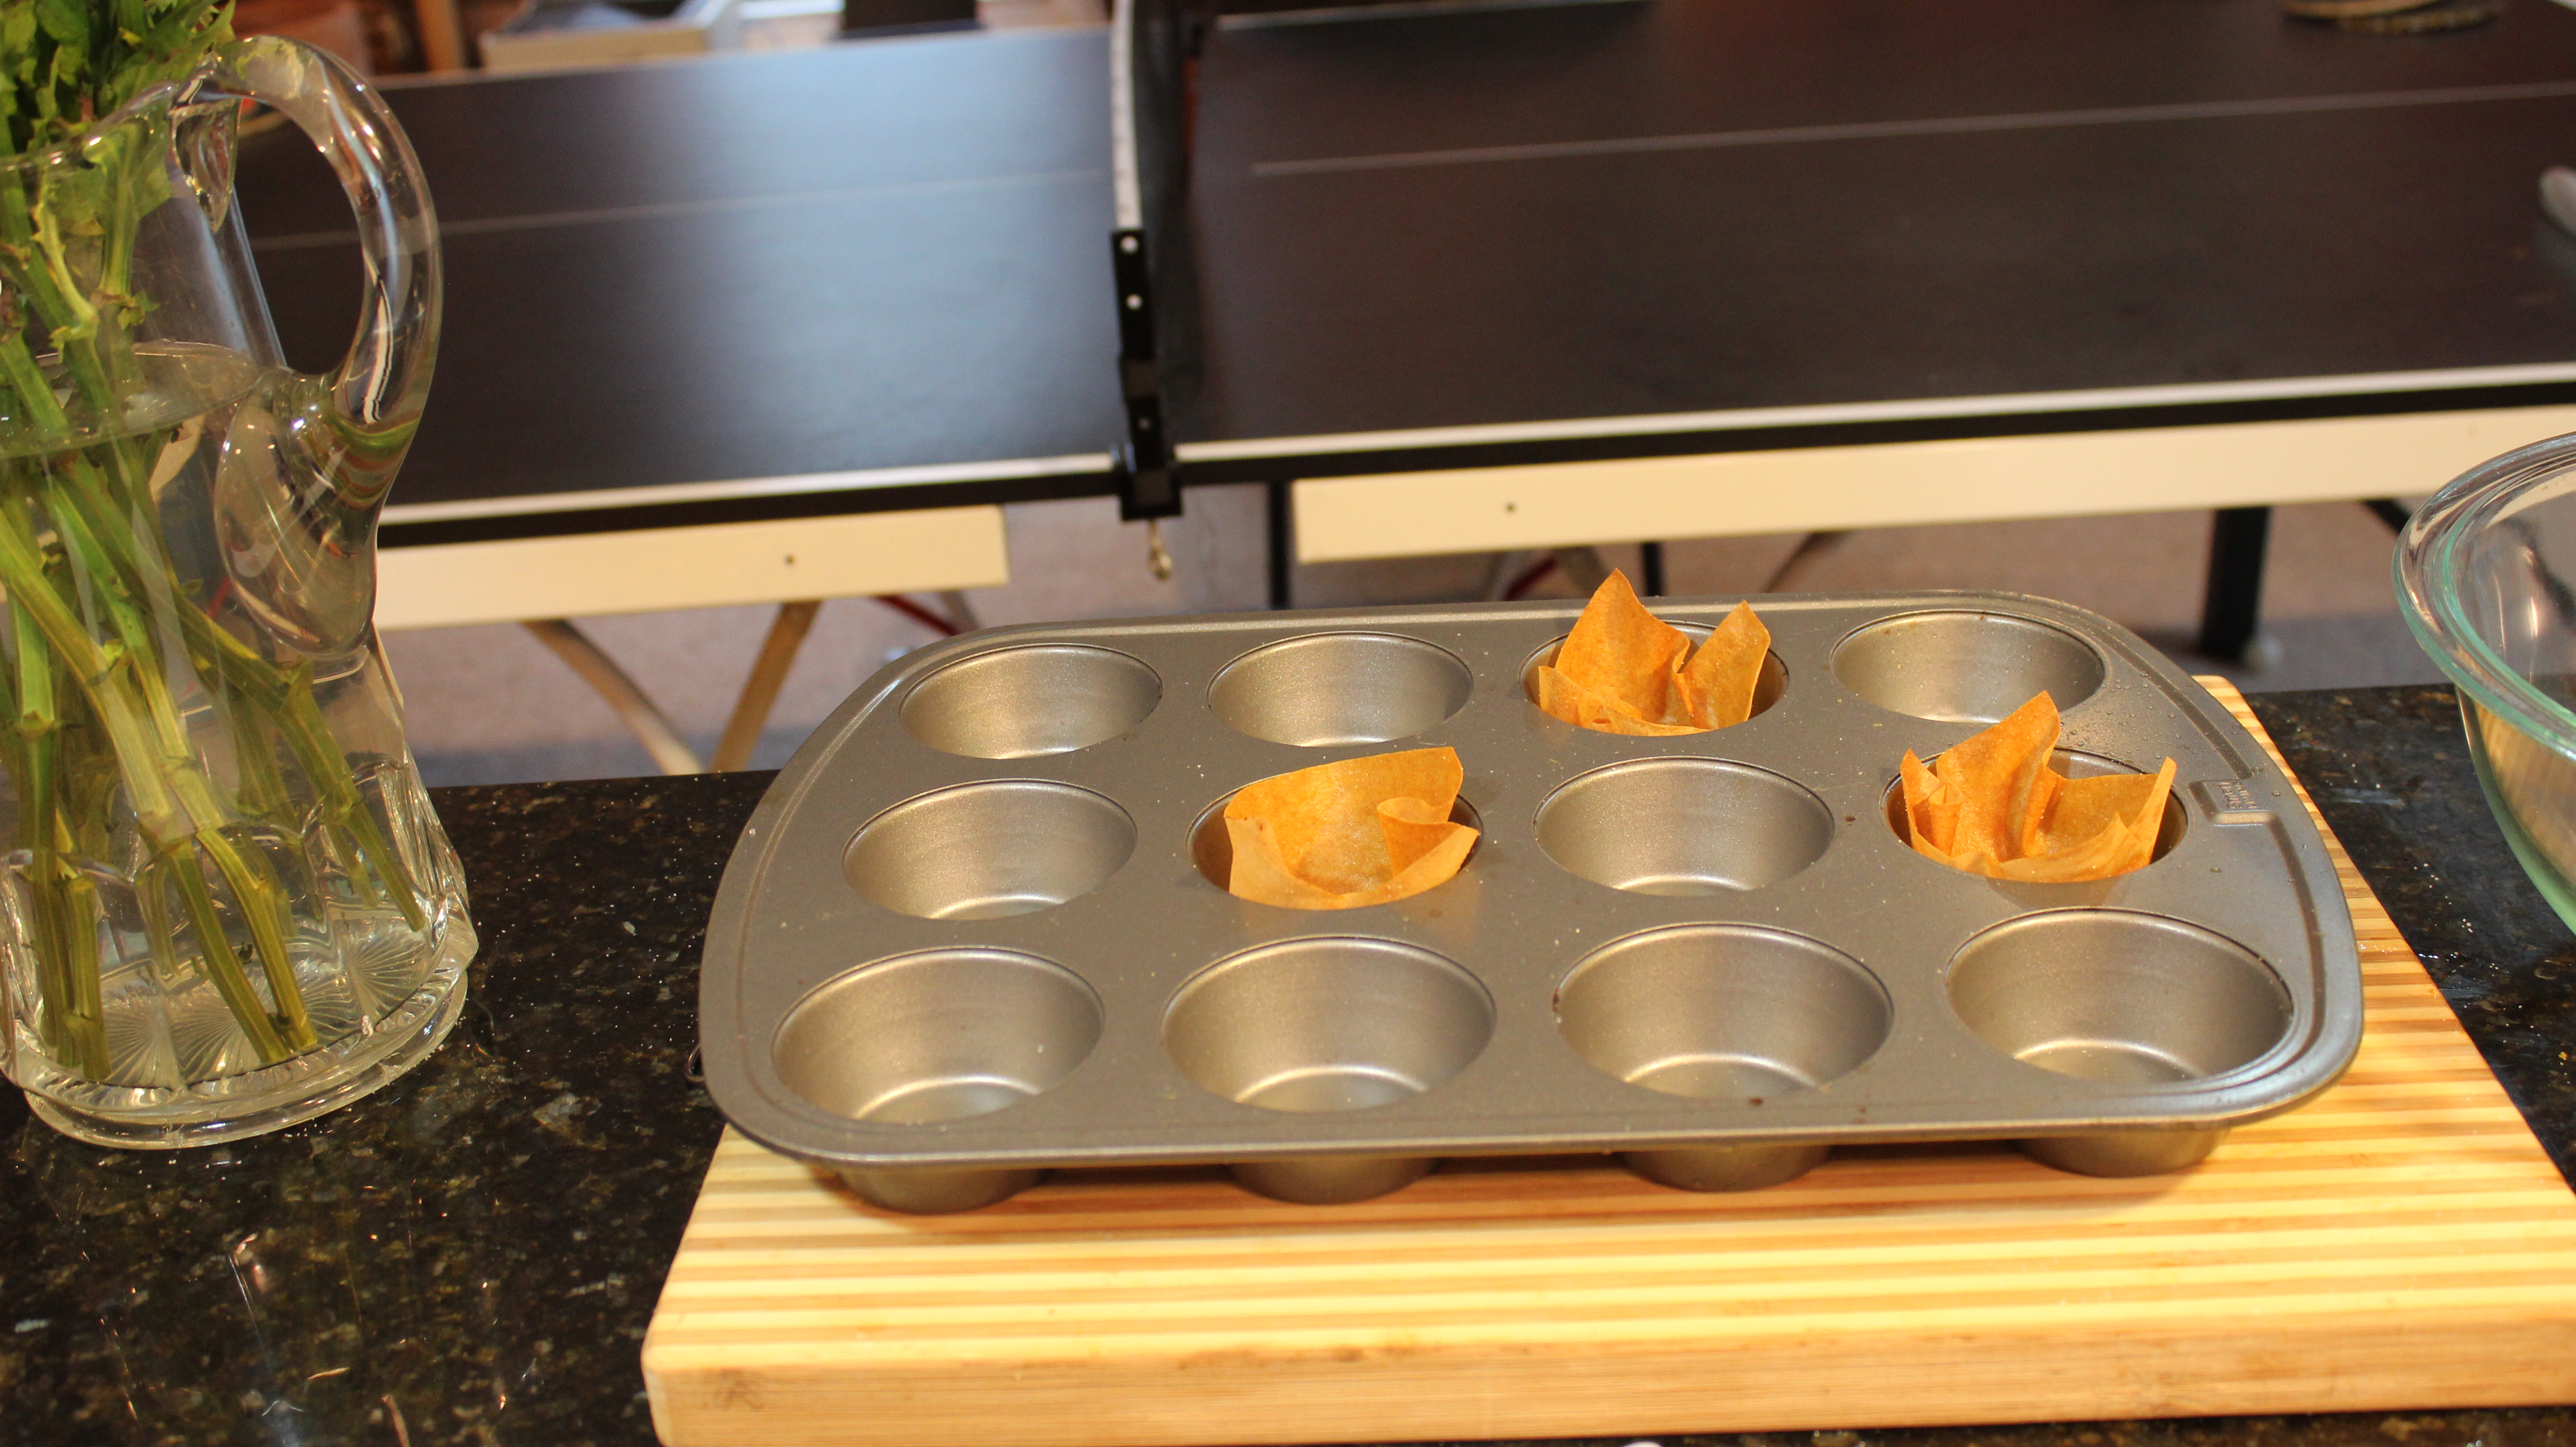
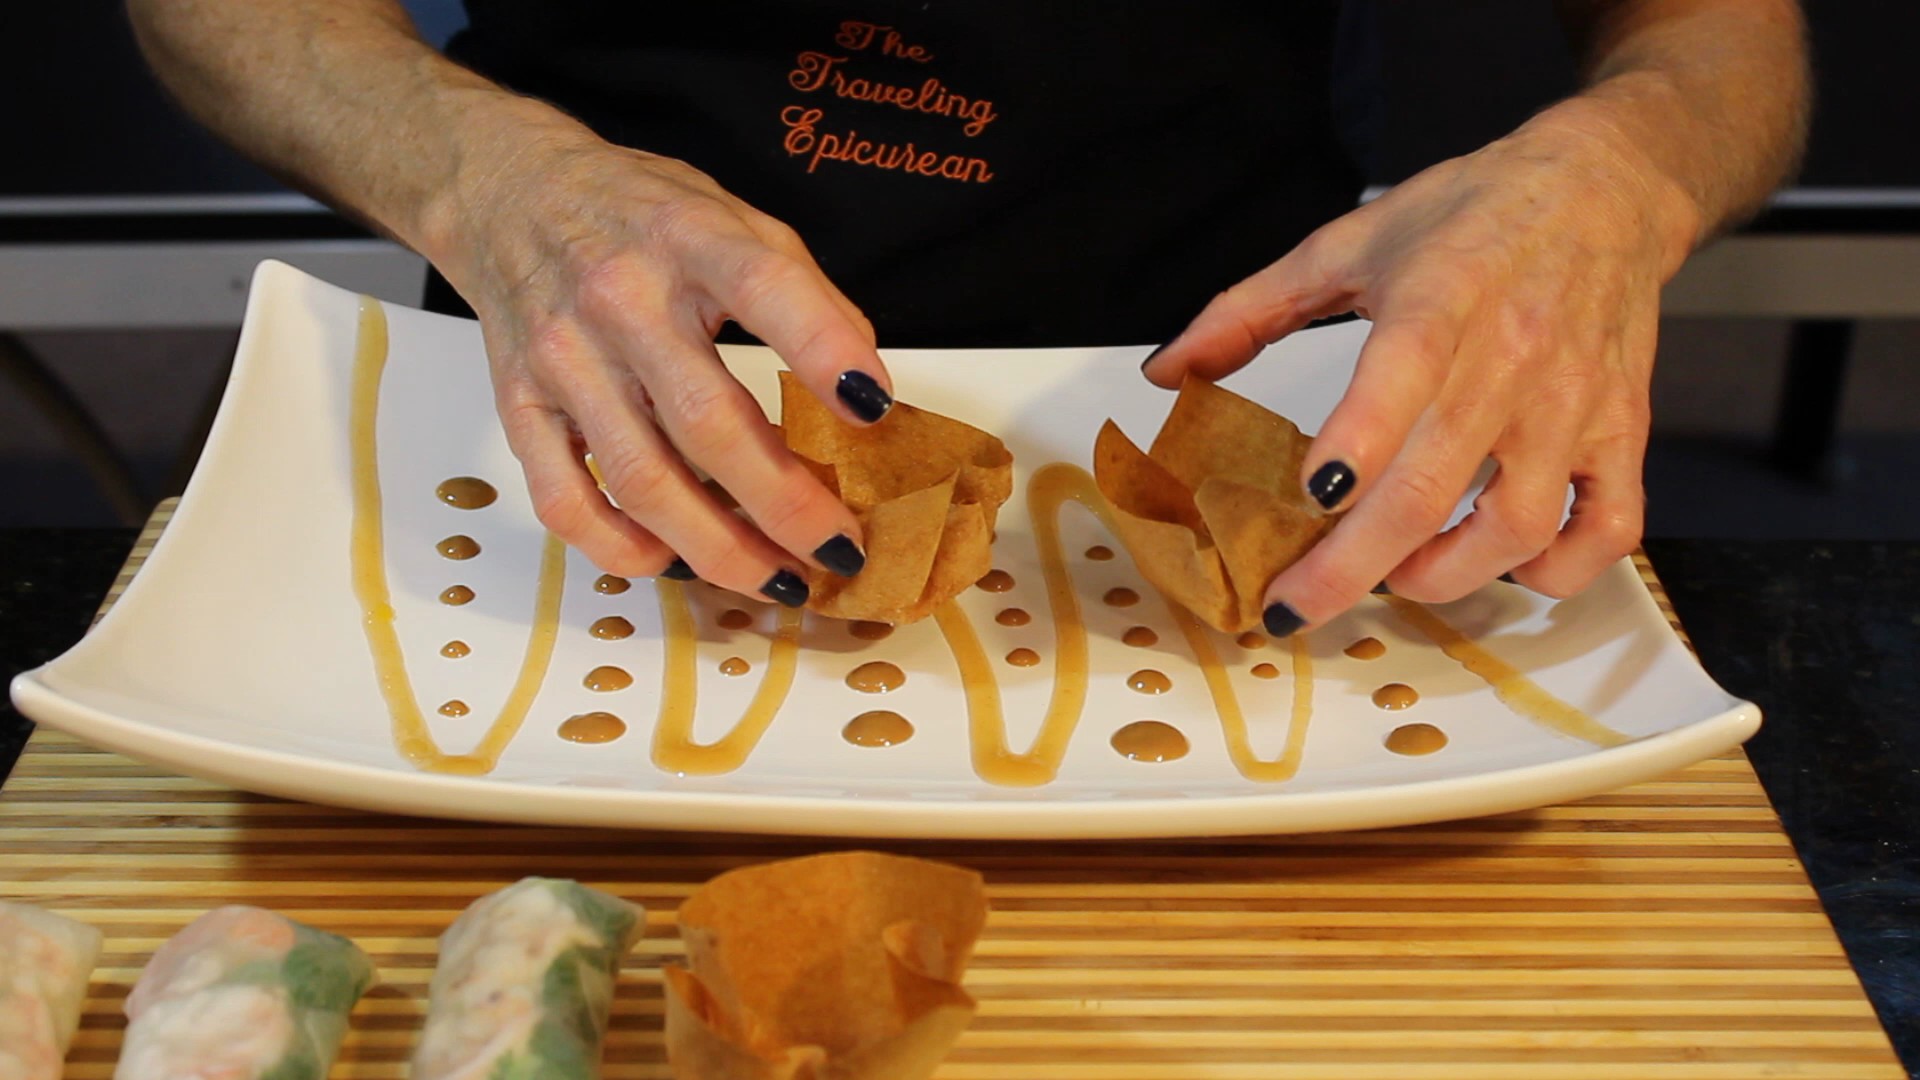
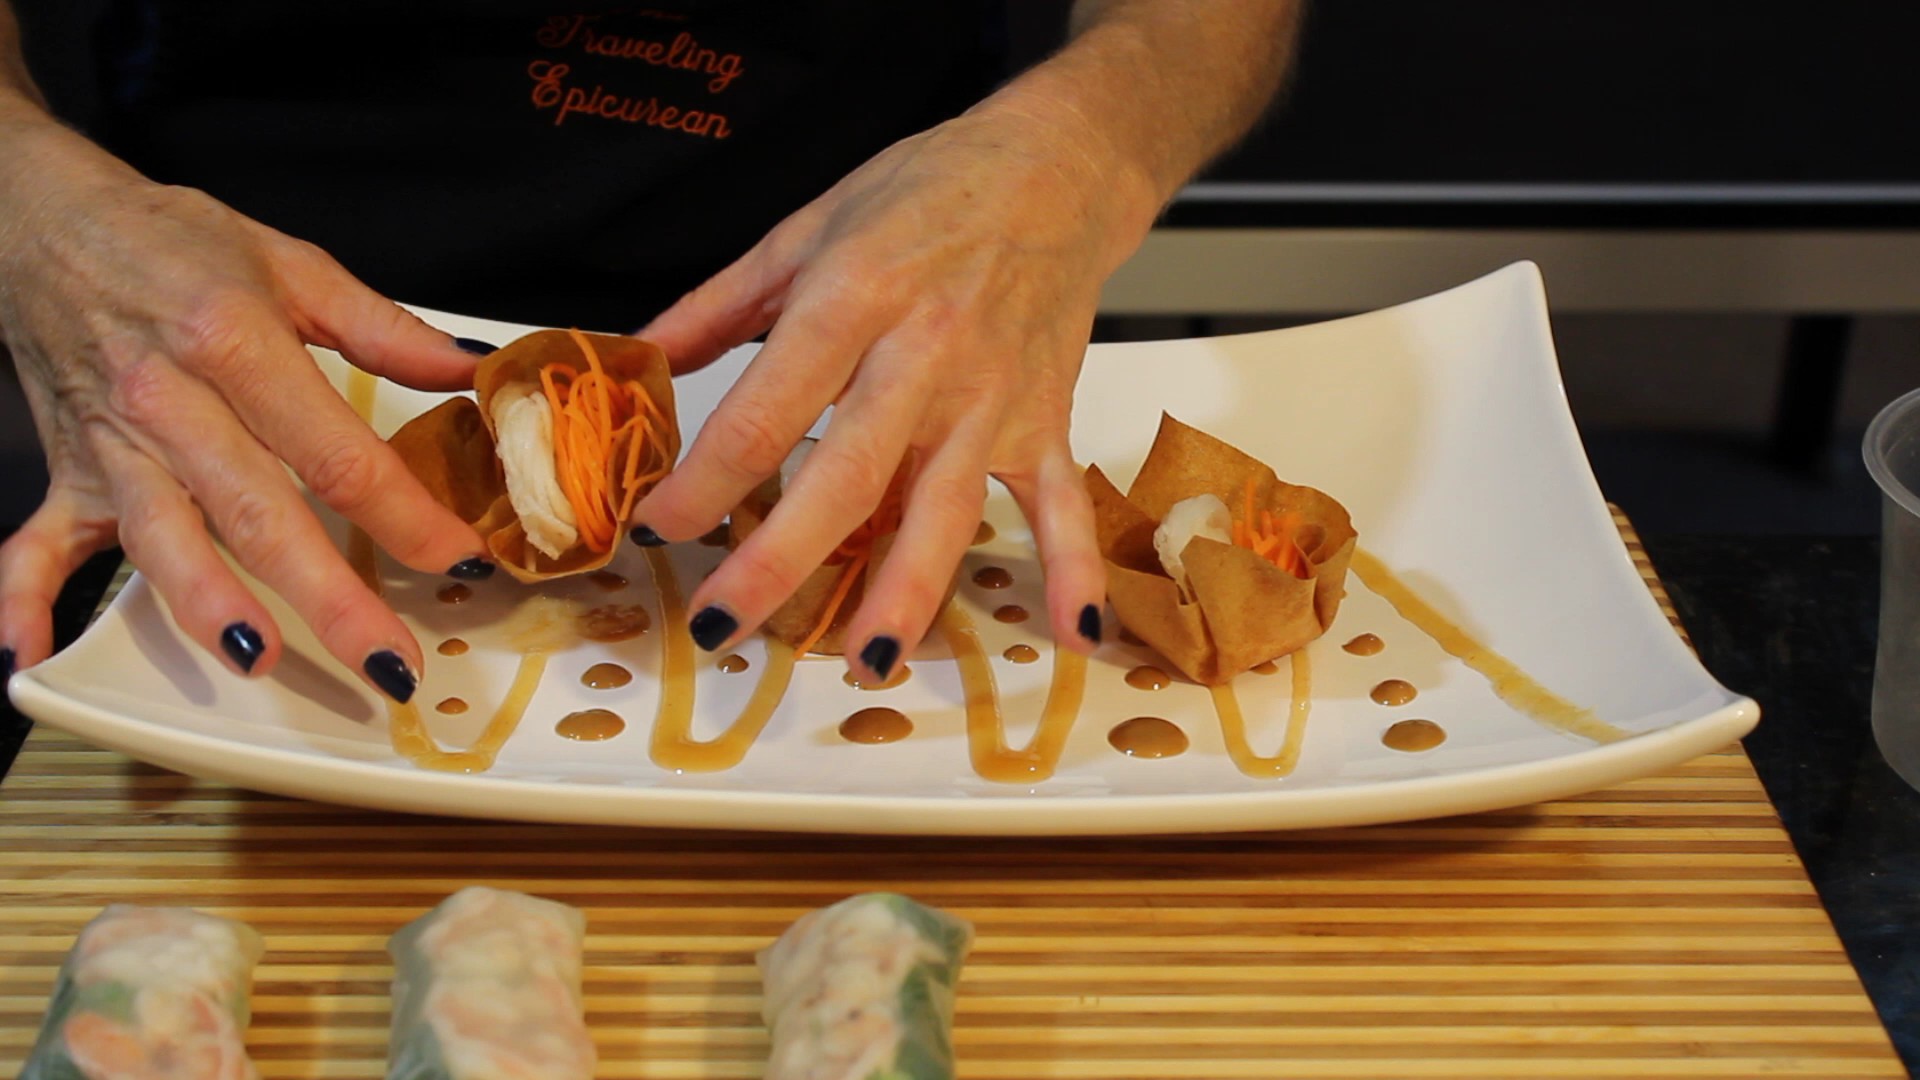
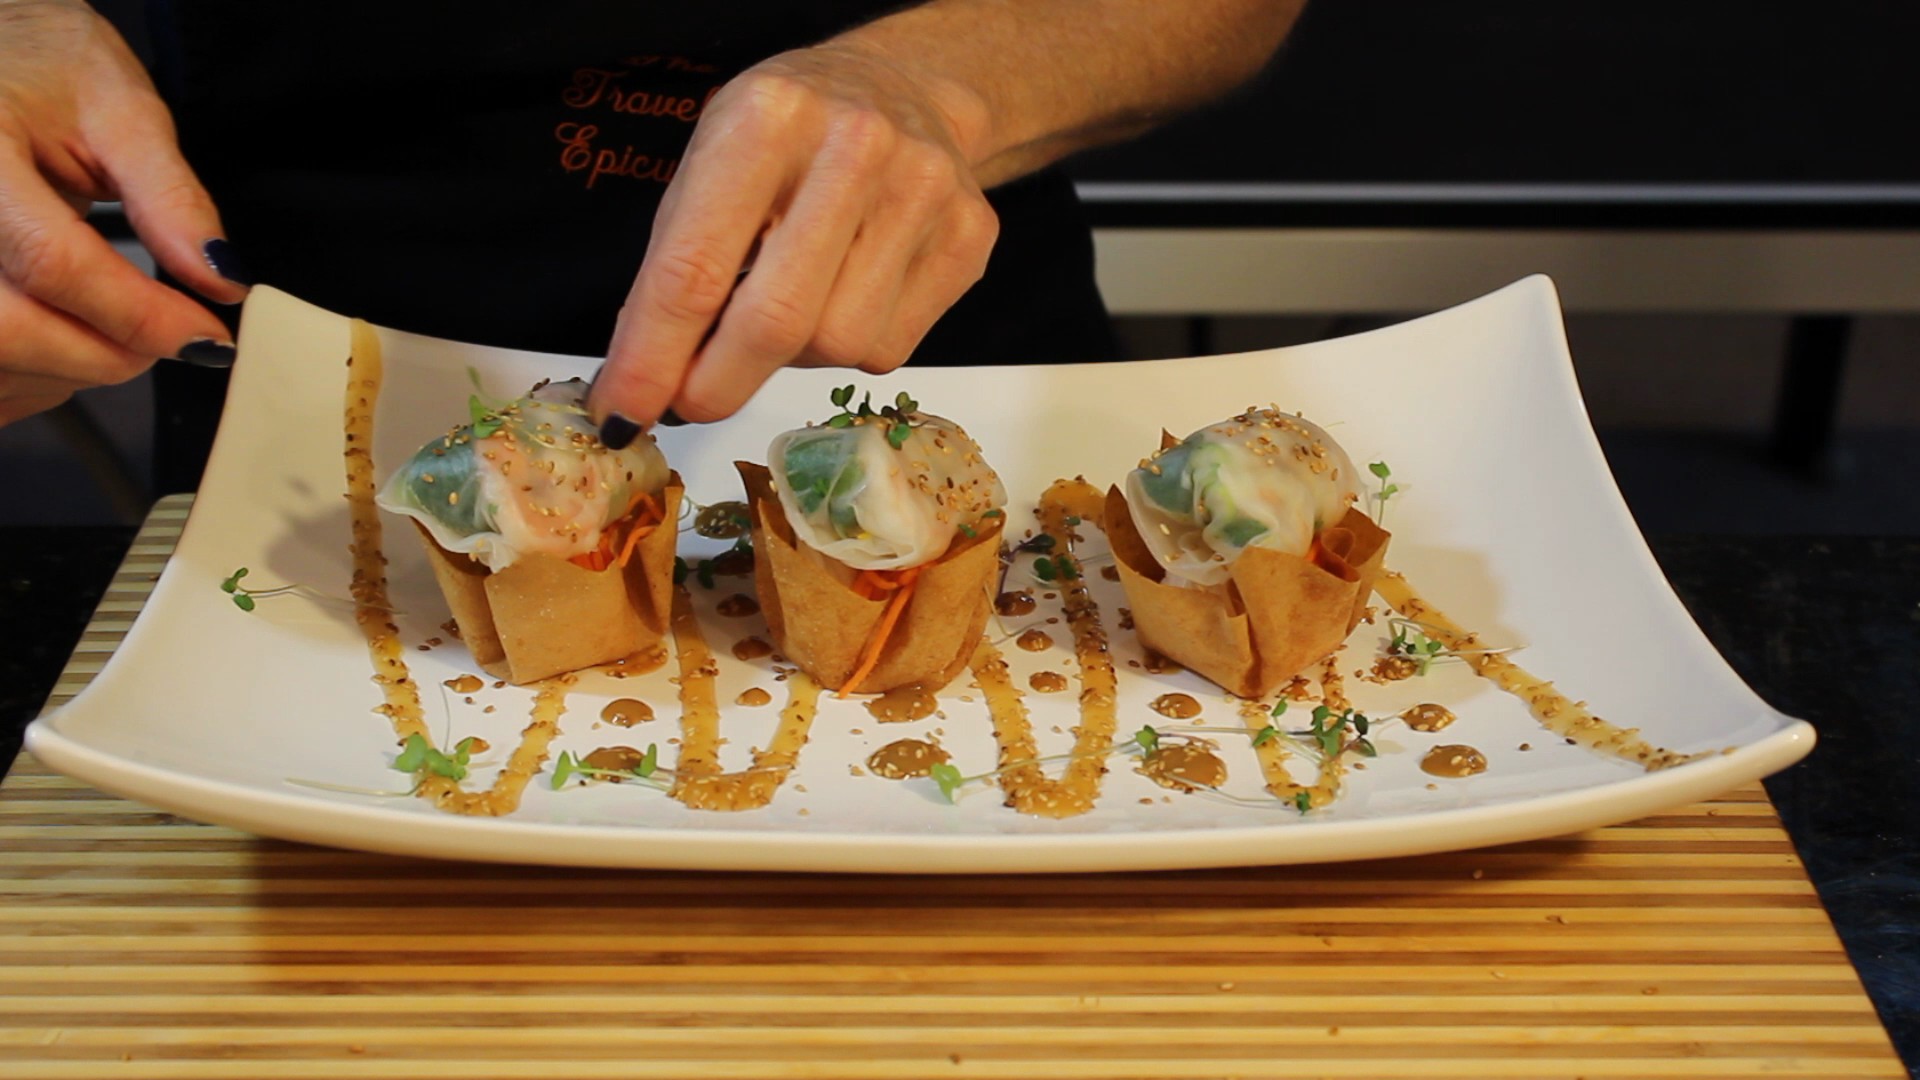
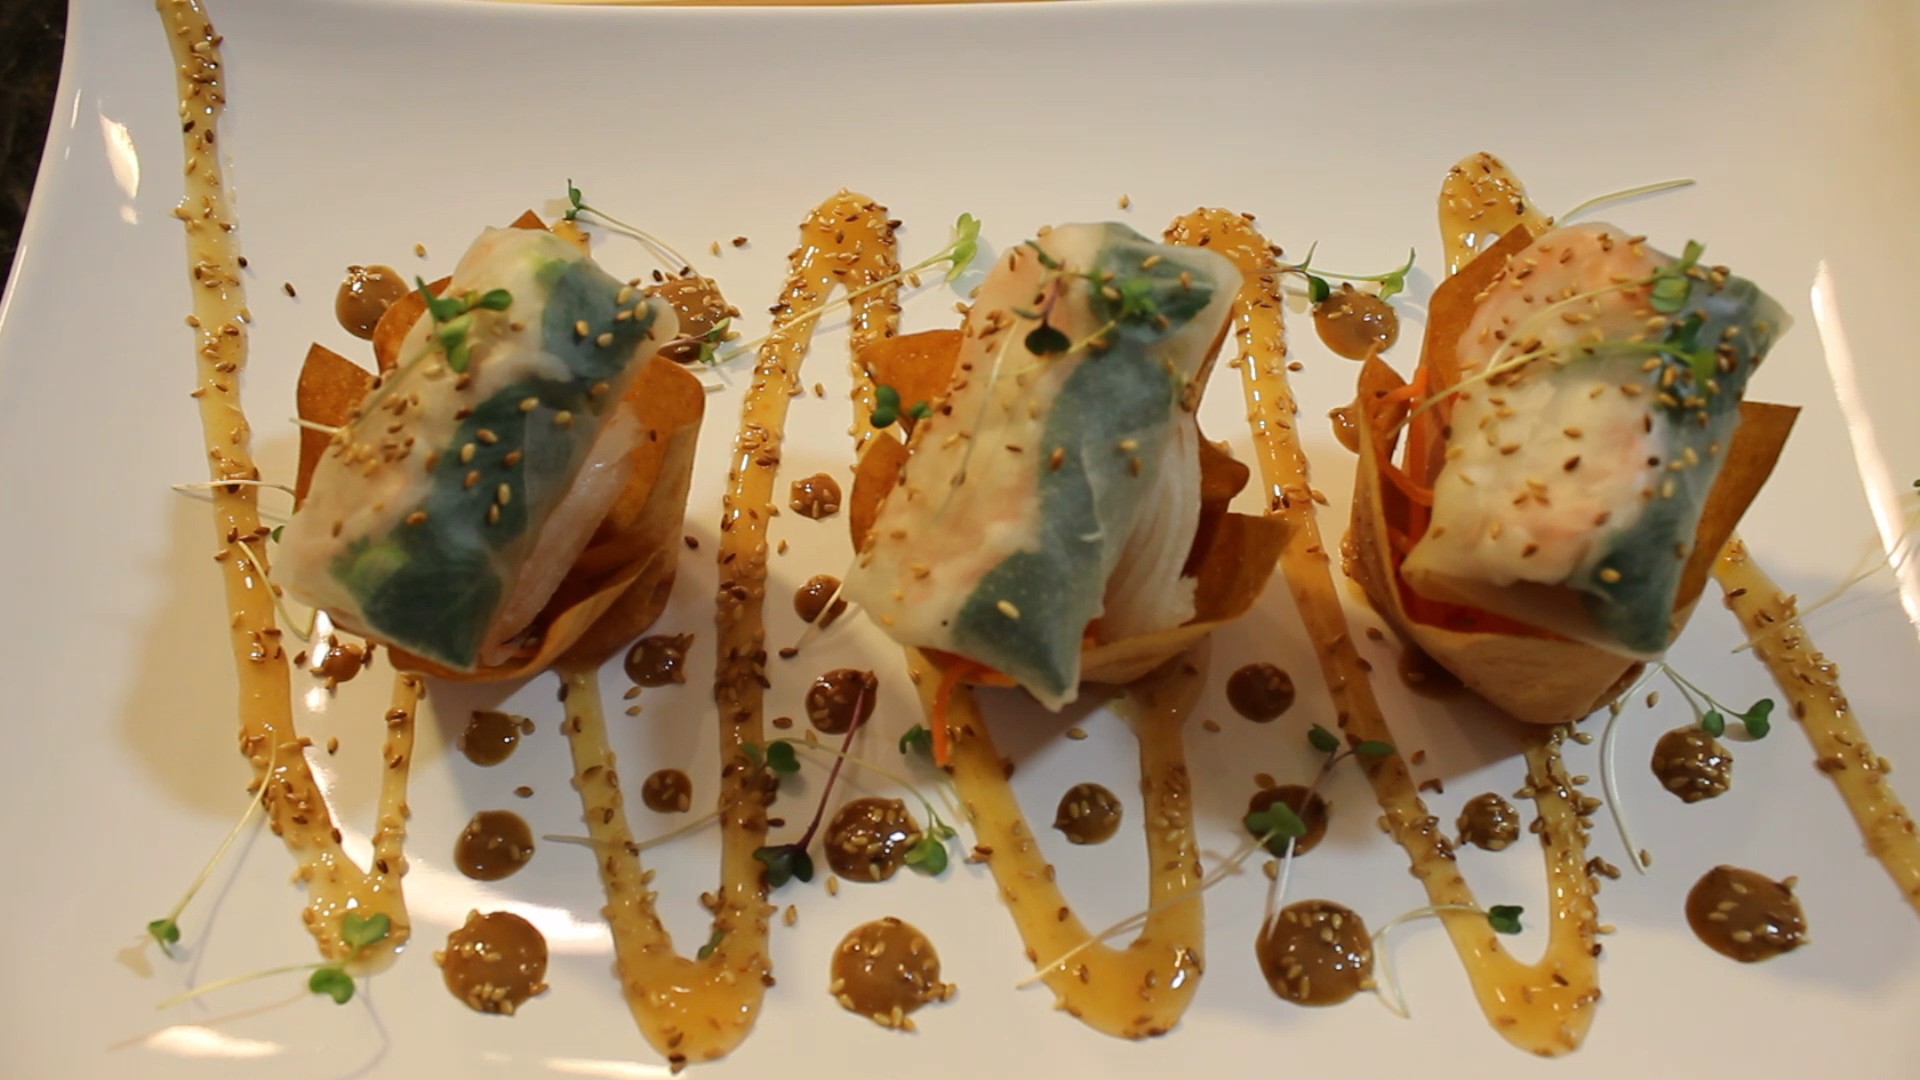
Well OK, I had a little organizing to do and a plate to figure out for my MasterChef casting call debut! I really wanted to wow them! The part about the “NO kitchen” and “come prepared” got me to thinking that a cold dish of some sort might be a wise way to go! An appetizer is probably the most logical then, right? Yes that’s it, it came to me. I would make my “Fresh Shrimp and Chive Rolls” with the new MasterChef sauces that I have created which I can decorate the plate with. A julienne of daikon radish, carrots and a sprinkle of toasted sesame seeds with micro herbs for some pizzaz would add in the finishing touches. I also thought I needed to add in some height so I came up with baked egg roll shells that I form in a cup cake pan. I got this idea from my “Bloody Mary shrimp and Mango-Curry Shrimp in Wonton cups at Nancy’s Show” except I decided to use egg rolls shells instead of won-ton because they are a little bit lighter.
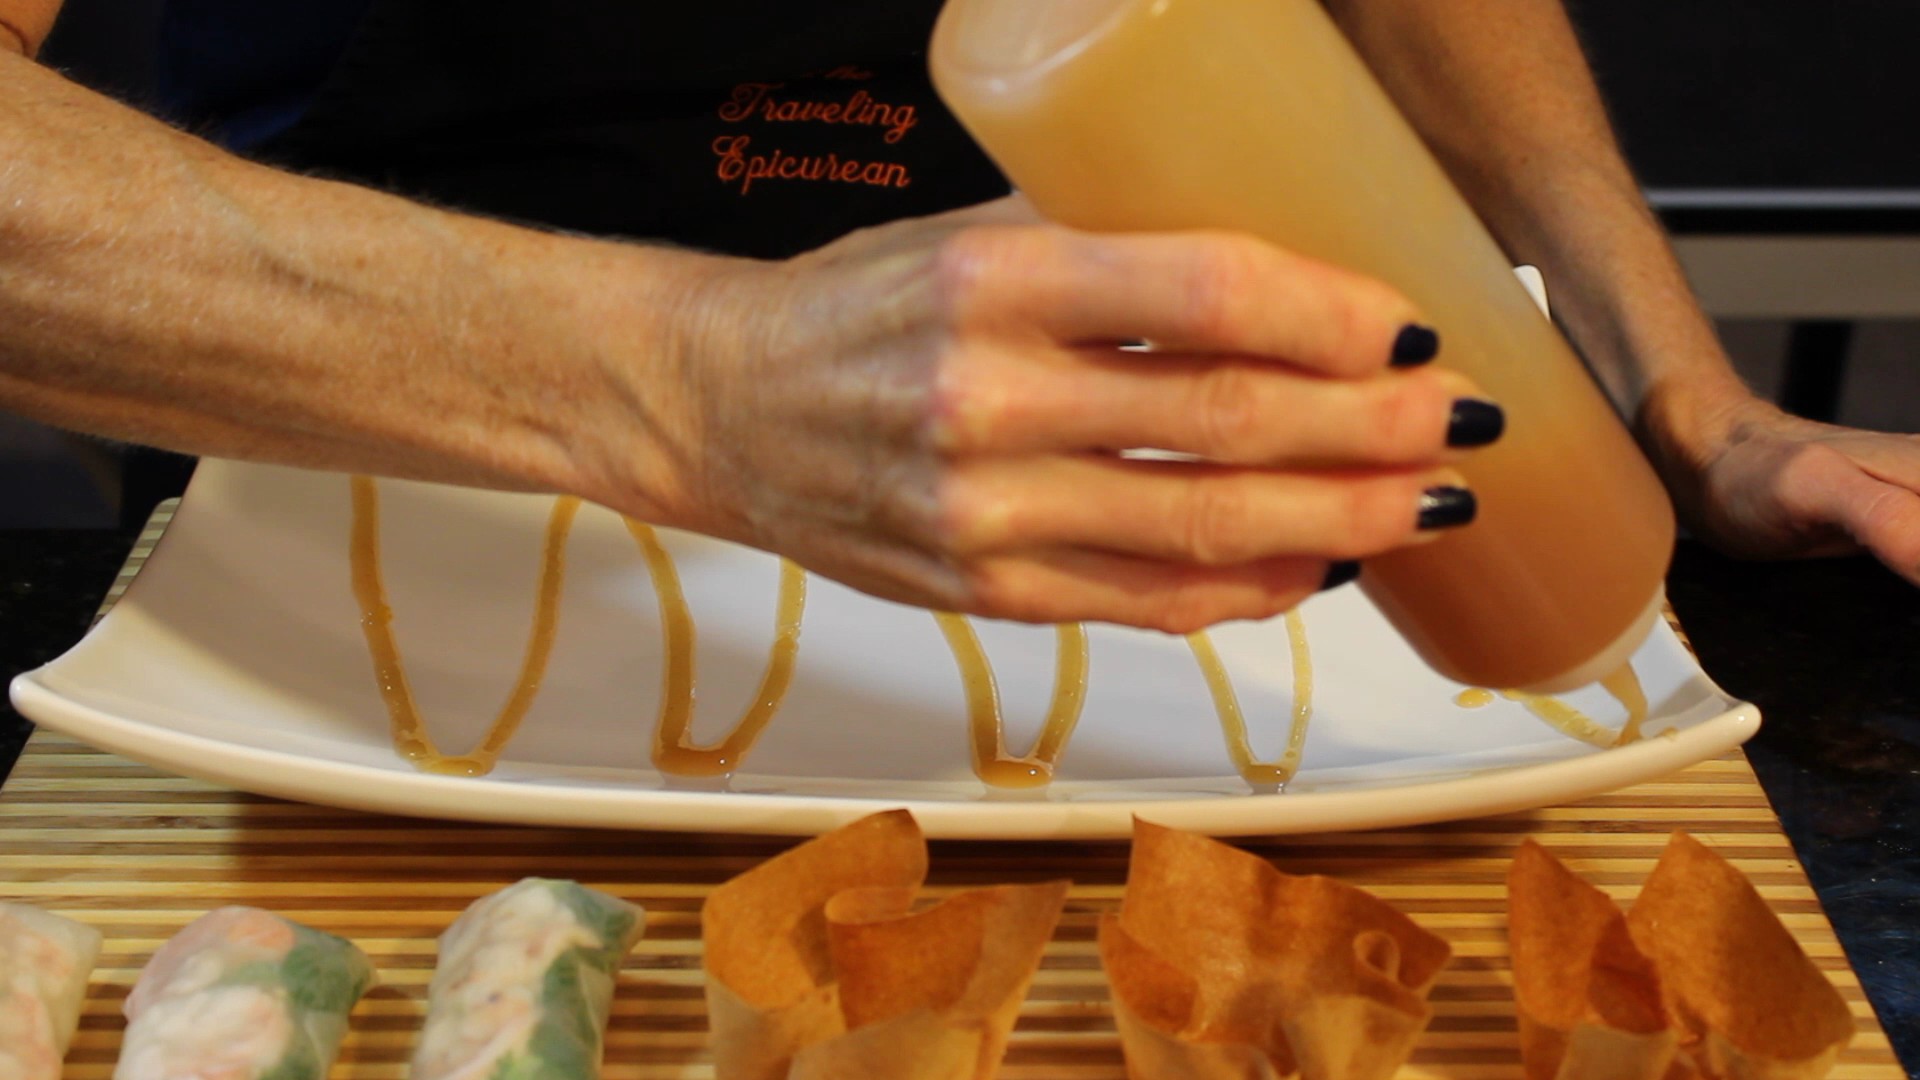
Now that I knew what I was going to make I thought I would practice my plate decorating with my MasterChef Sauces by shooting it in this weeks show so I could share this fun experience with all of you! It was definitely a lot of work to do this and go to the casting call but I did it! It was an awesome experience being there and the “MasterChef team” was pretty dynamite. They had everything down to a science and moved around with ease offering up a very warm welcome to all the competitors. I am super glad that I took Reilly and Bella’s advice on going for this.
I kicked you know what with my dish and the plating. I went there and did exactly what I set out to do with my presentation with 8 or so seconds left before they yelled “TIMES UP”! That part I have to say was such a RUSH because it reminded me of chopped!!! I was then the first to be called back in with 8 others for that first plate presentation part from our first group of 30 plating competitors. I might be over thinking all of this a little, but I was so tired from preparing the food and shooting the show I feel as though I forgot to prep myself on what exactly to say about “me” when they pulled us 8 into interview. Although, I had them laughing a bit. I got the feeling what was more important to them was the person who said the right things in that second interviewing, more character notfood ability. Gods only knows I do have lots of that so if it doesn’t work out this time I NOW know what they want next time around! I still have to wait until the end of October to see if I hear from them (they are still traveling to other states). I had an incredible time and will keep you all posted. Thank you all for your support, it means a lot! Hope you enjoy “My MasterChef Sauces” Show!
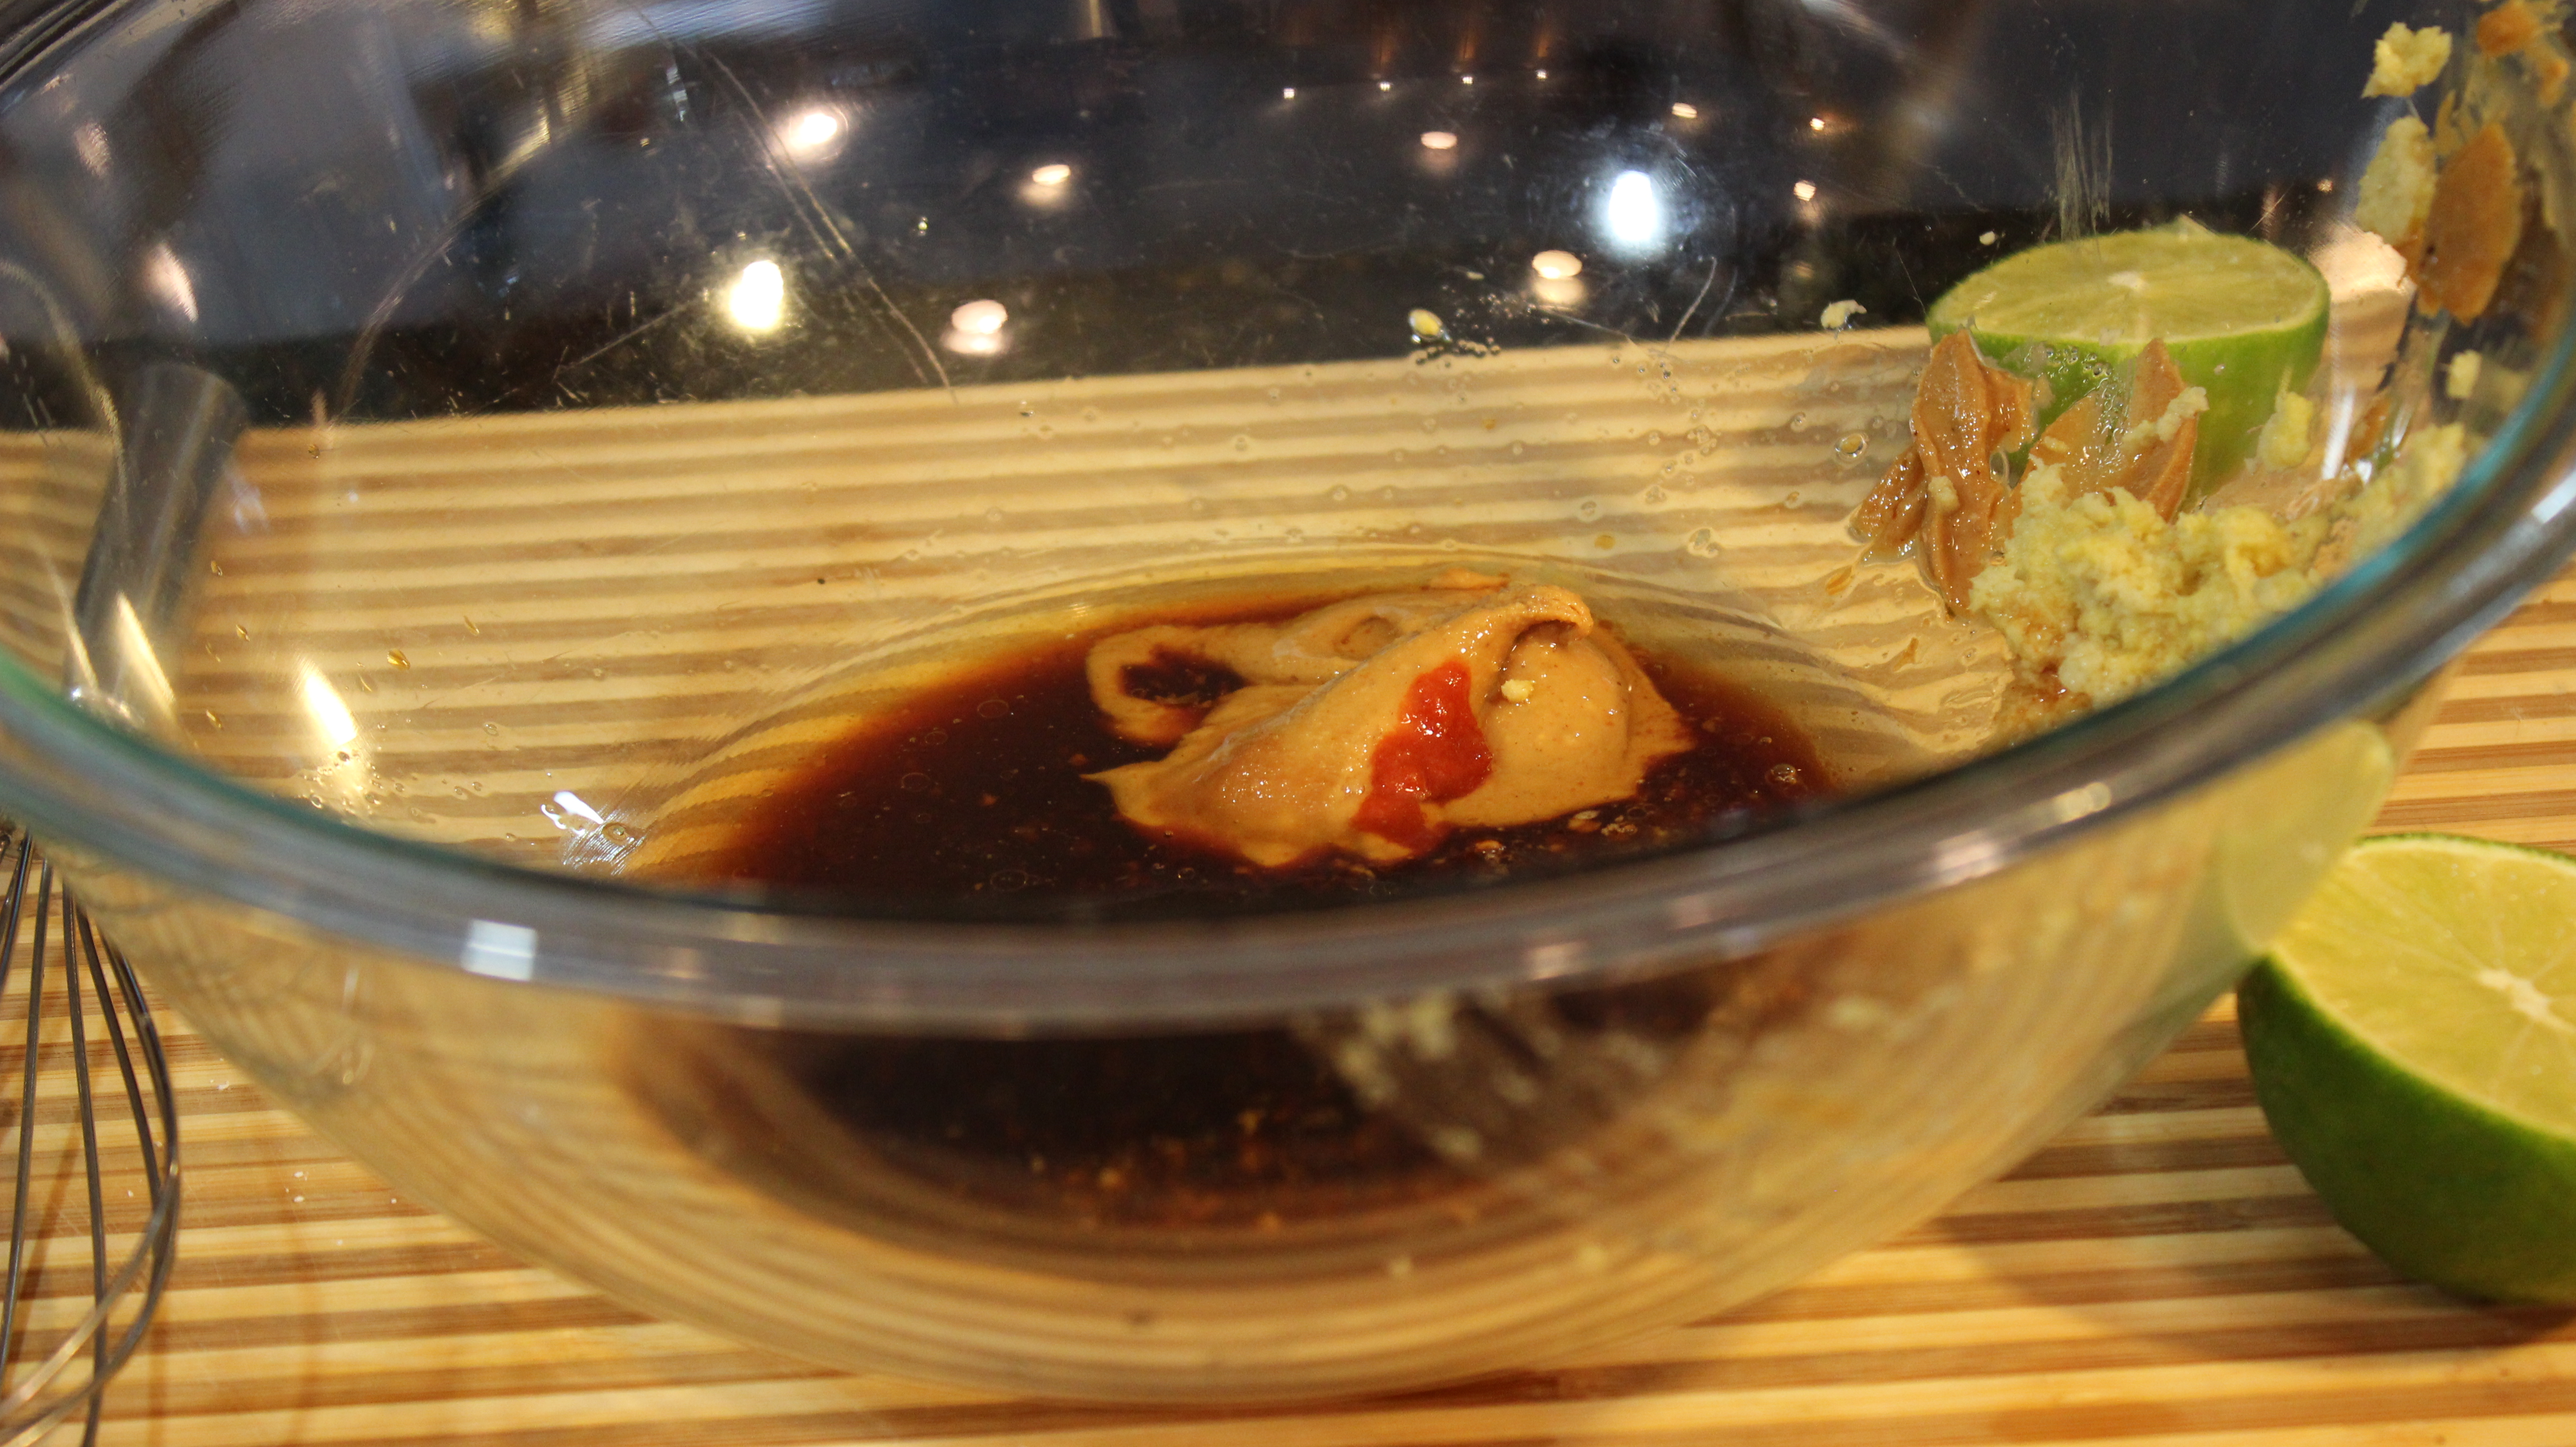
Ingredients for Ginger-Peanut Sesame Sauce:
3 tbsp smooth peanut butter (Teddy’s All Natural)
1/4 cup soy sauce
2 tbsp toasted sesame oil
1 1/2 tbsp vegetable oil
1 tbsp rice wine vinegar
1 tbsp red wine vinegar
1/2 tsp wasabi powder
2 tbsp sugar
1/2-1 tsp Siracha (can find this next to Tabasco products)
1 whole lime
1 tbsp corn starch dissolved in 3 tbsp pineapple juice – Use 1 1/2 tsp of this
1 tbsp fresh grated ginger
2 tbsp half and half
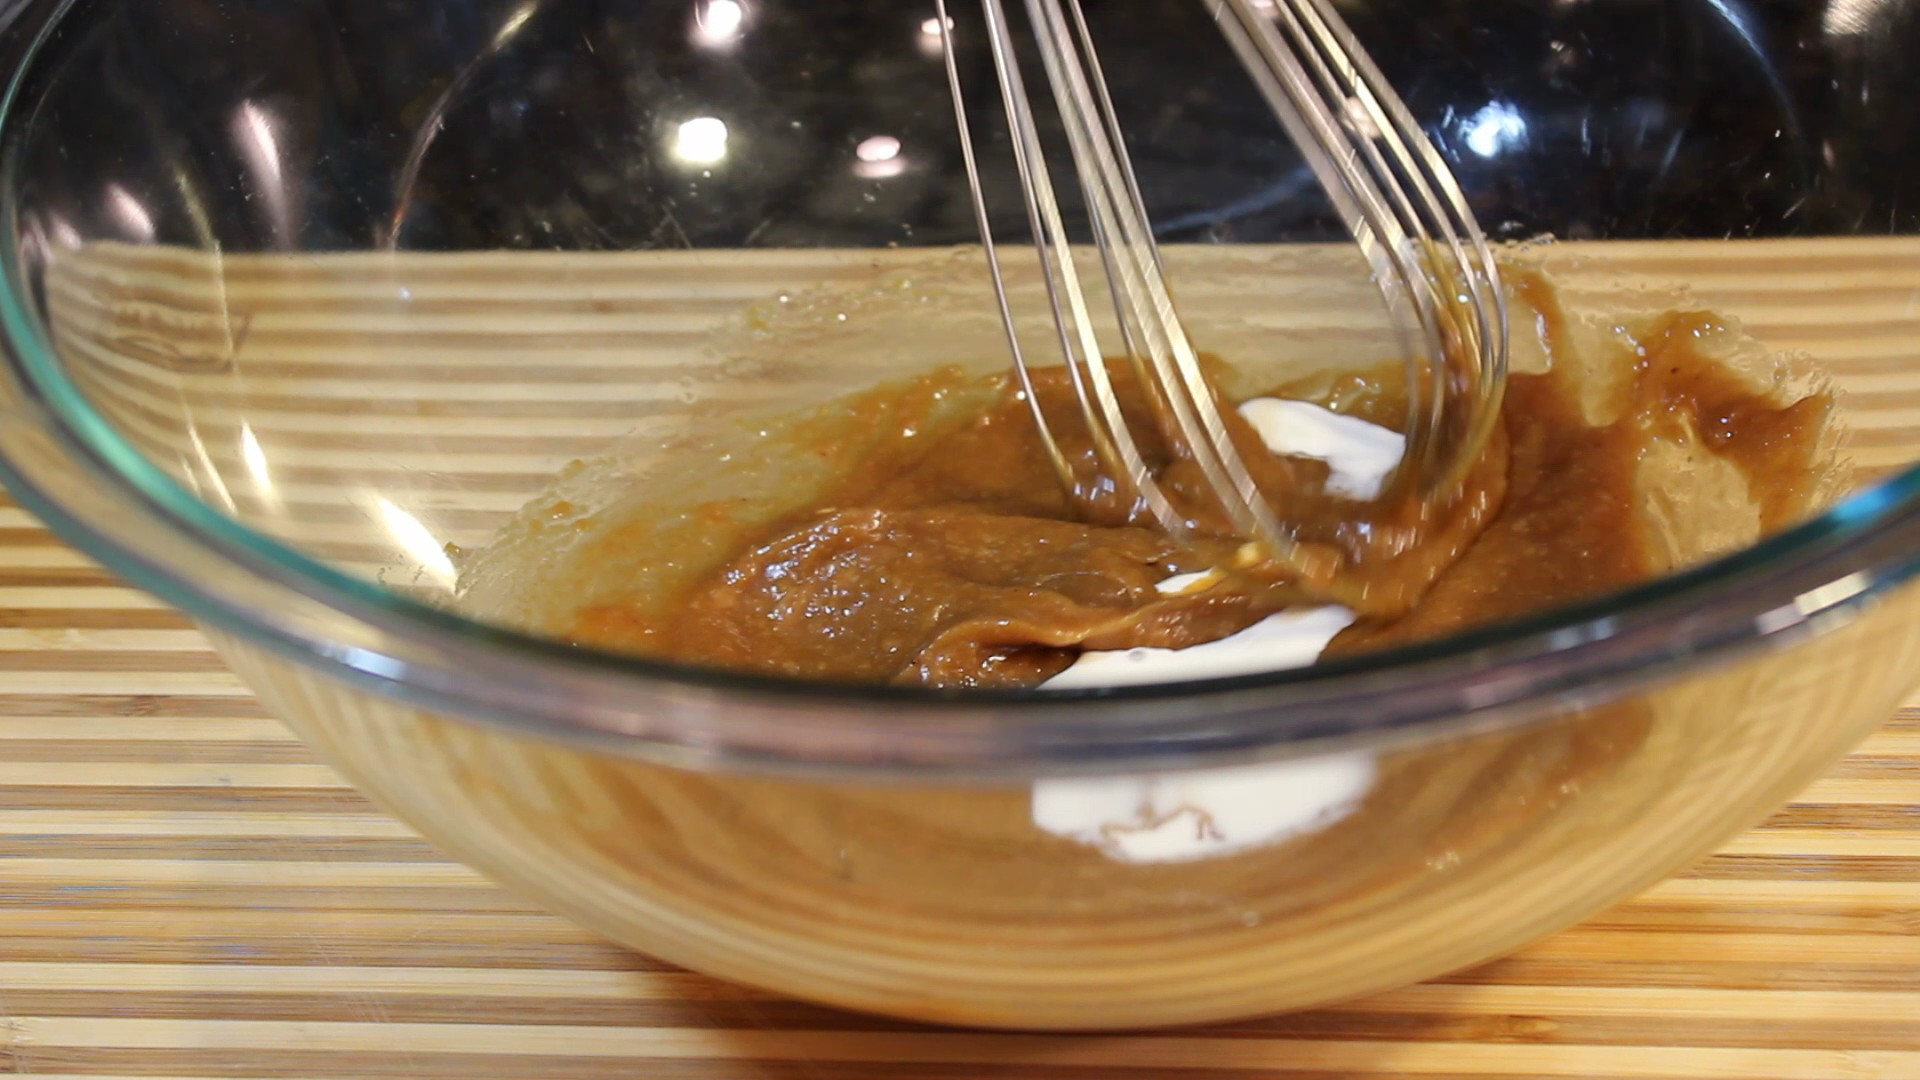
Directions for Ginger-Peanut Sesame Sauce:
Add all of the ingredients to a large bowl (EXCEPT corn starch mixture) and whisk
Squeeze only 1/2 of the lime in at this point
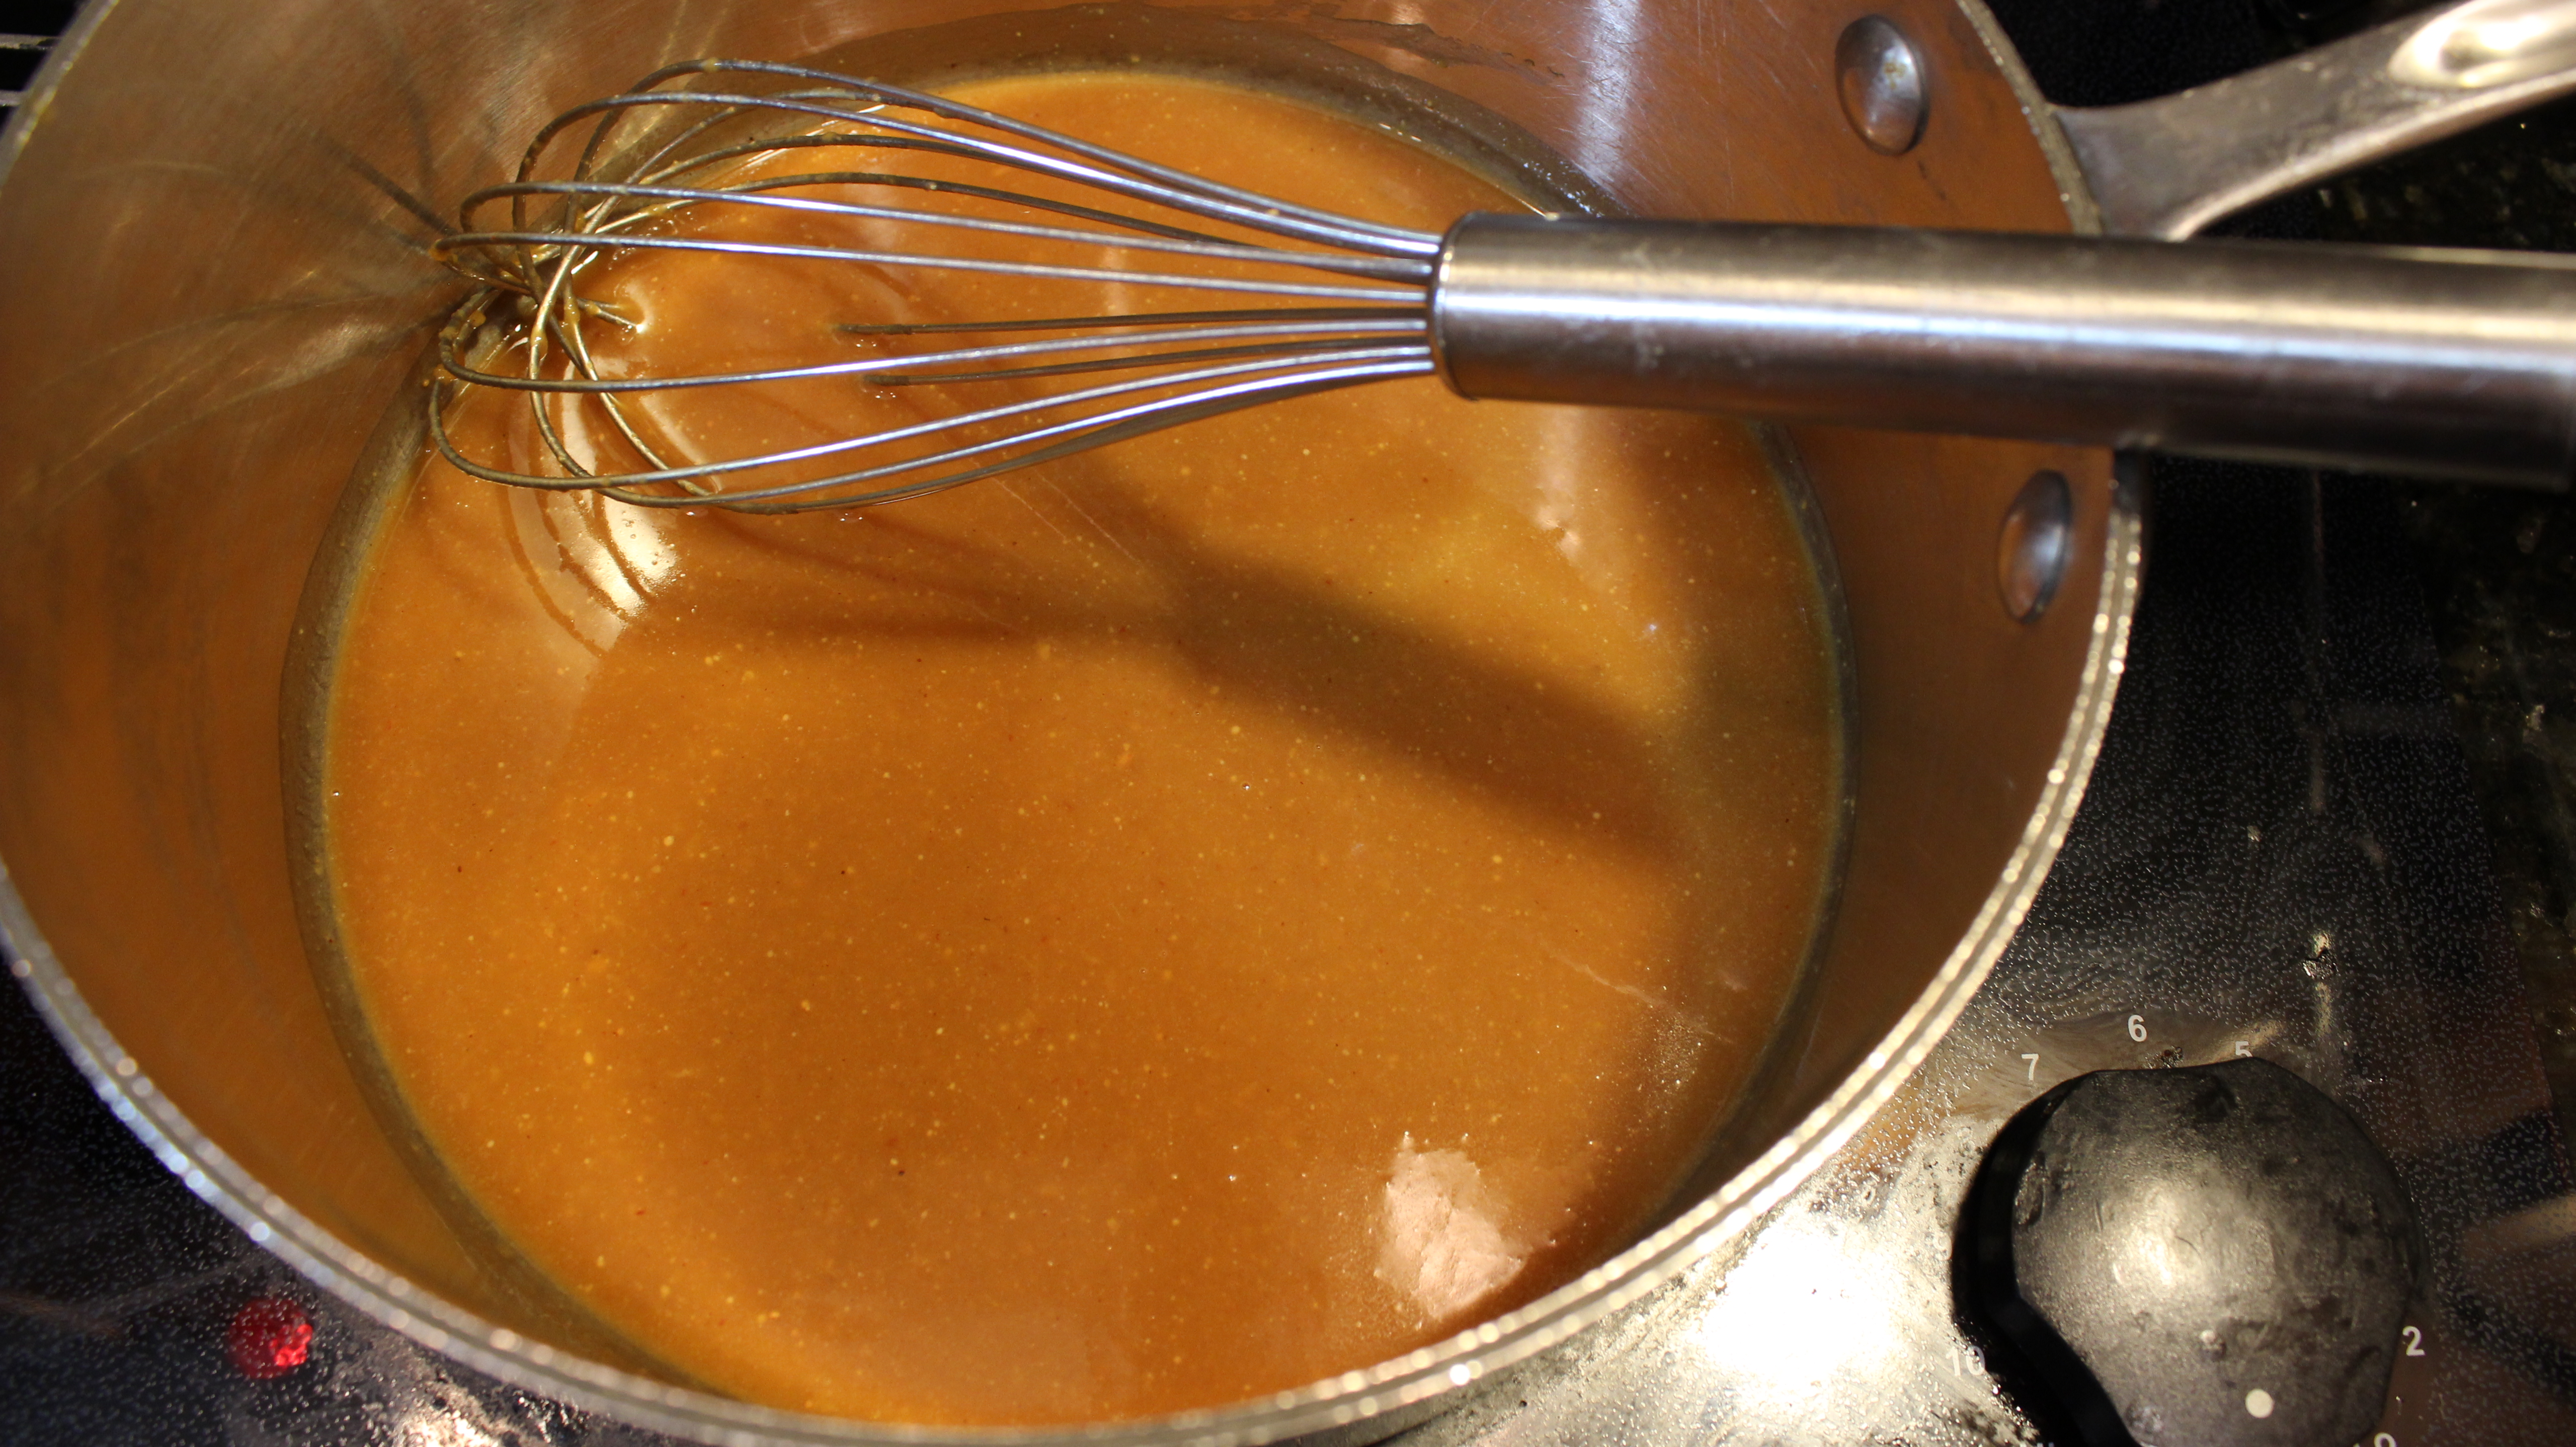
Add to medium pan over medium/high bring to a low simmer – whisking constantly this will be about 2-3 minutes
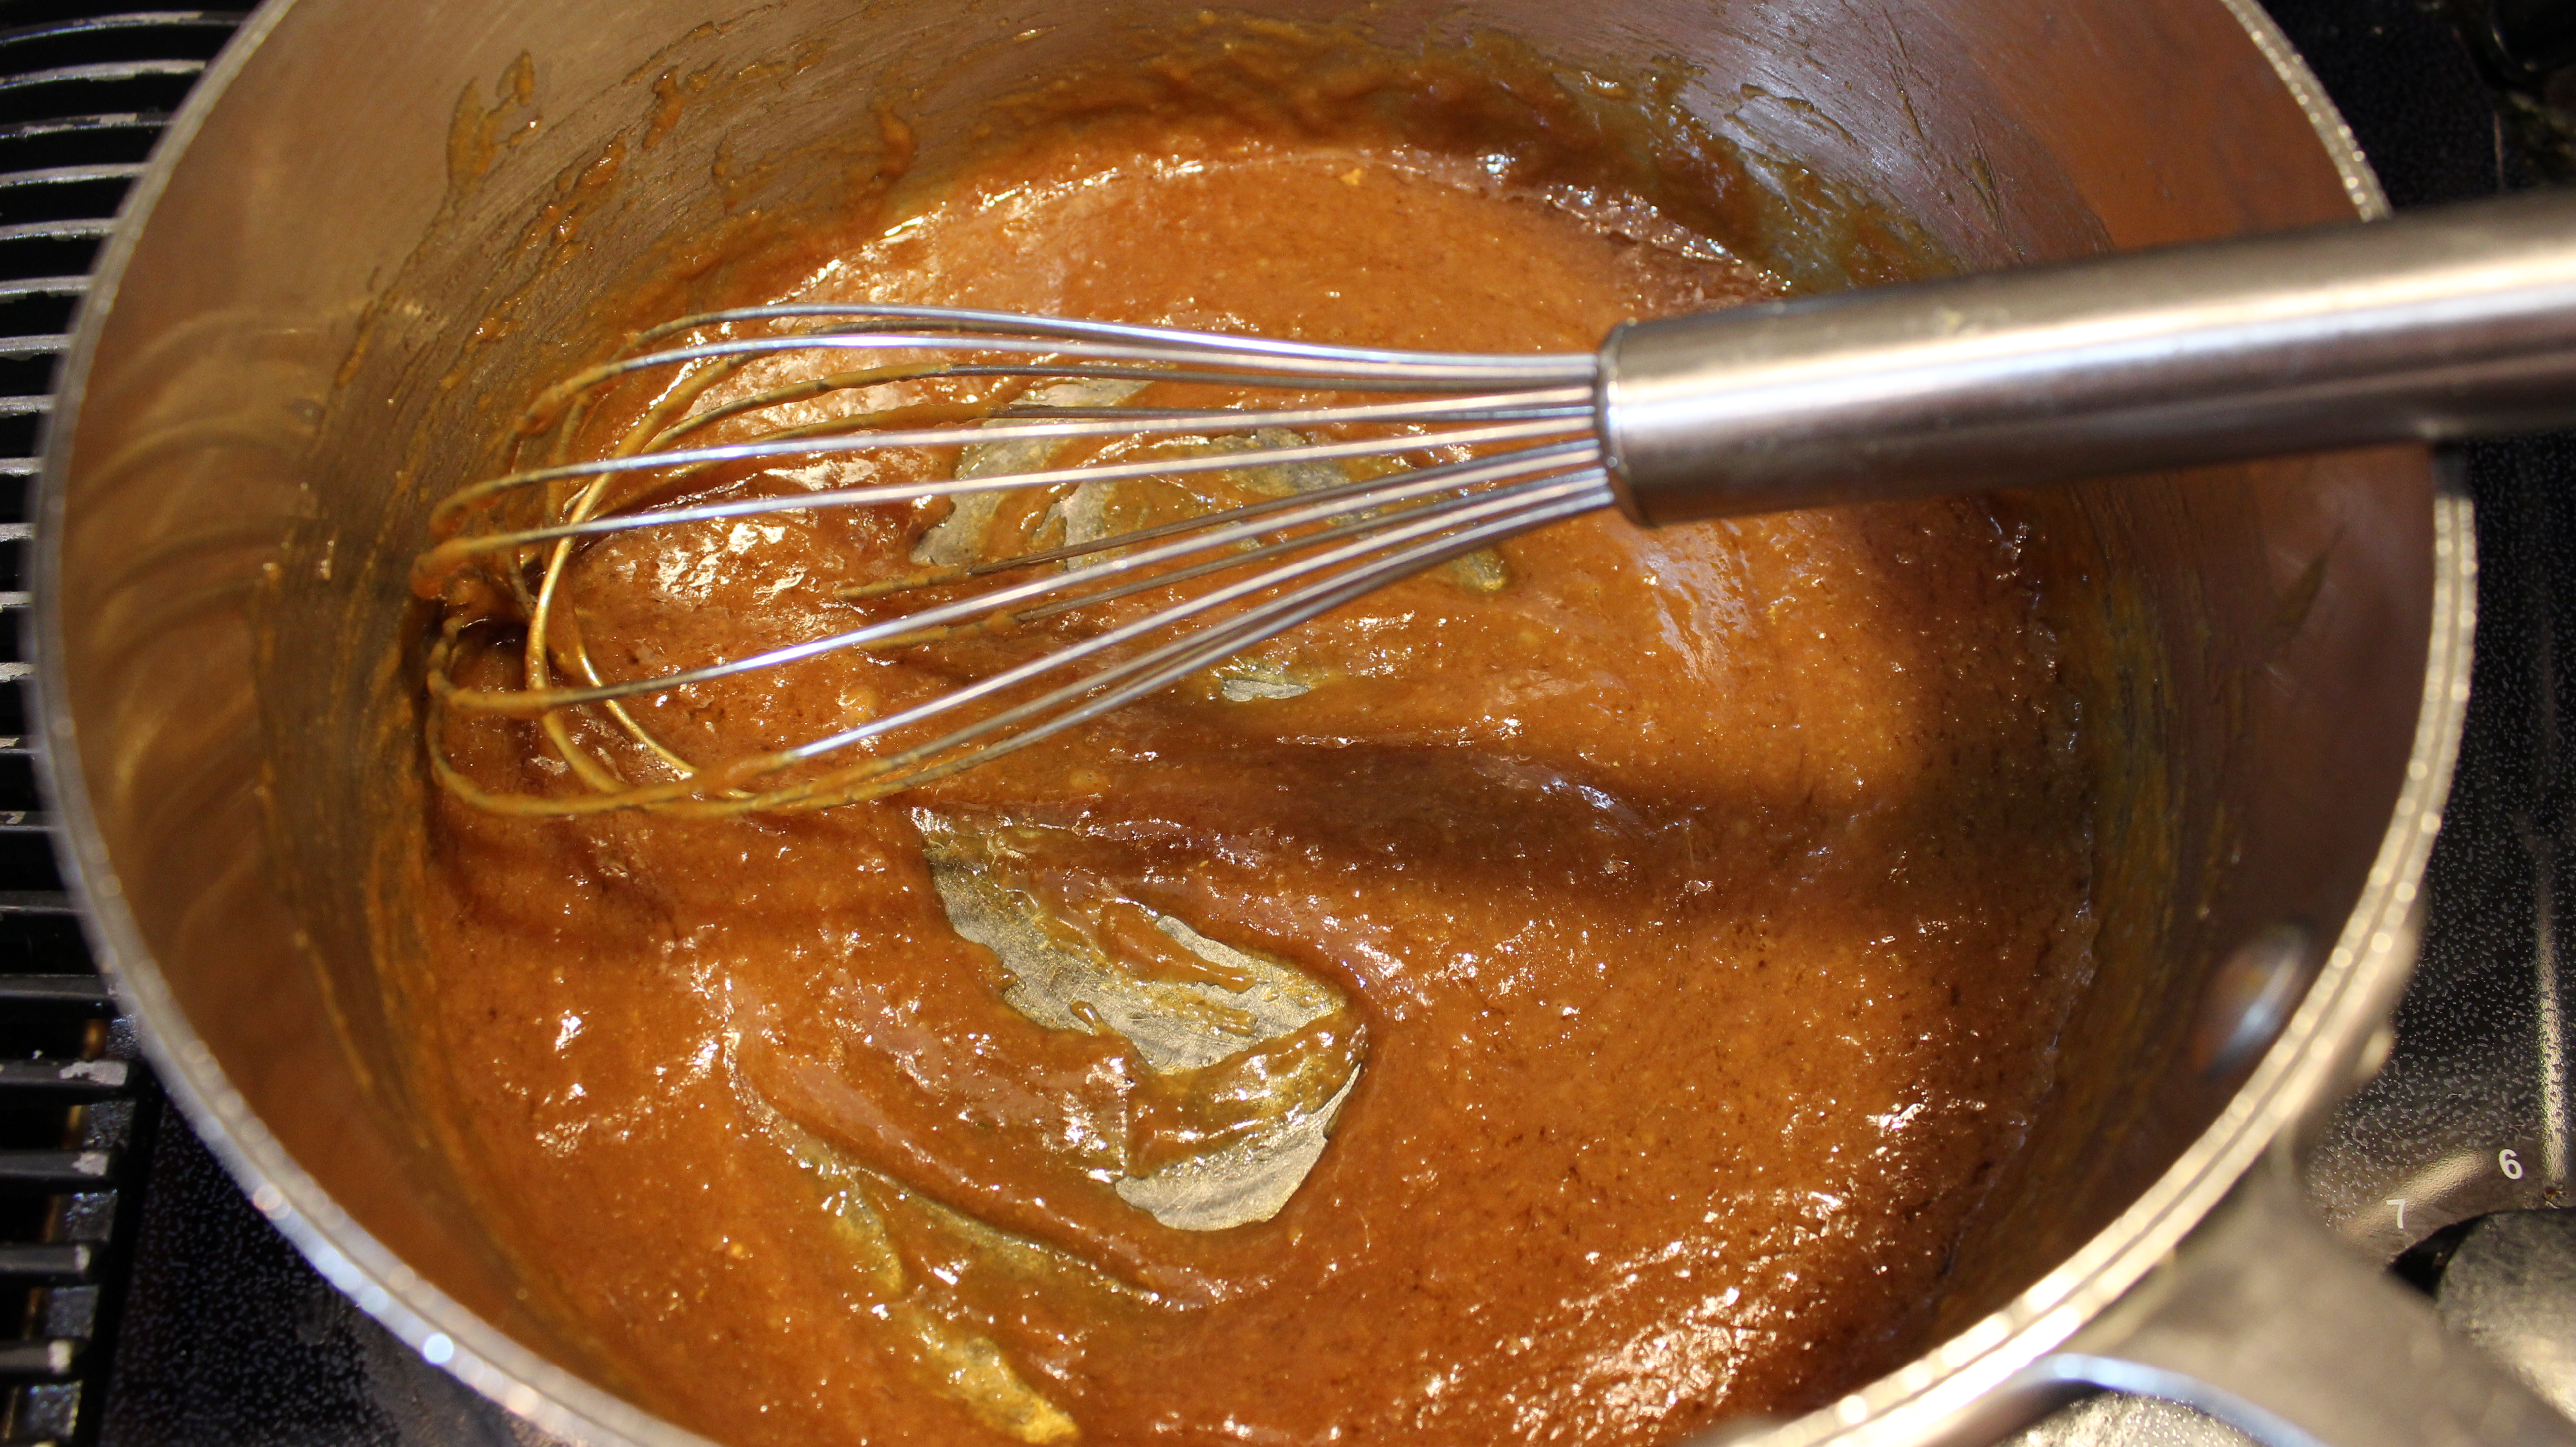
When this begins to thicken turn down to med/low and add in 1 1/2 tsp of corn starch mixture and keep whisking- this will be about 3-4 minutes
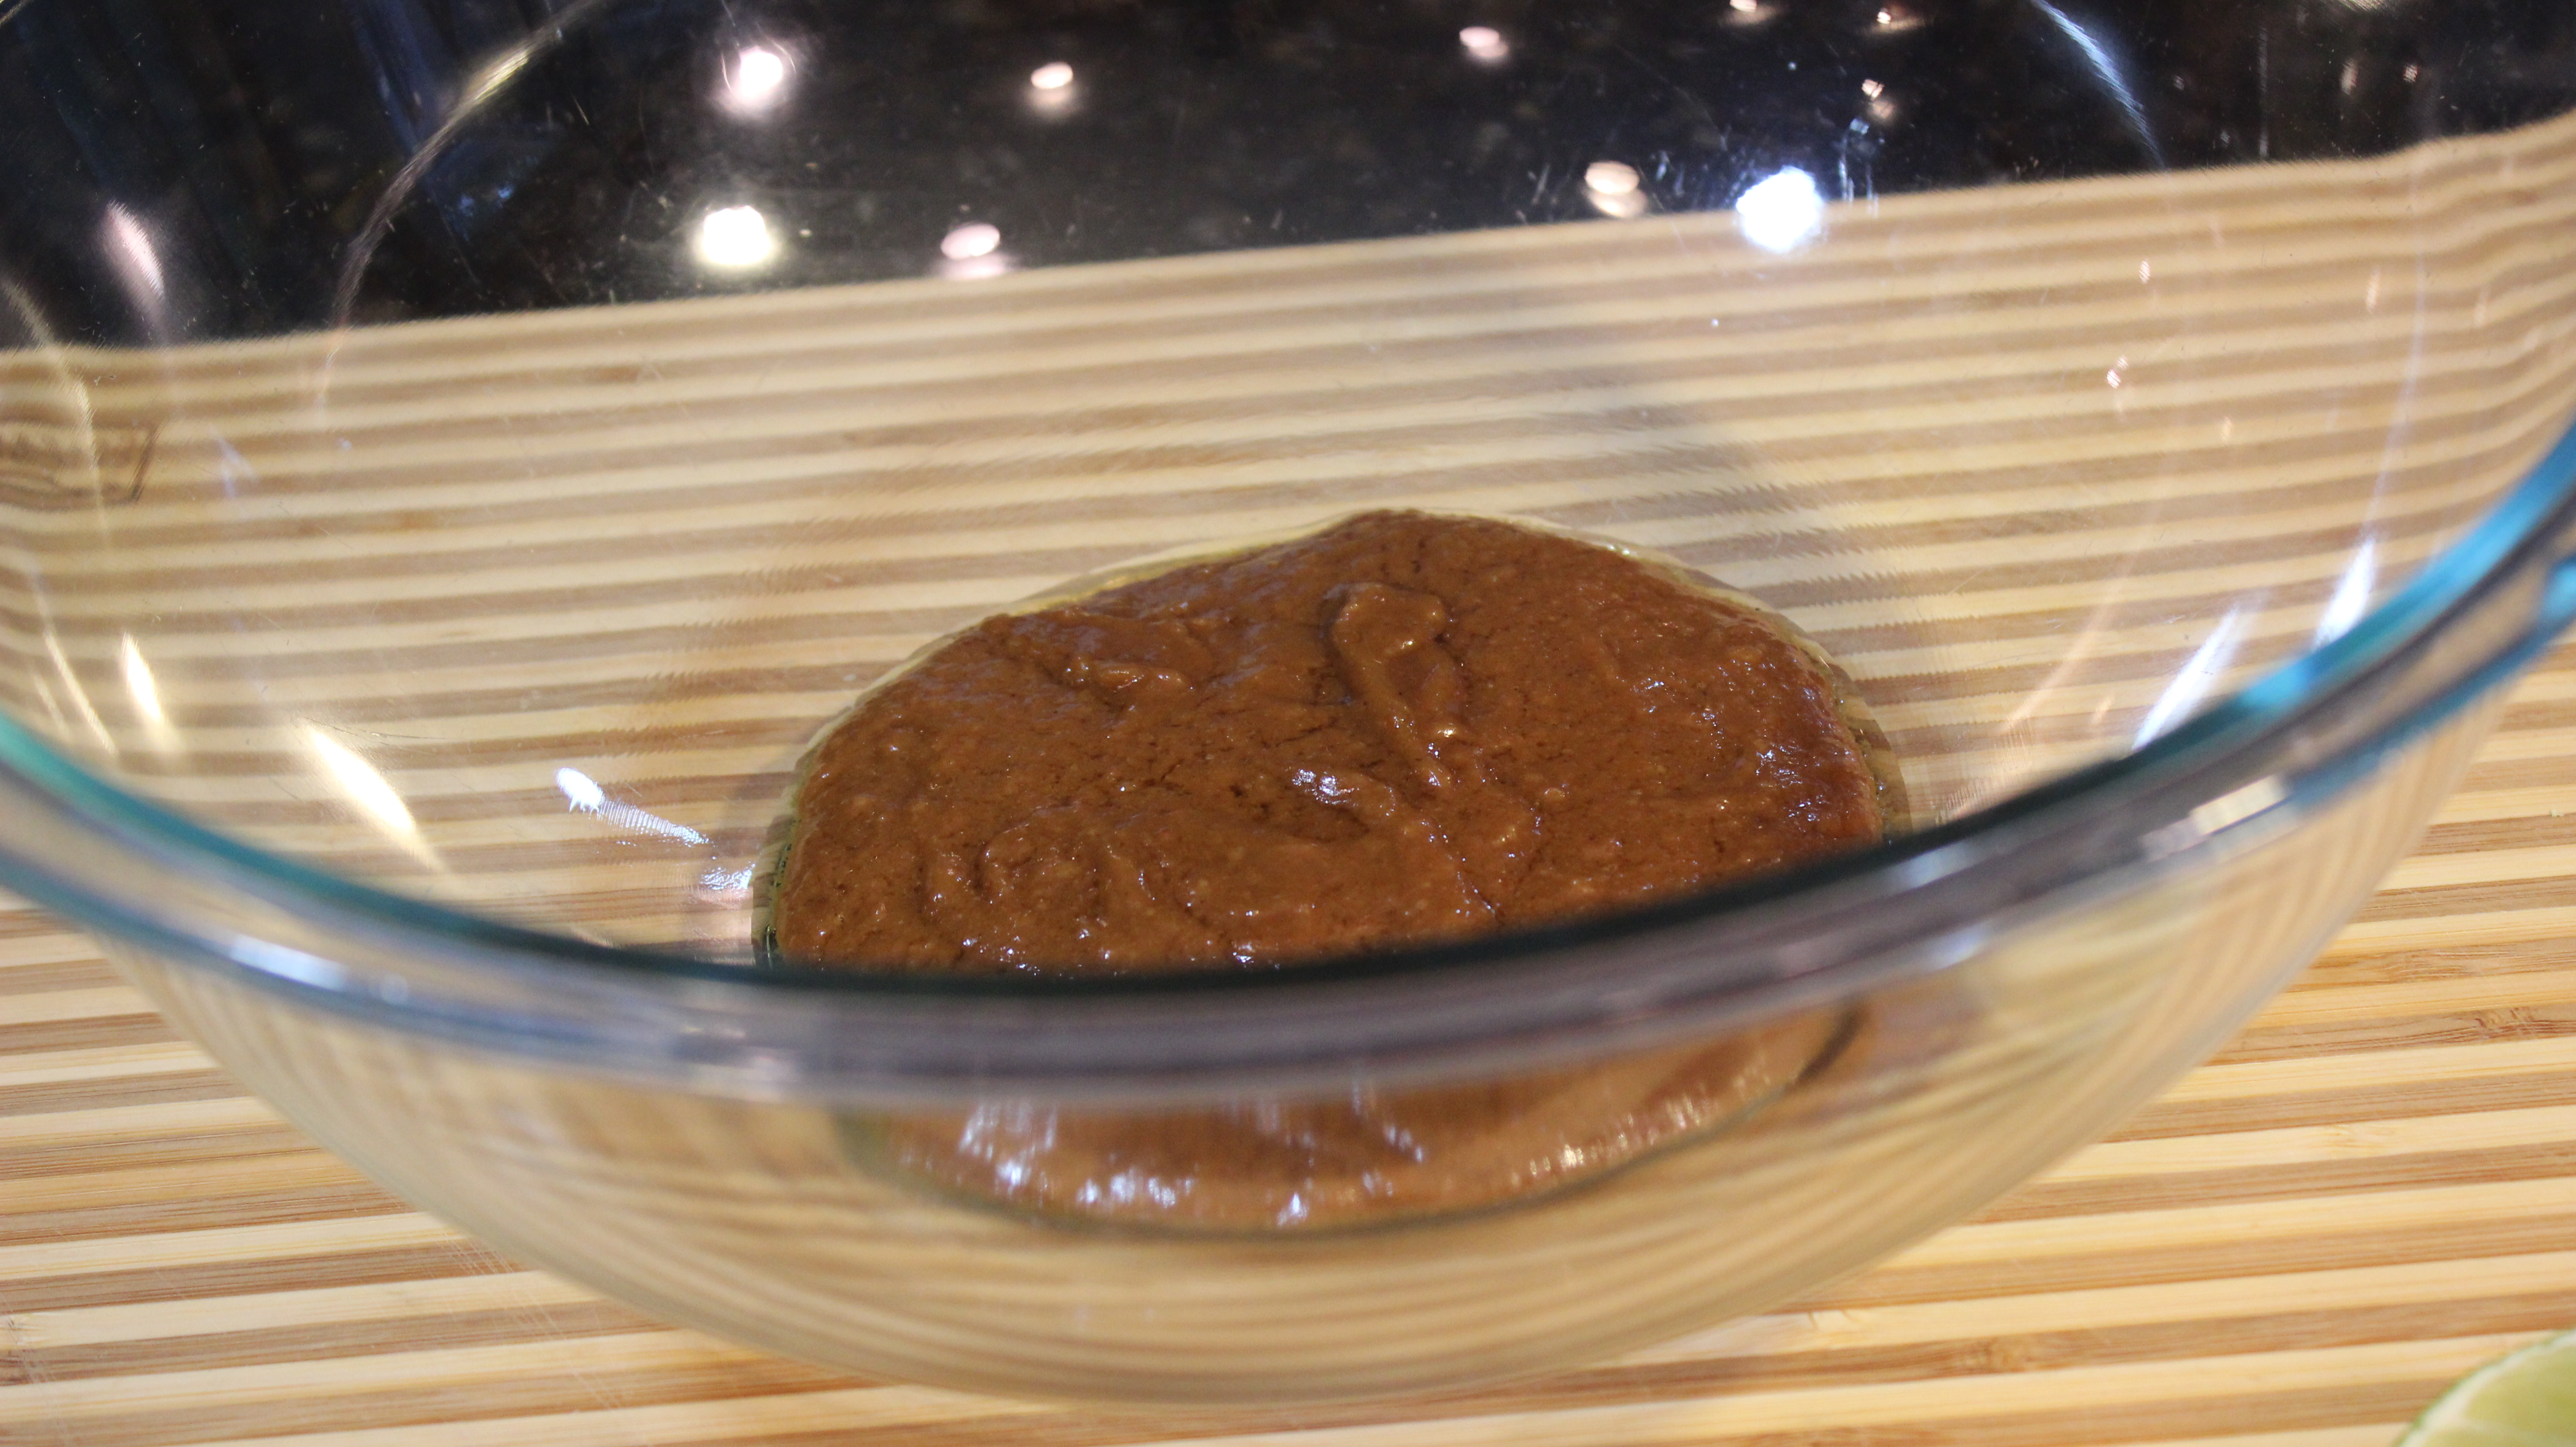
Remove from stove and cool
When cooled add in 2 tbsp half and half and a squeeze of the other half of the lime and whisk briefly til smooth
Add to ramekins for a dipping sauce or put into squeeze bottle to decorate plate with
Ingredients for Spicy, Sweet and Sour Mango Sauce:
1 cup pineapple juice
1/2 cup mango
1/4 cup red wine vinegar
1/4 cup sugar
1 tsp ketchup
1 tsp fresh grated ginger
1 tsp Siracha
1/8 tsp salt
2 tbsp corn starch dissolved in 3 tbsp water
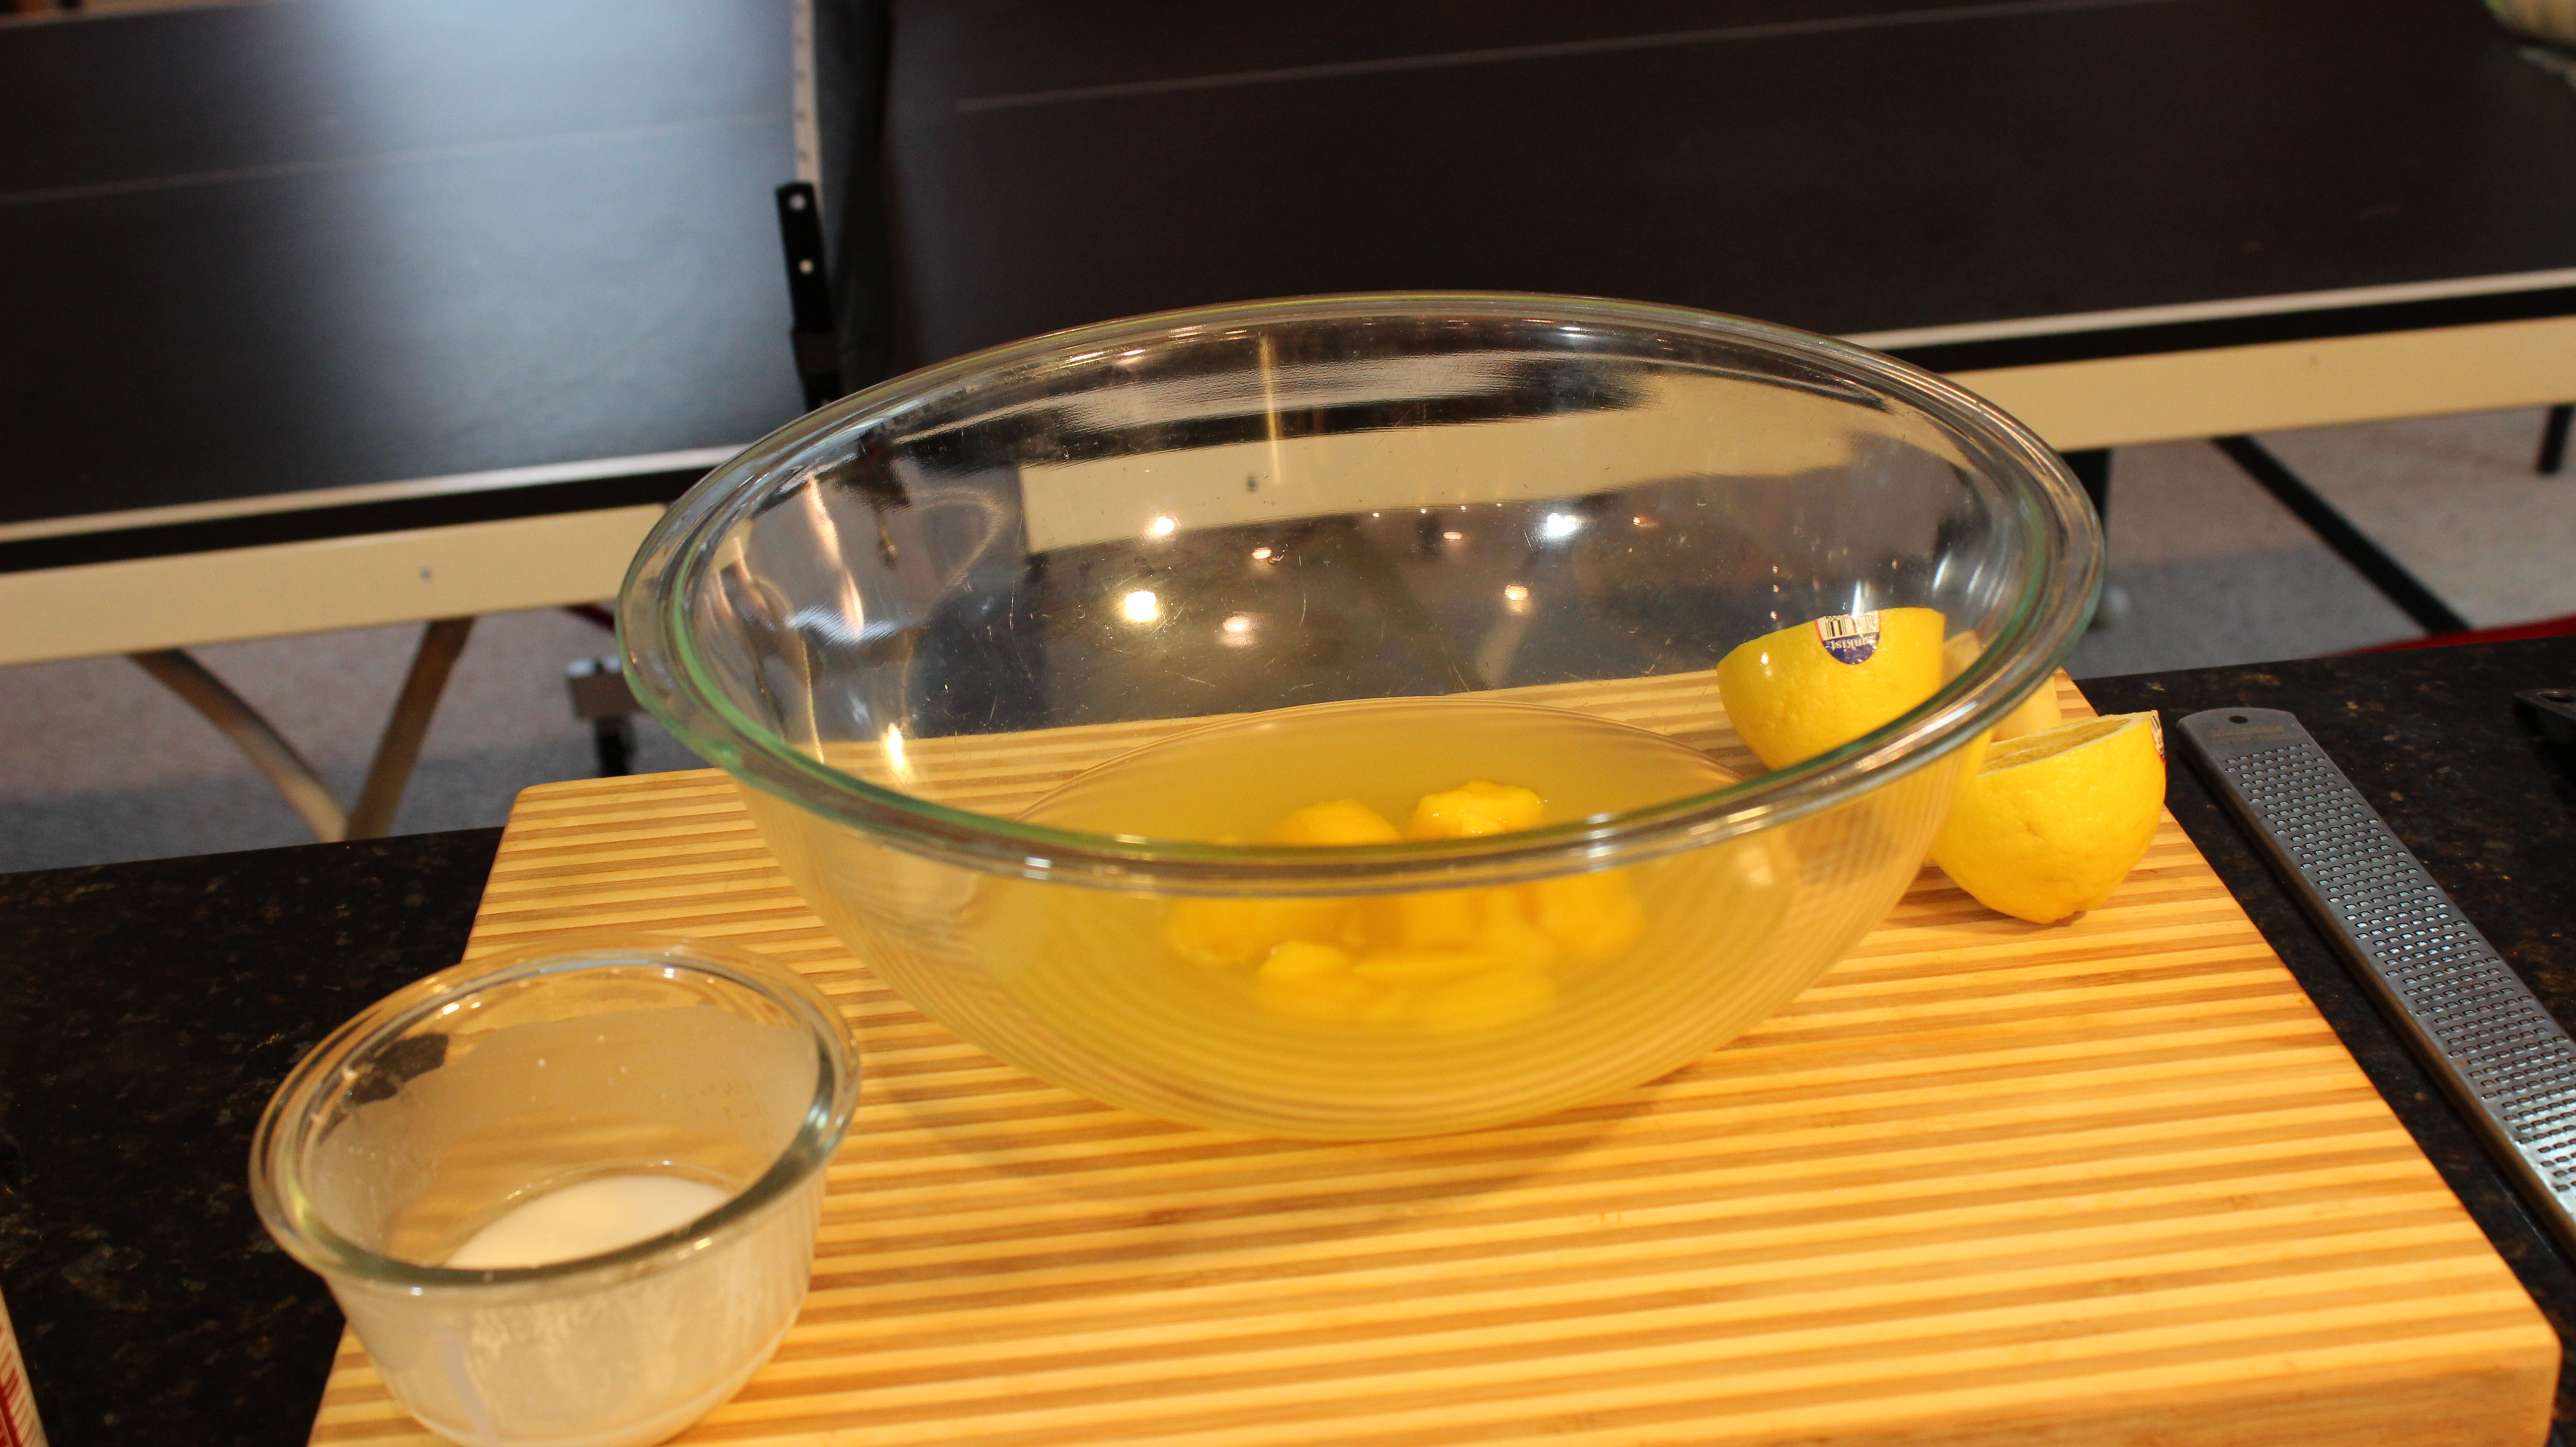
1 lemon
Directionsfor Spicy, Sweet and Sour Mango Sauce:
Add all of the ingredients to a large bowl except the corn starch mixture
Whisk til combined – use juice from 1/2 lemon here
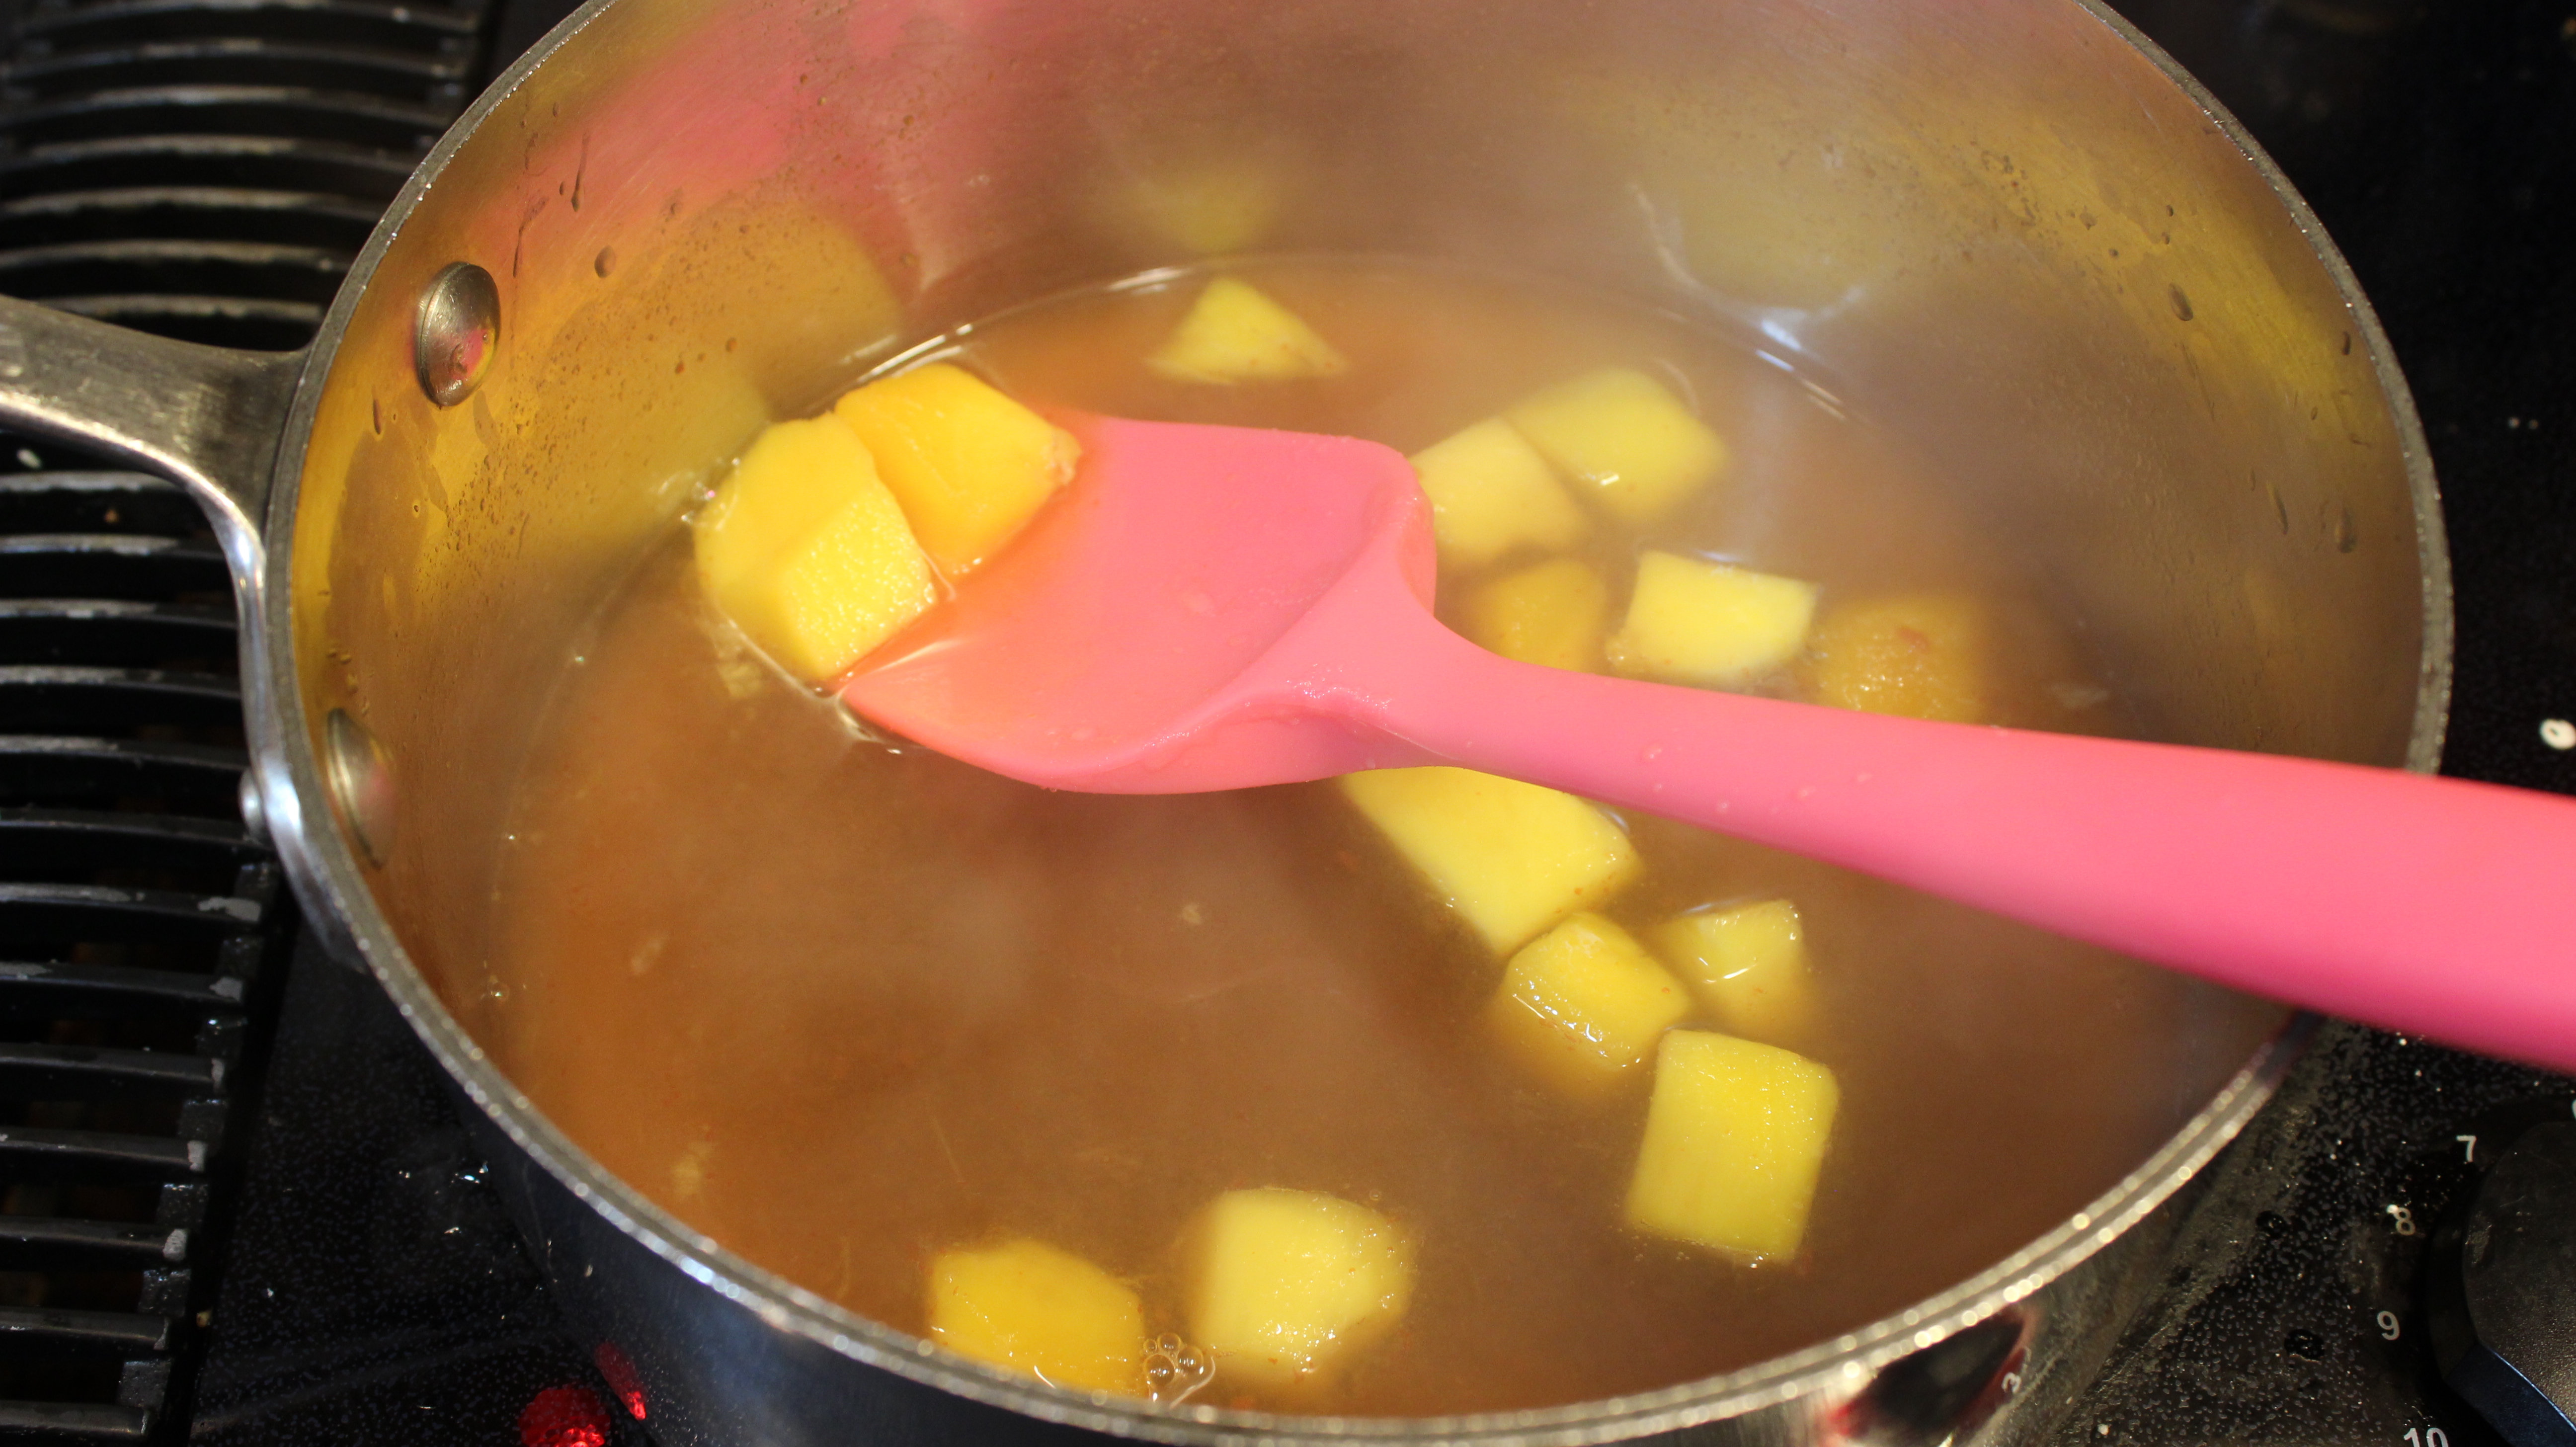
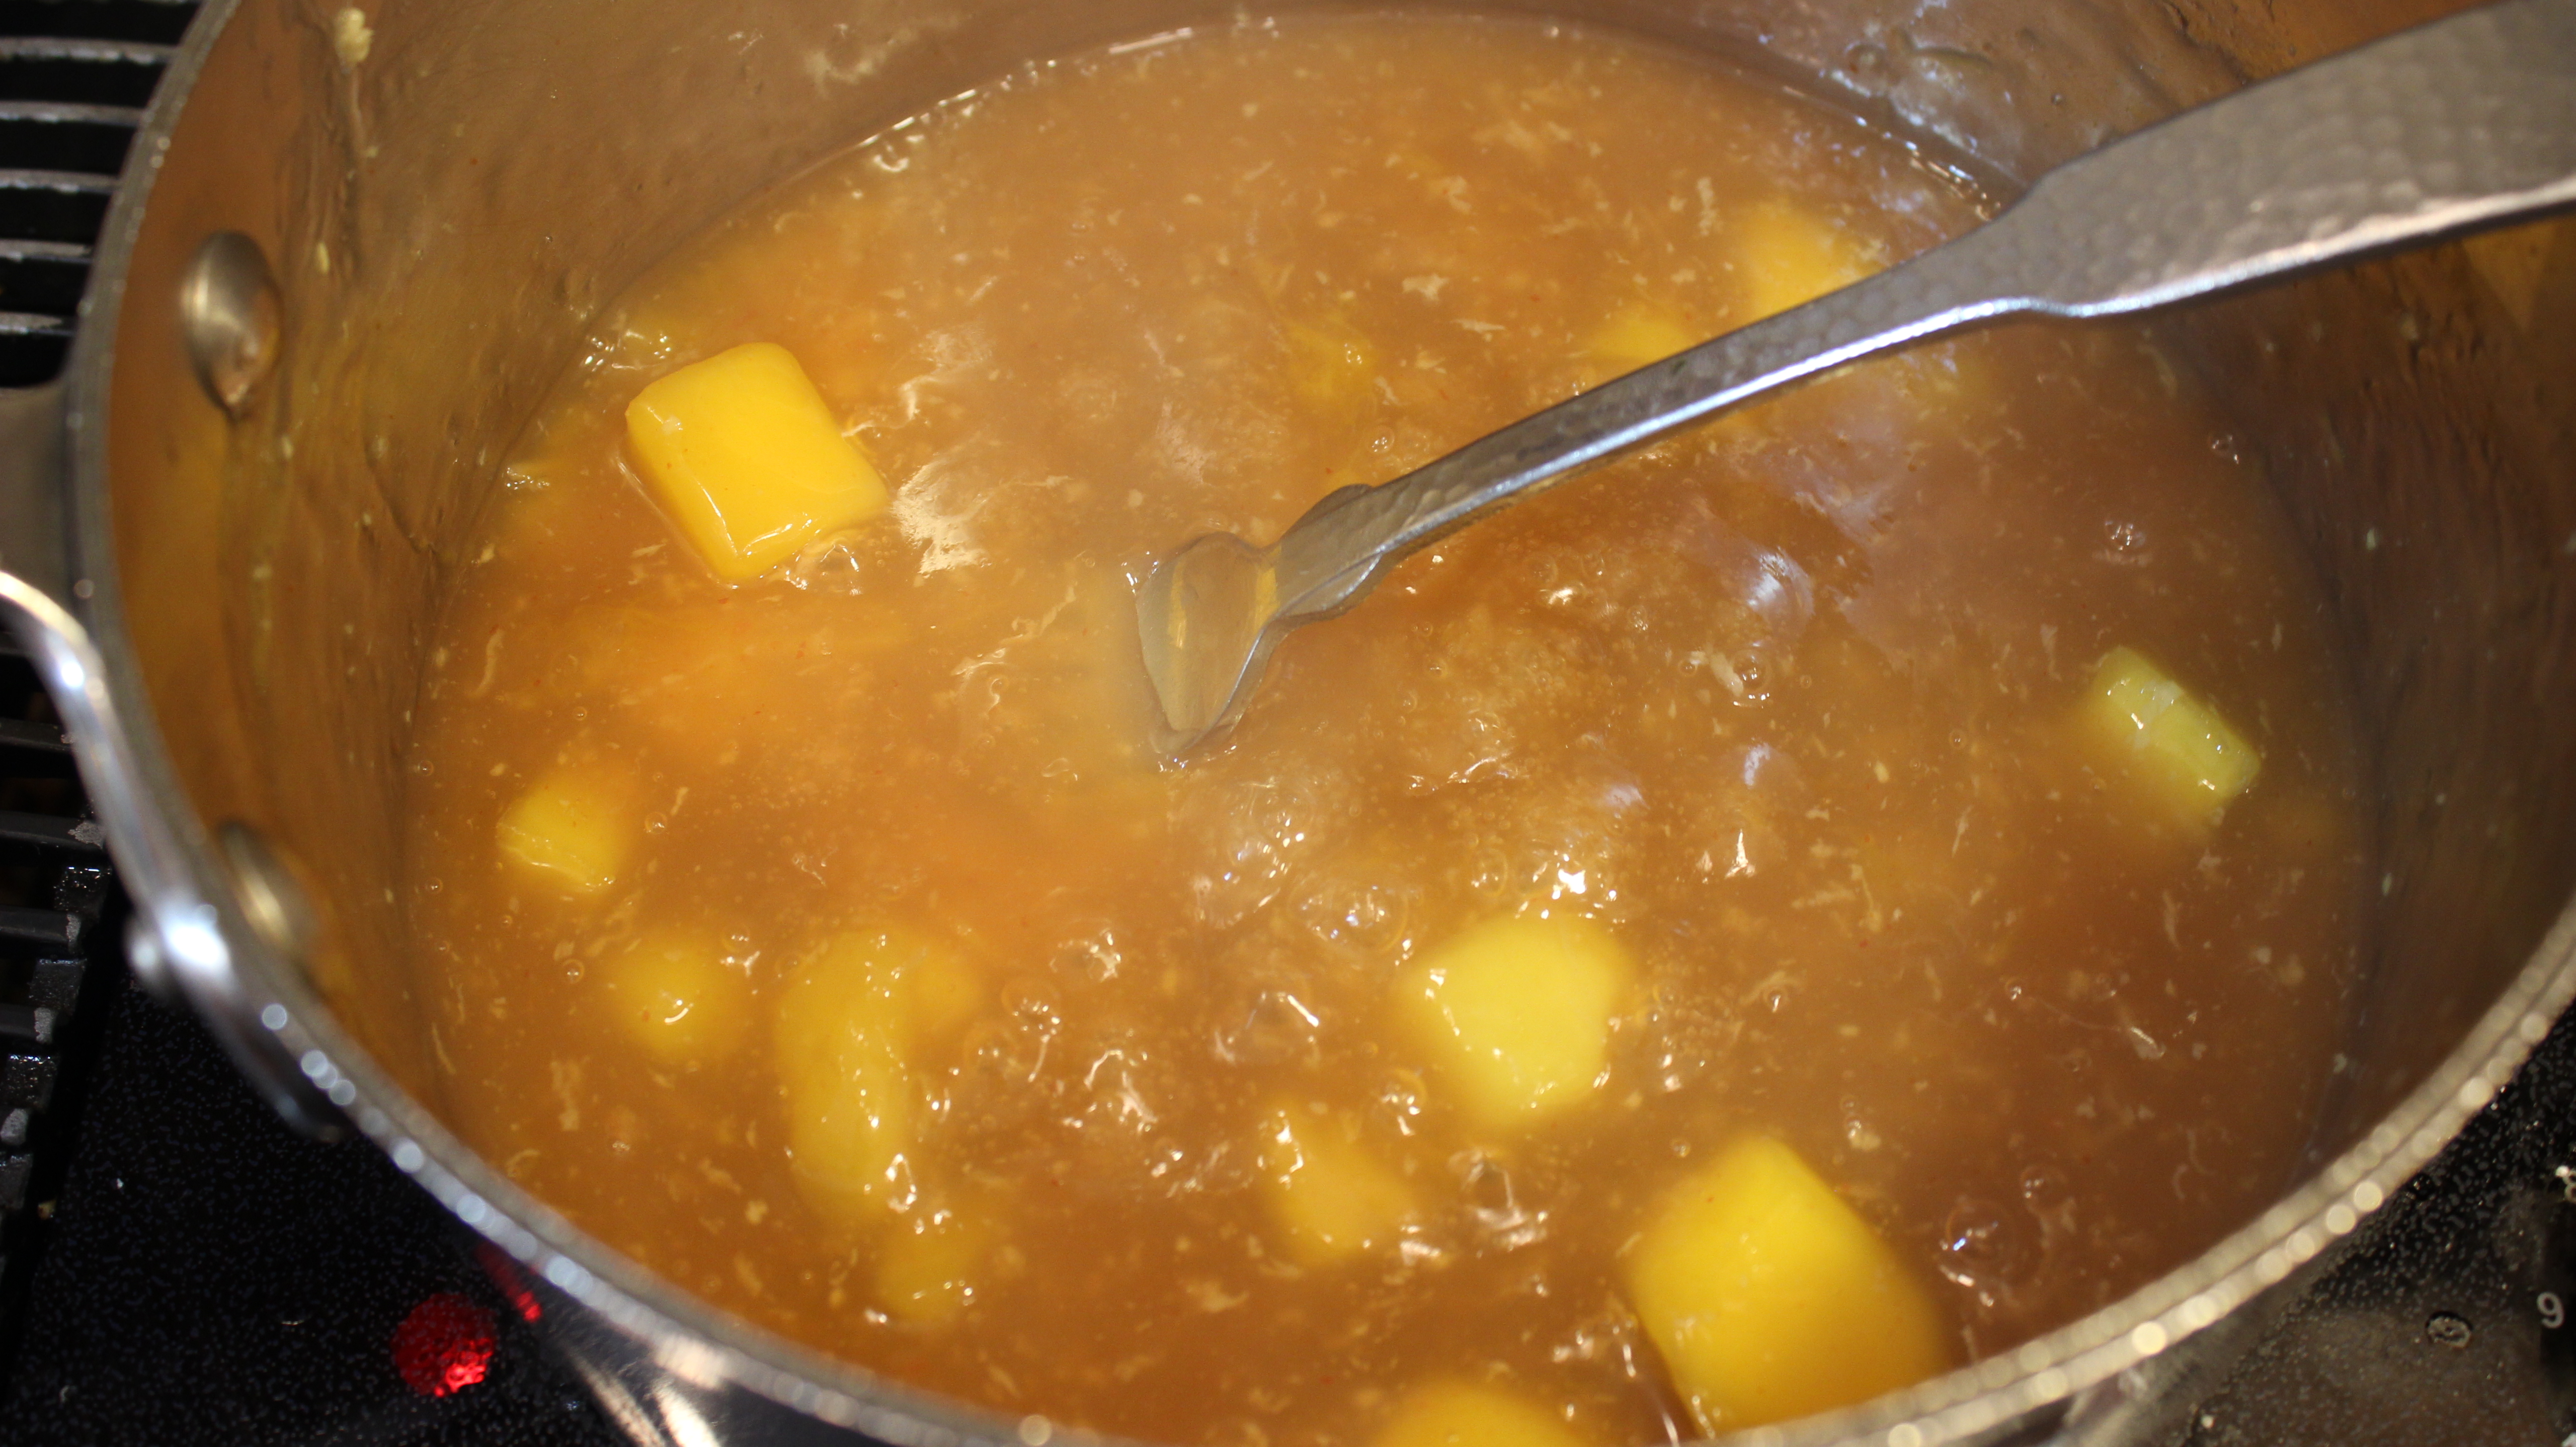
Add to a medium size pan over med/high heat and bring to a low simmer to melt sugar – 3 minutes
Add in corn starch and keep whisking at a low simmer til the mixture is transparent again and thickened – 5 more minutes
Mash Mango pieces into sauce with a fork
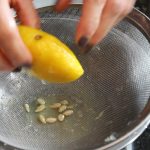
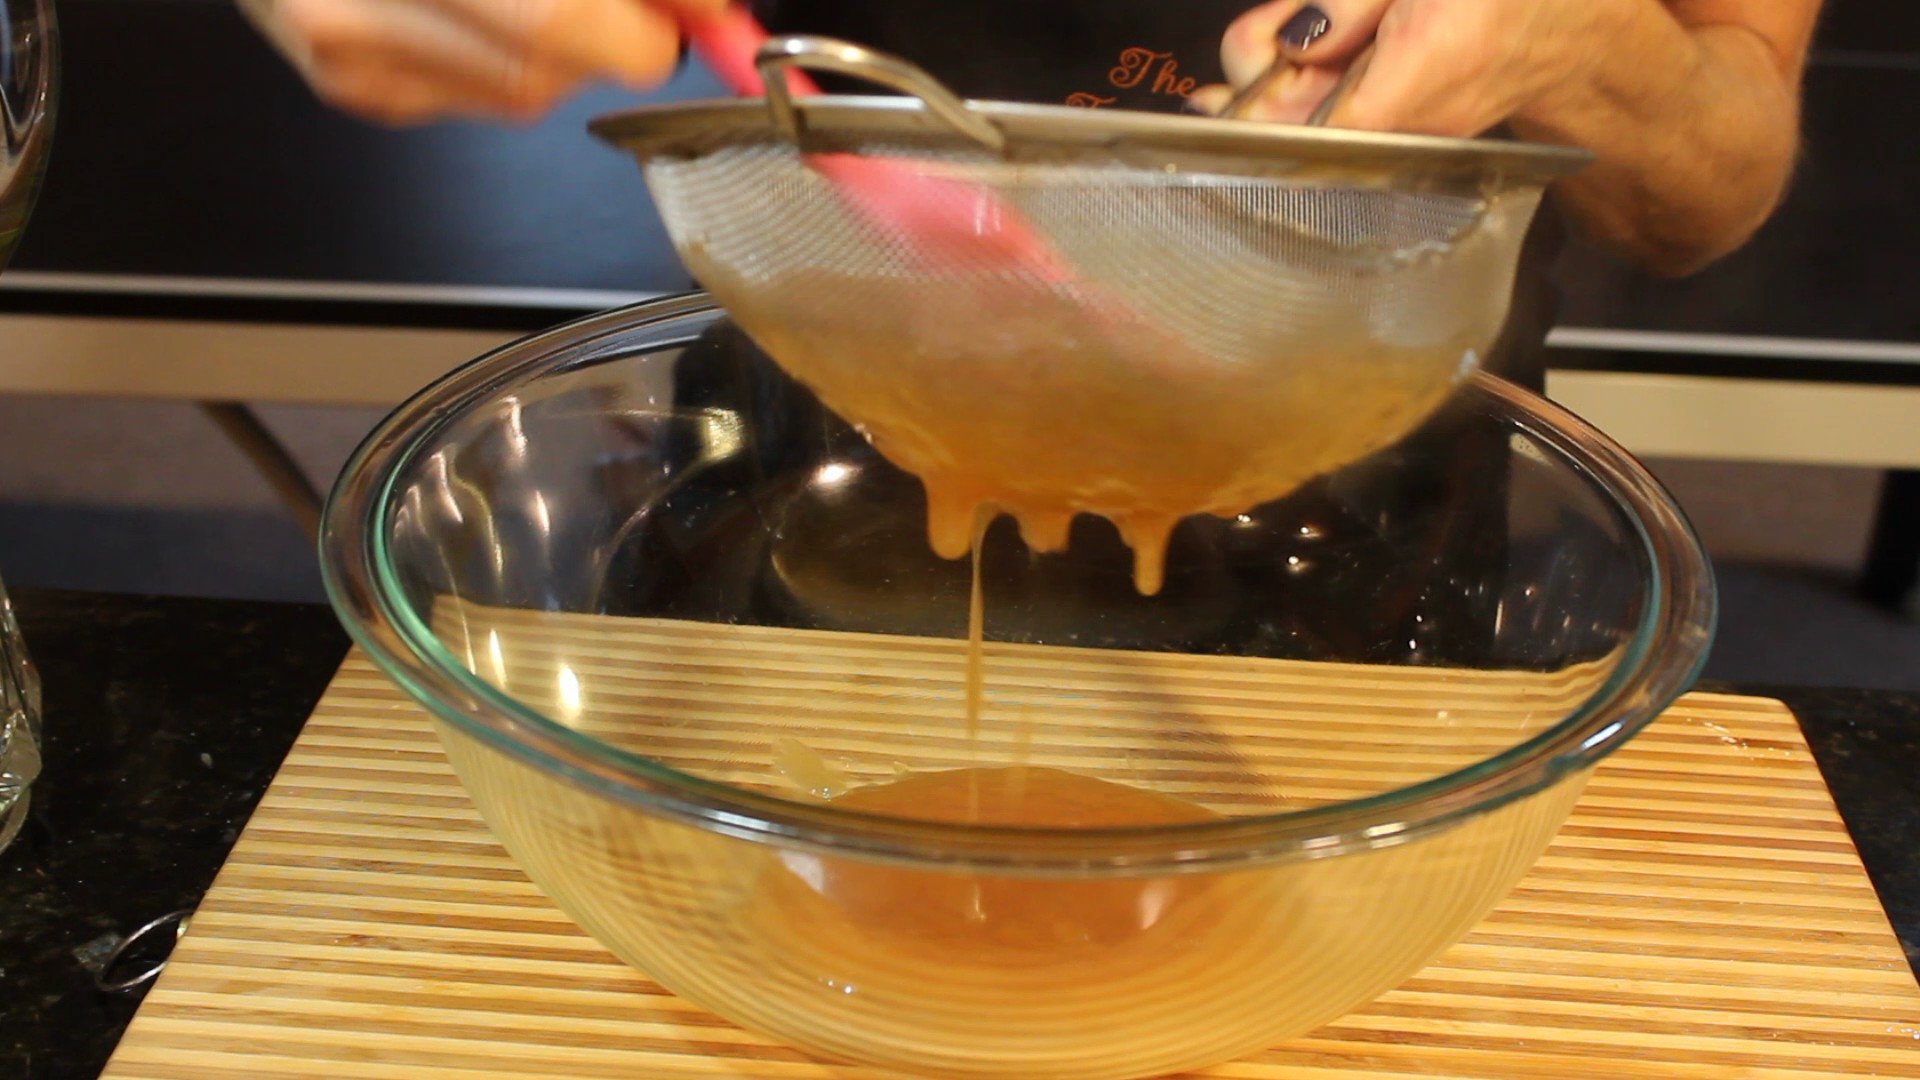
Remove from heat and press thru a sieve into a bowl and let cool completely (can add a little squeeze of the other half of the lemon if too thick)
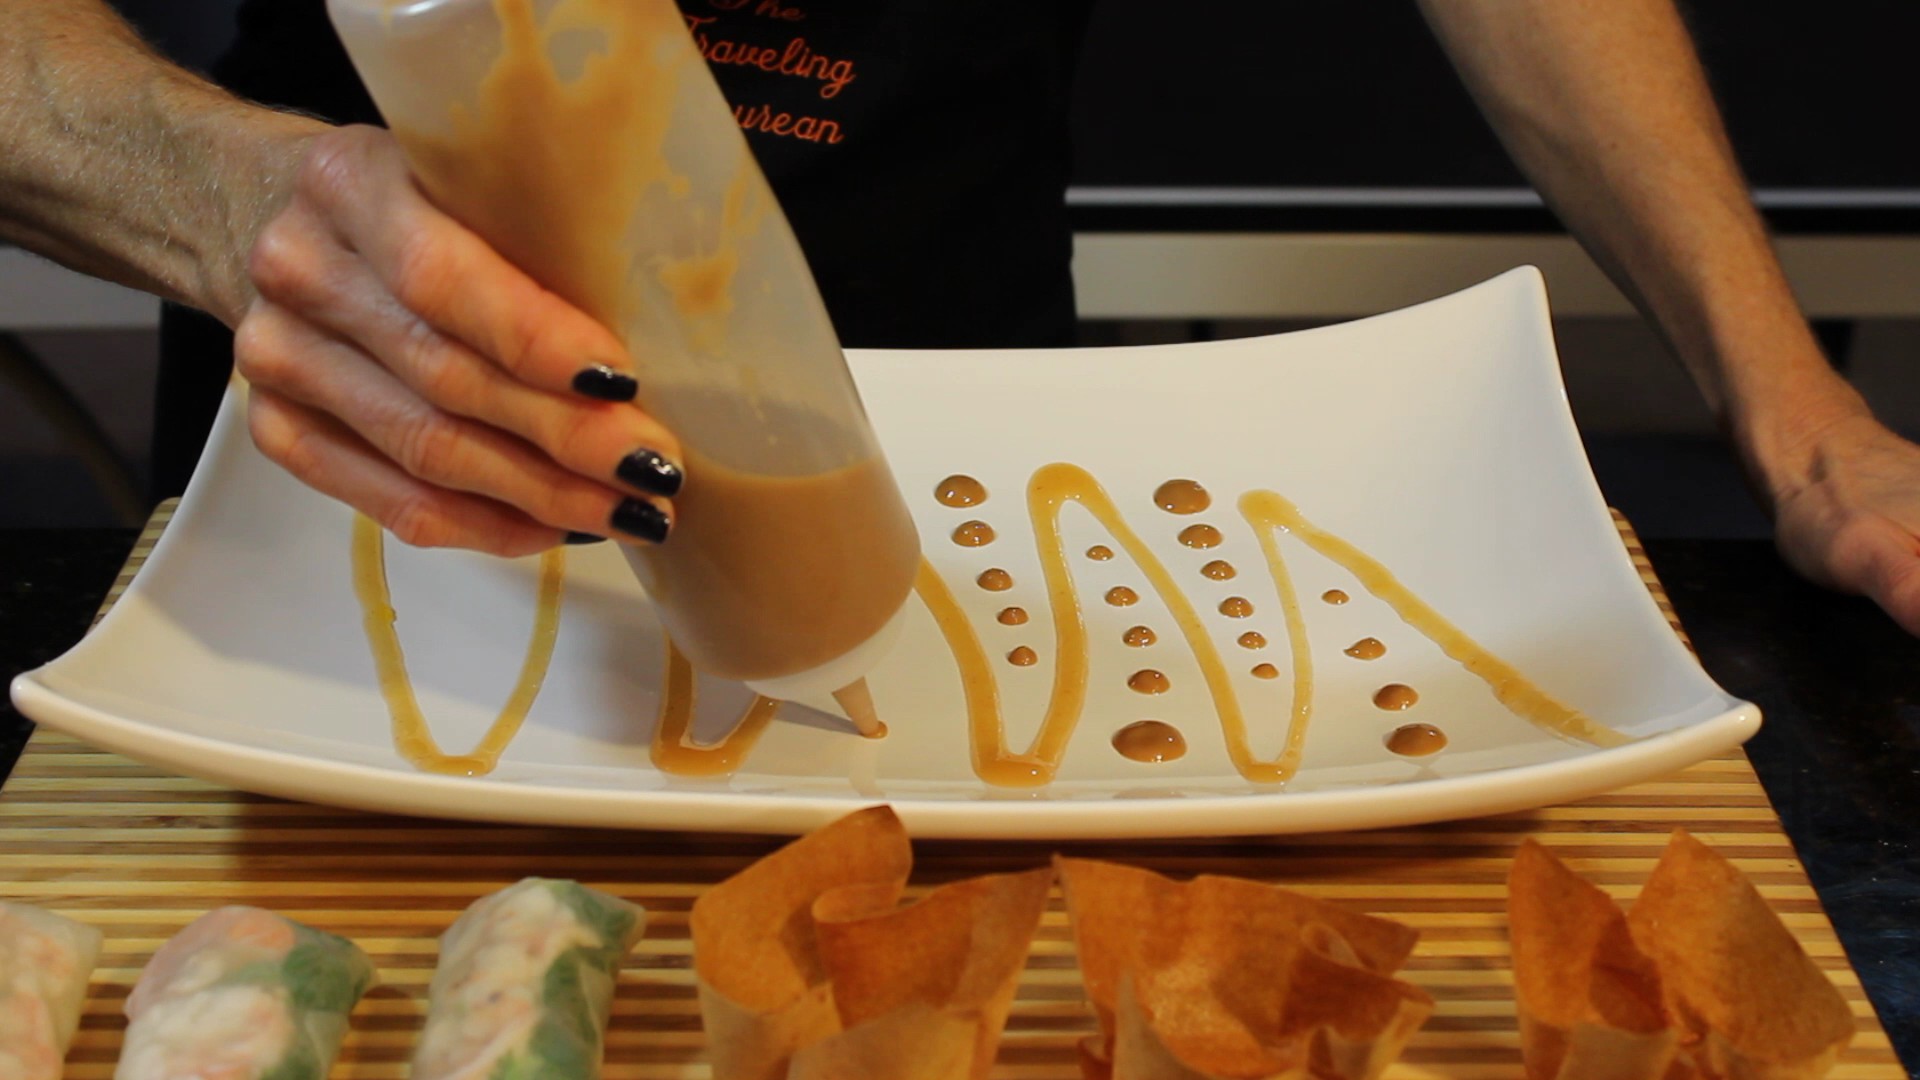
Pour into ramekins for dipping or put in a squeeze bottle to draw on plates …have fun decorating!
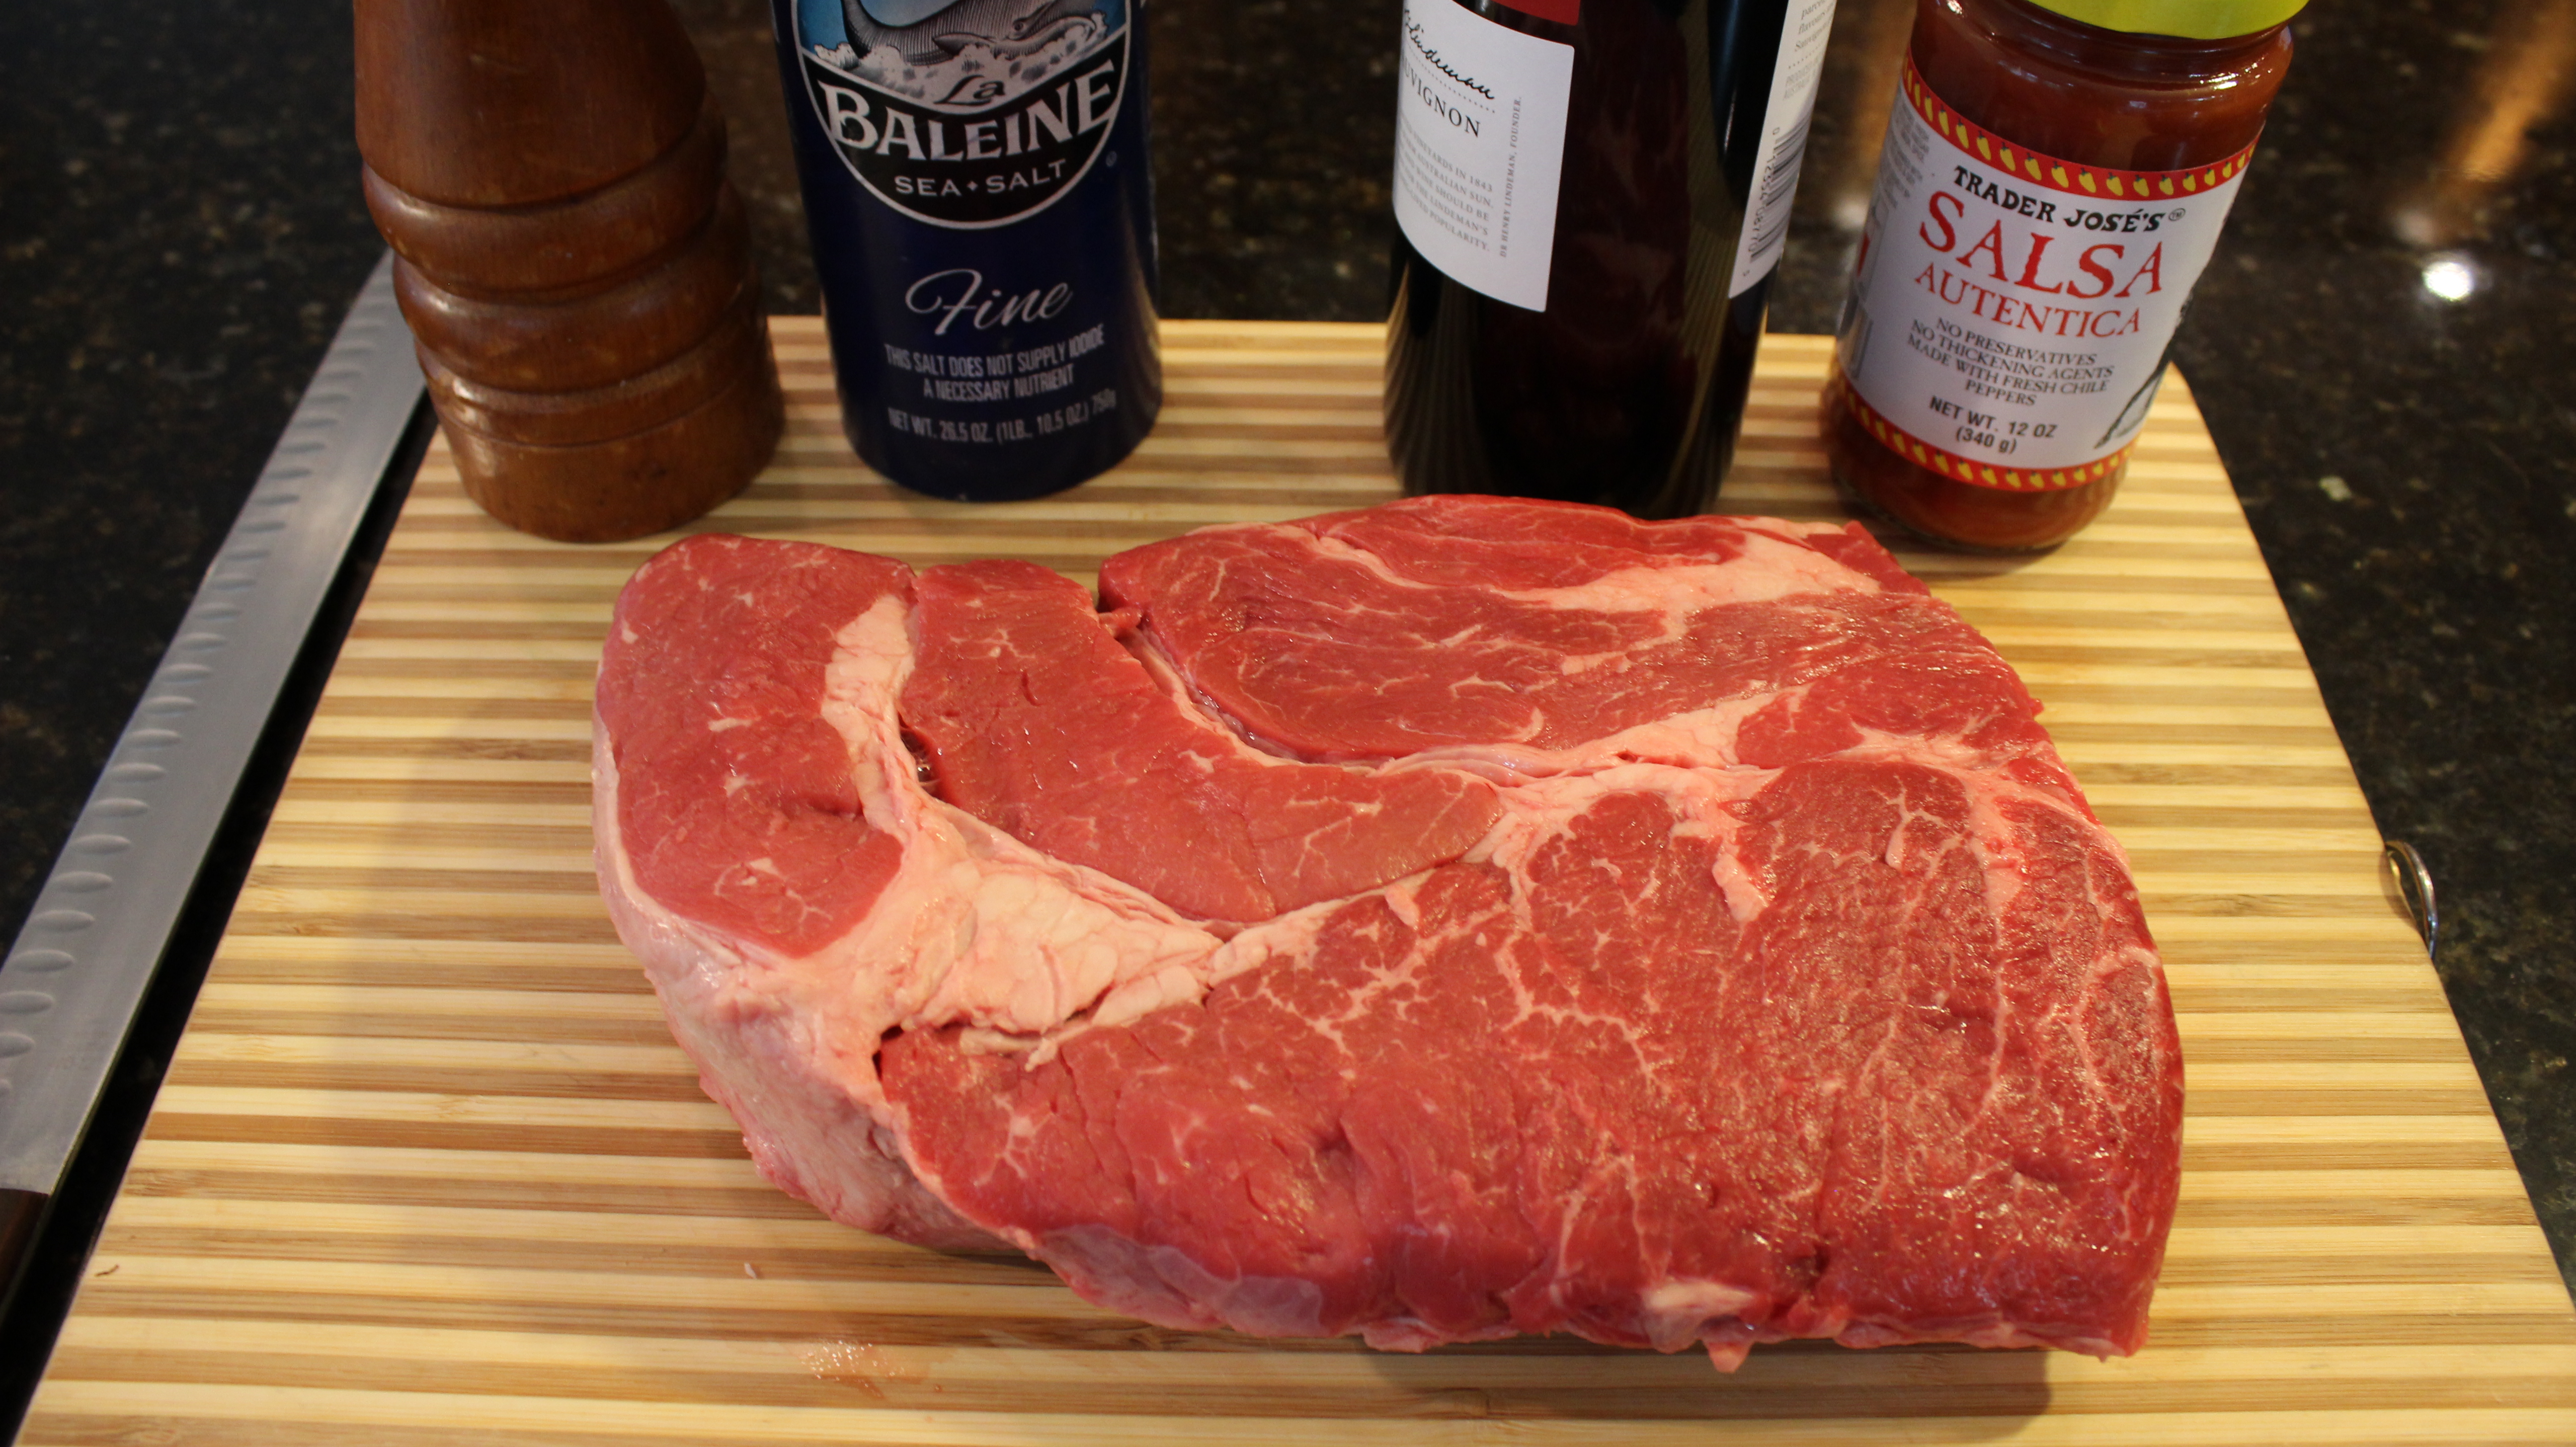
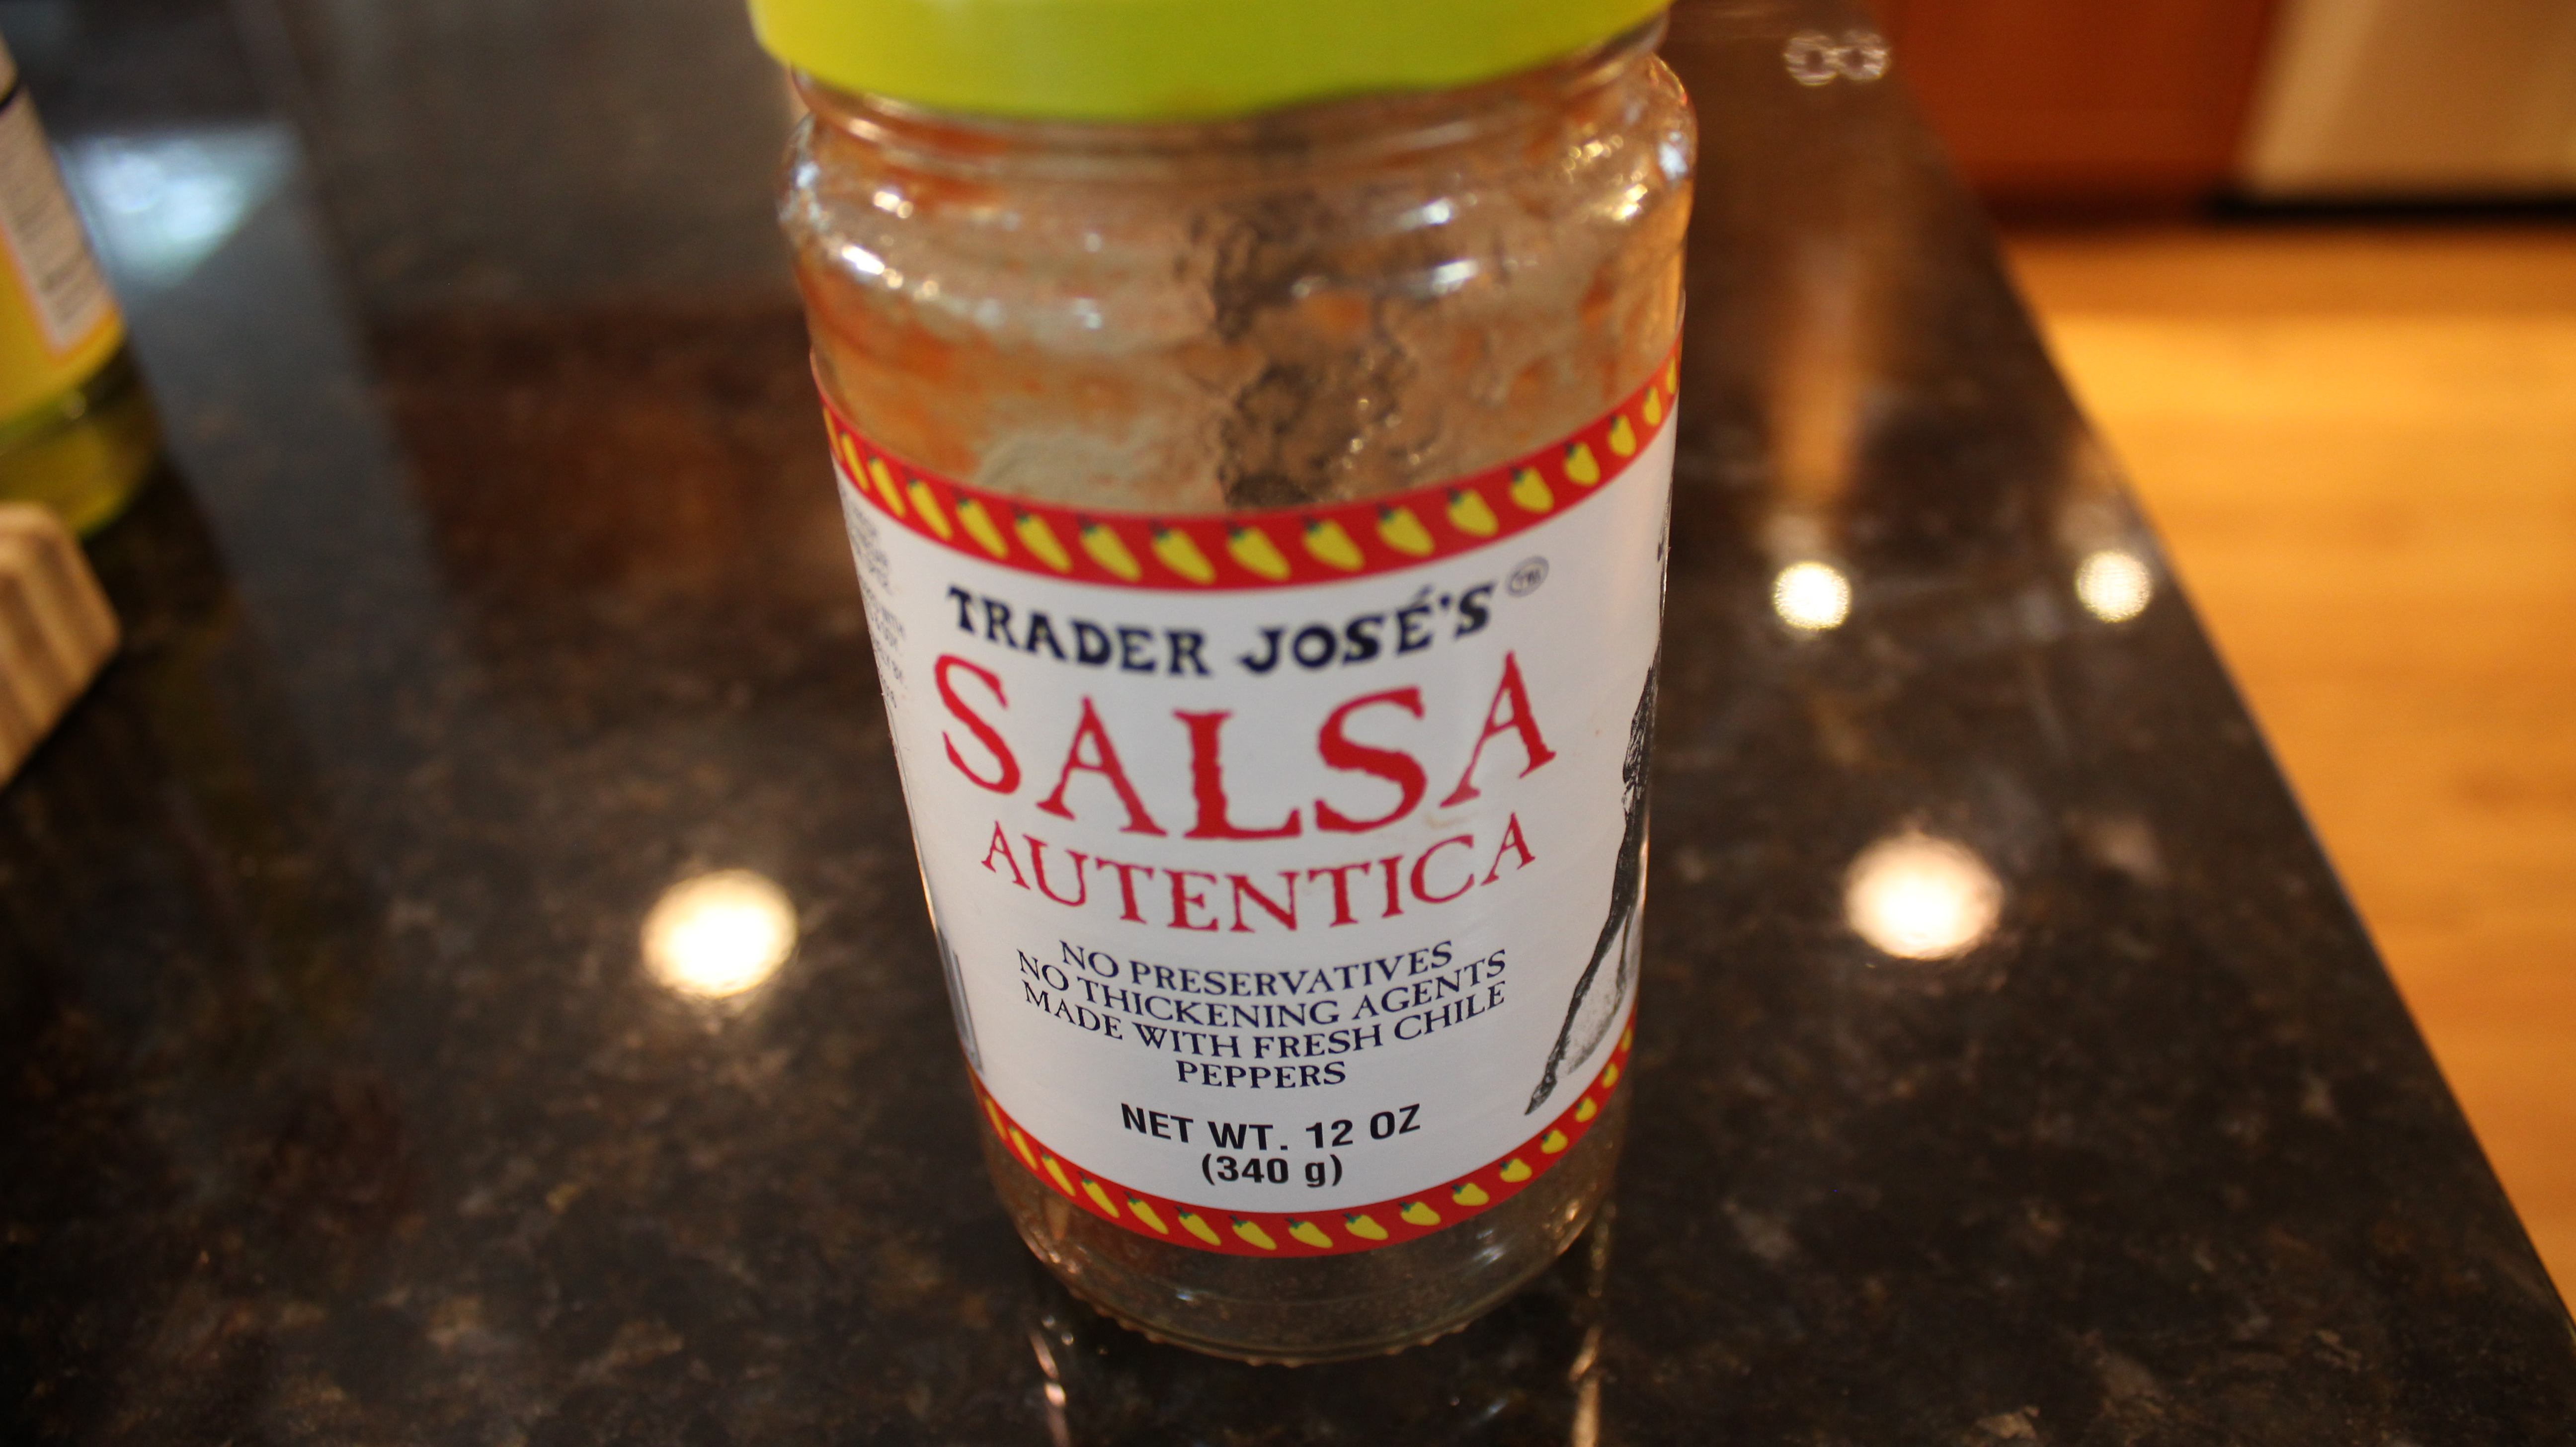
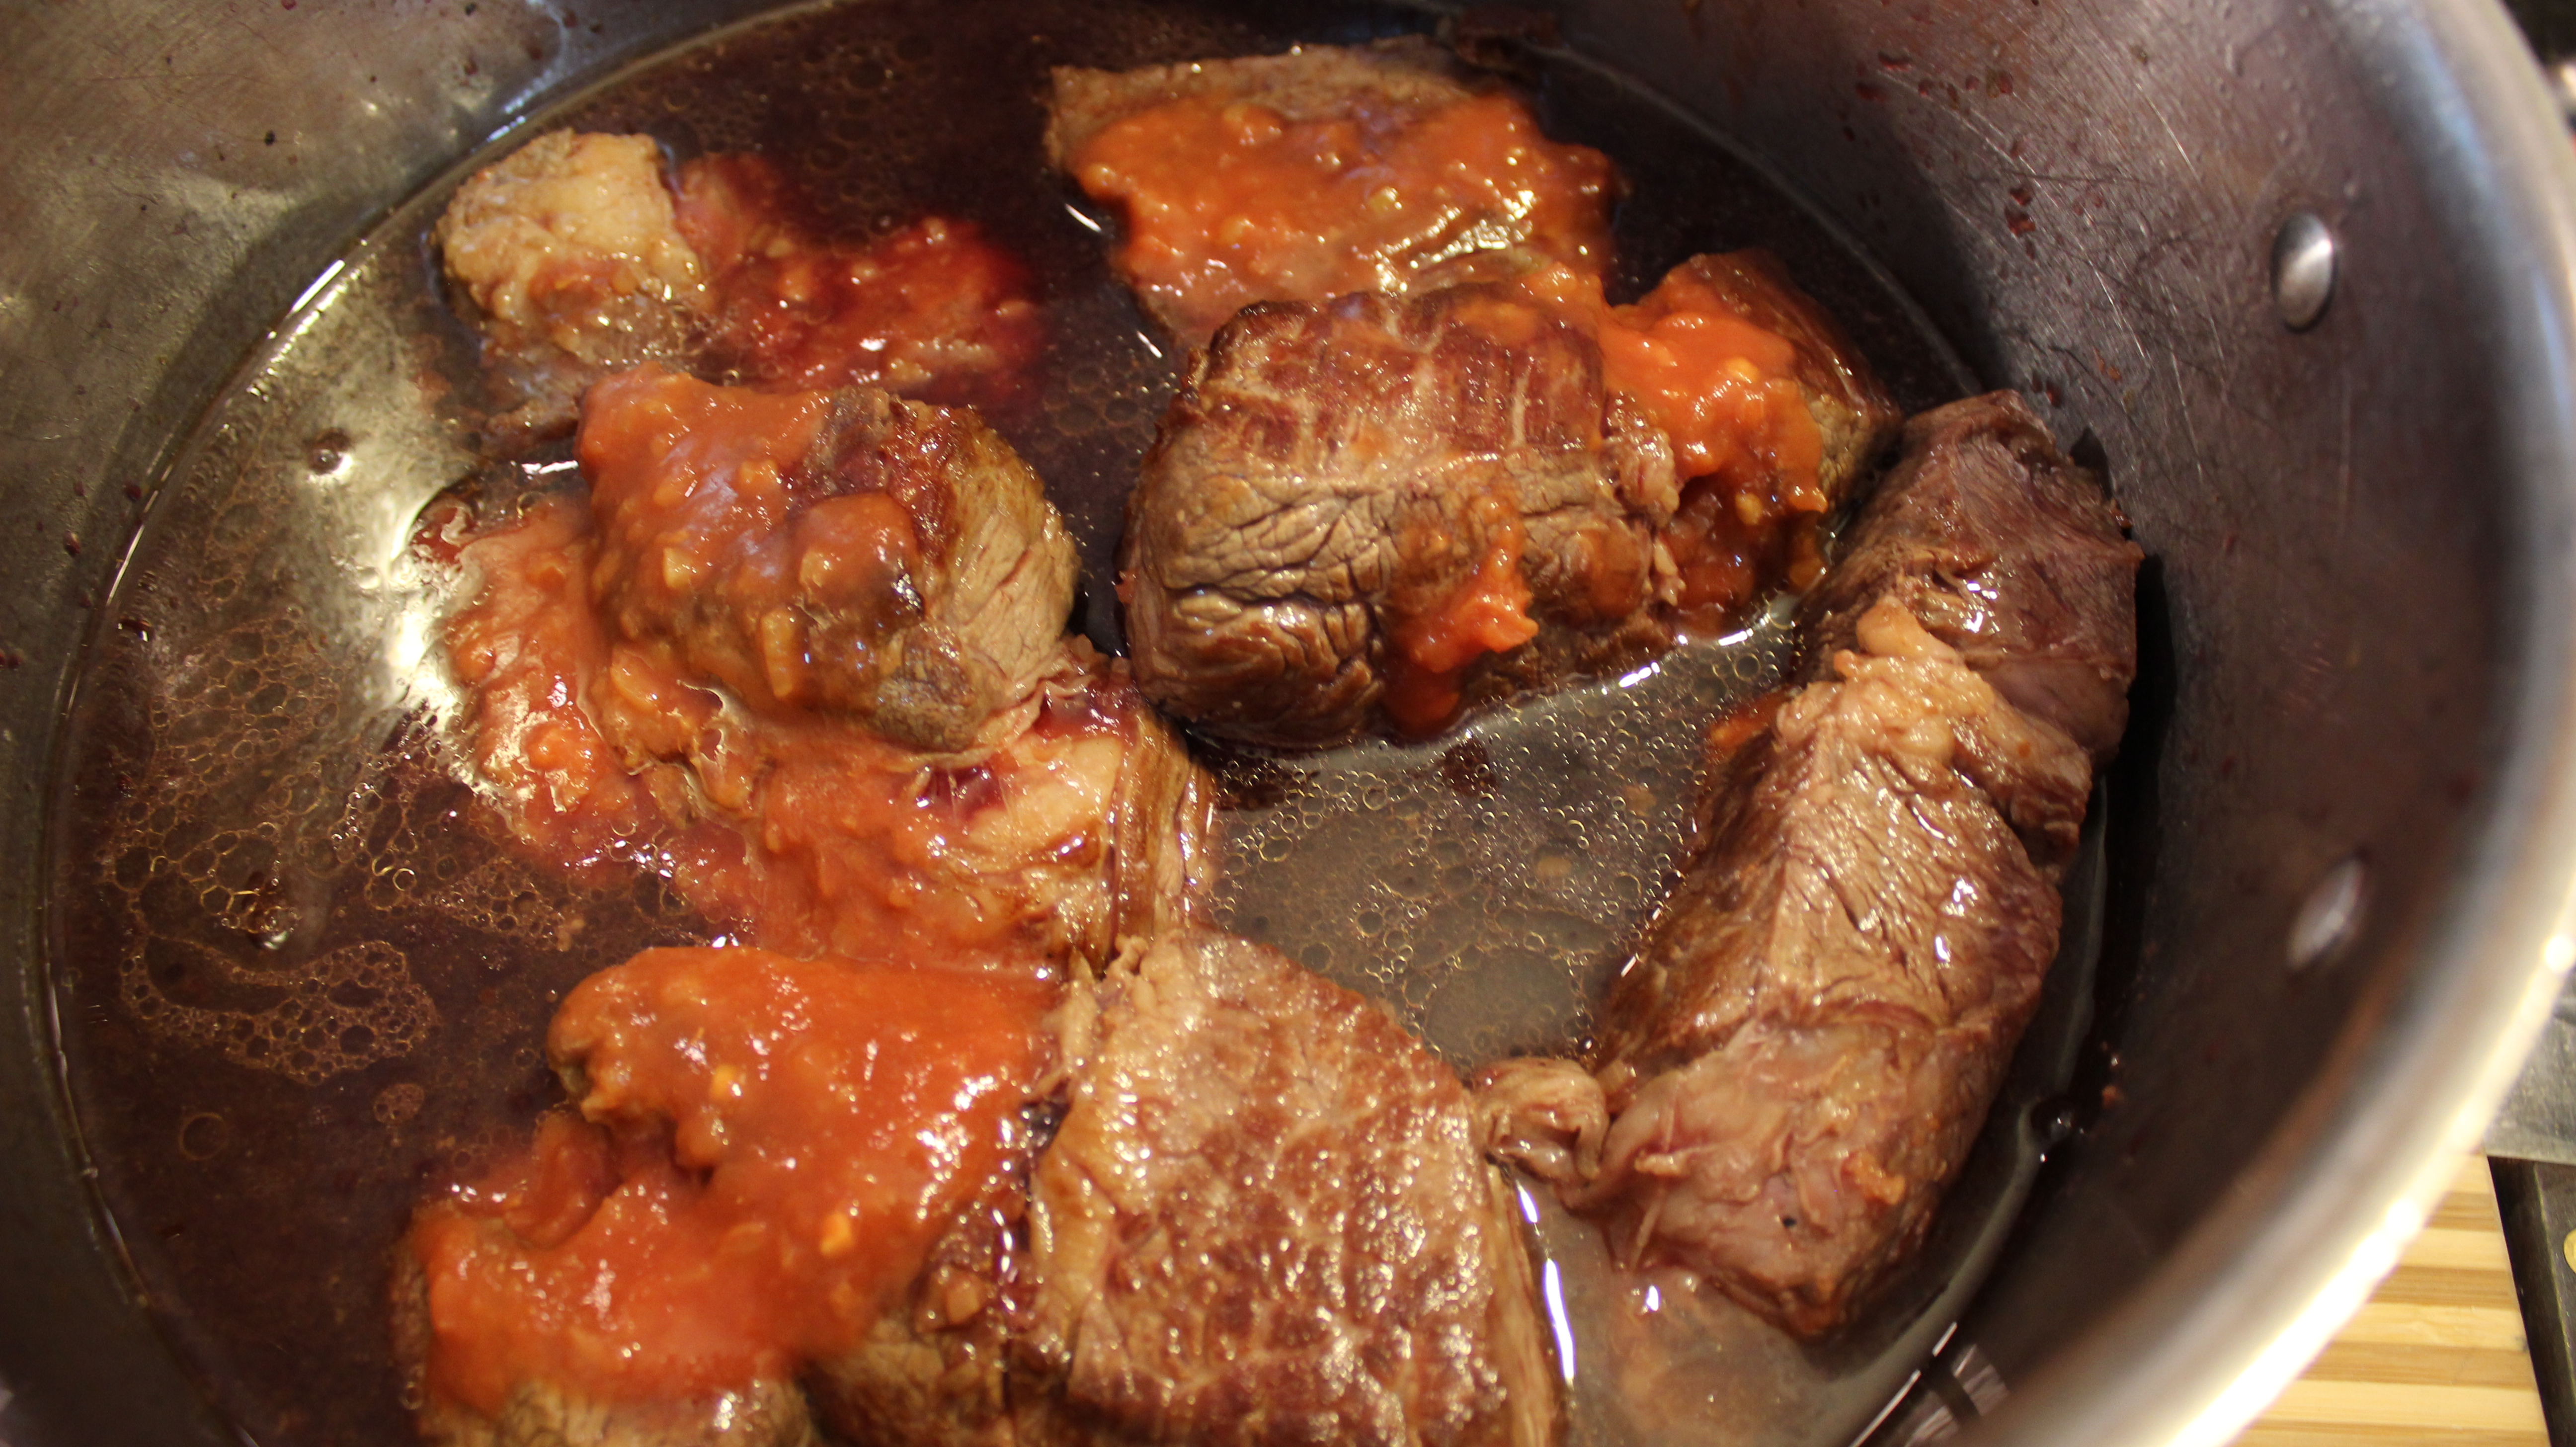
Just wait until you taste the flavors in this pulled beef taco dish that ONLY uses three ingredients! Yes, that’s right we only use three ingredients… red wine, Trader Joe’s Autentica Salsa and a chuck roast that braises in the oven for two and a half hours with the cover off. I almost feel like we are cheating here by only using these three items because it seems as though something this amazing in taste, similar to Boeuf Bourguignon, should involve way more effort and ingredients. I think it’s important here to use the oven instead of a crock pot because the dry heat helps to caramelize the beef really building on all those layers of flavors.
This is the perfect dish for having groups of friends over because it’s a total make ahead dish. You can even make my mango salsa the day before. If you are really in a pinch for time you could always buy fresh made salsa at the store. I personally like to make this homemade pulled beef the morning of the party so that the house fills with all the aromas of the braising chuck roast, red wine and tomatoes. Really gets the juices flowing!
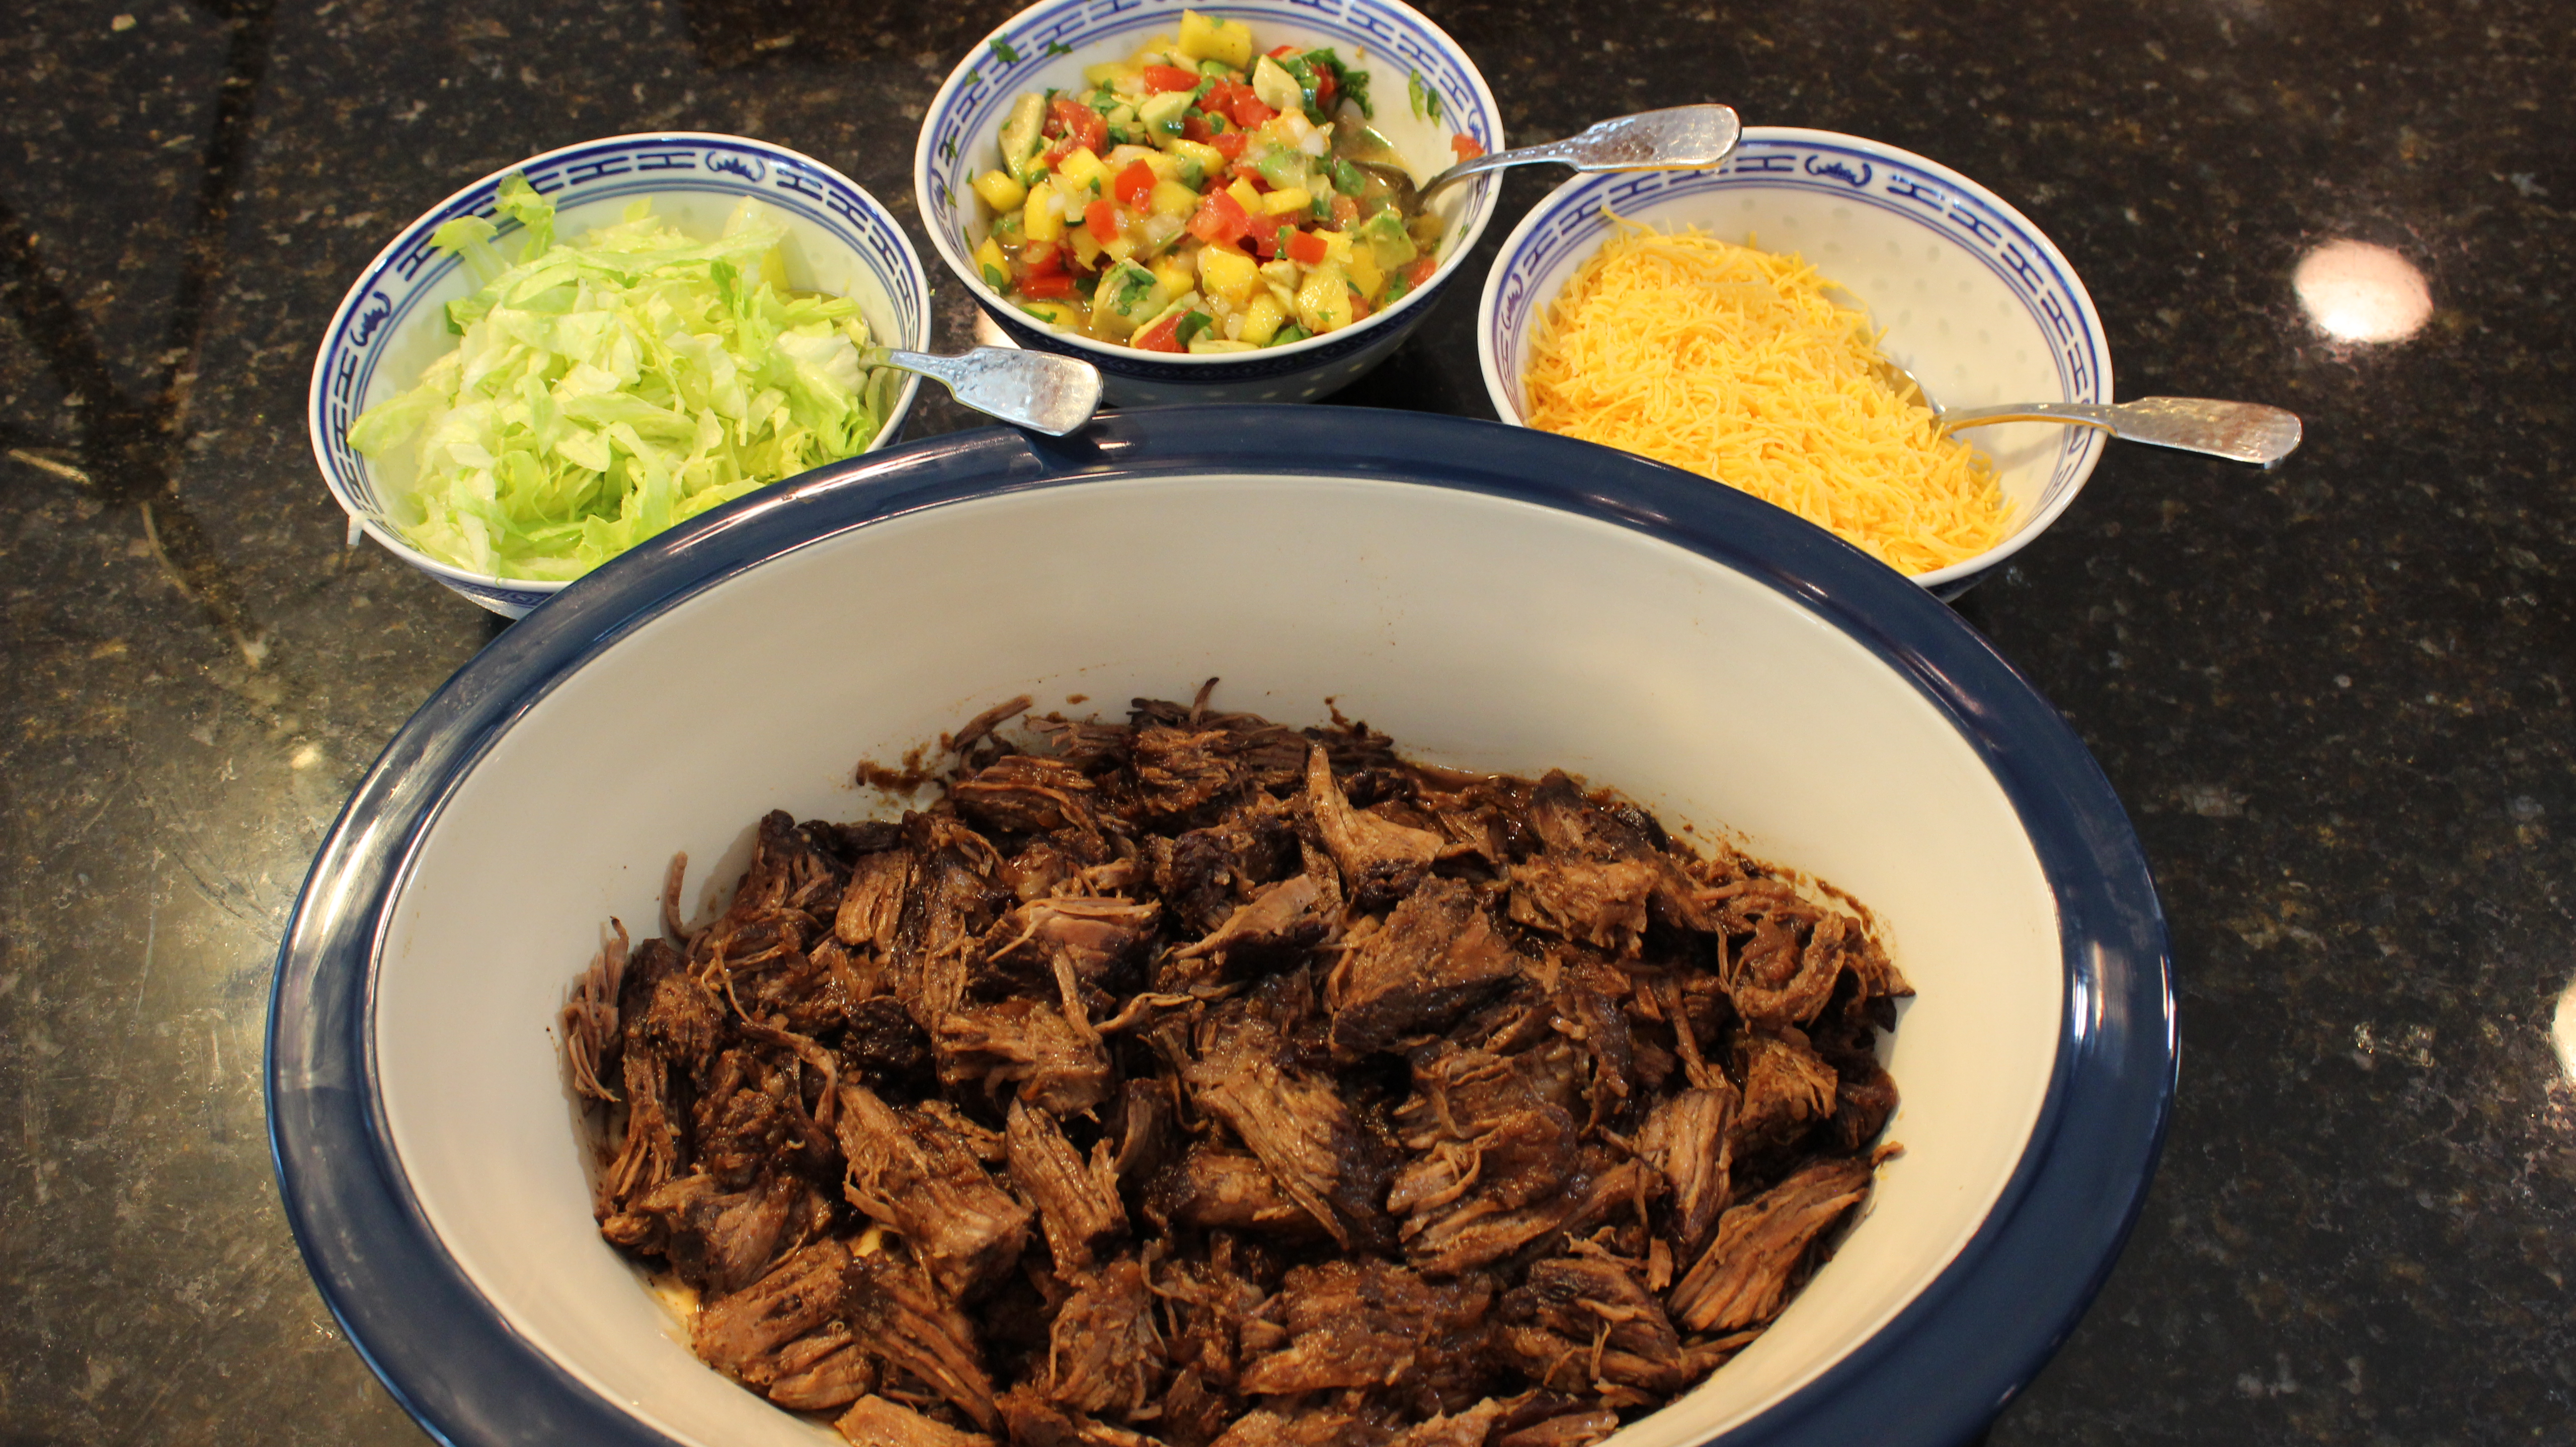
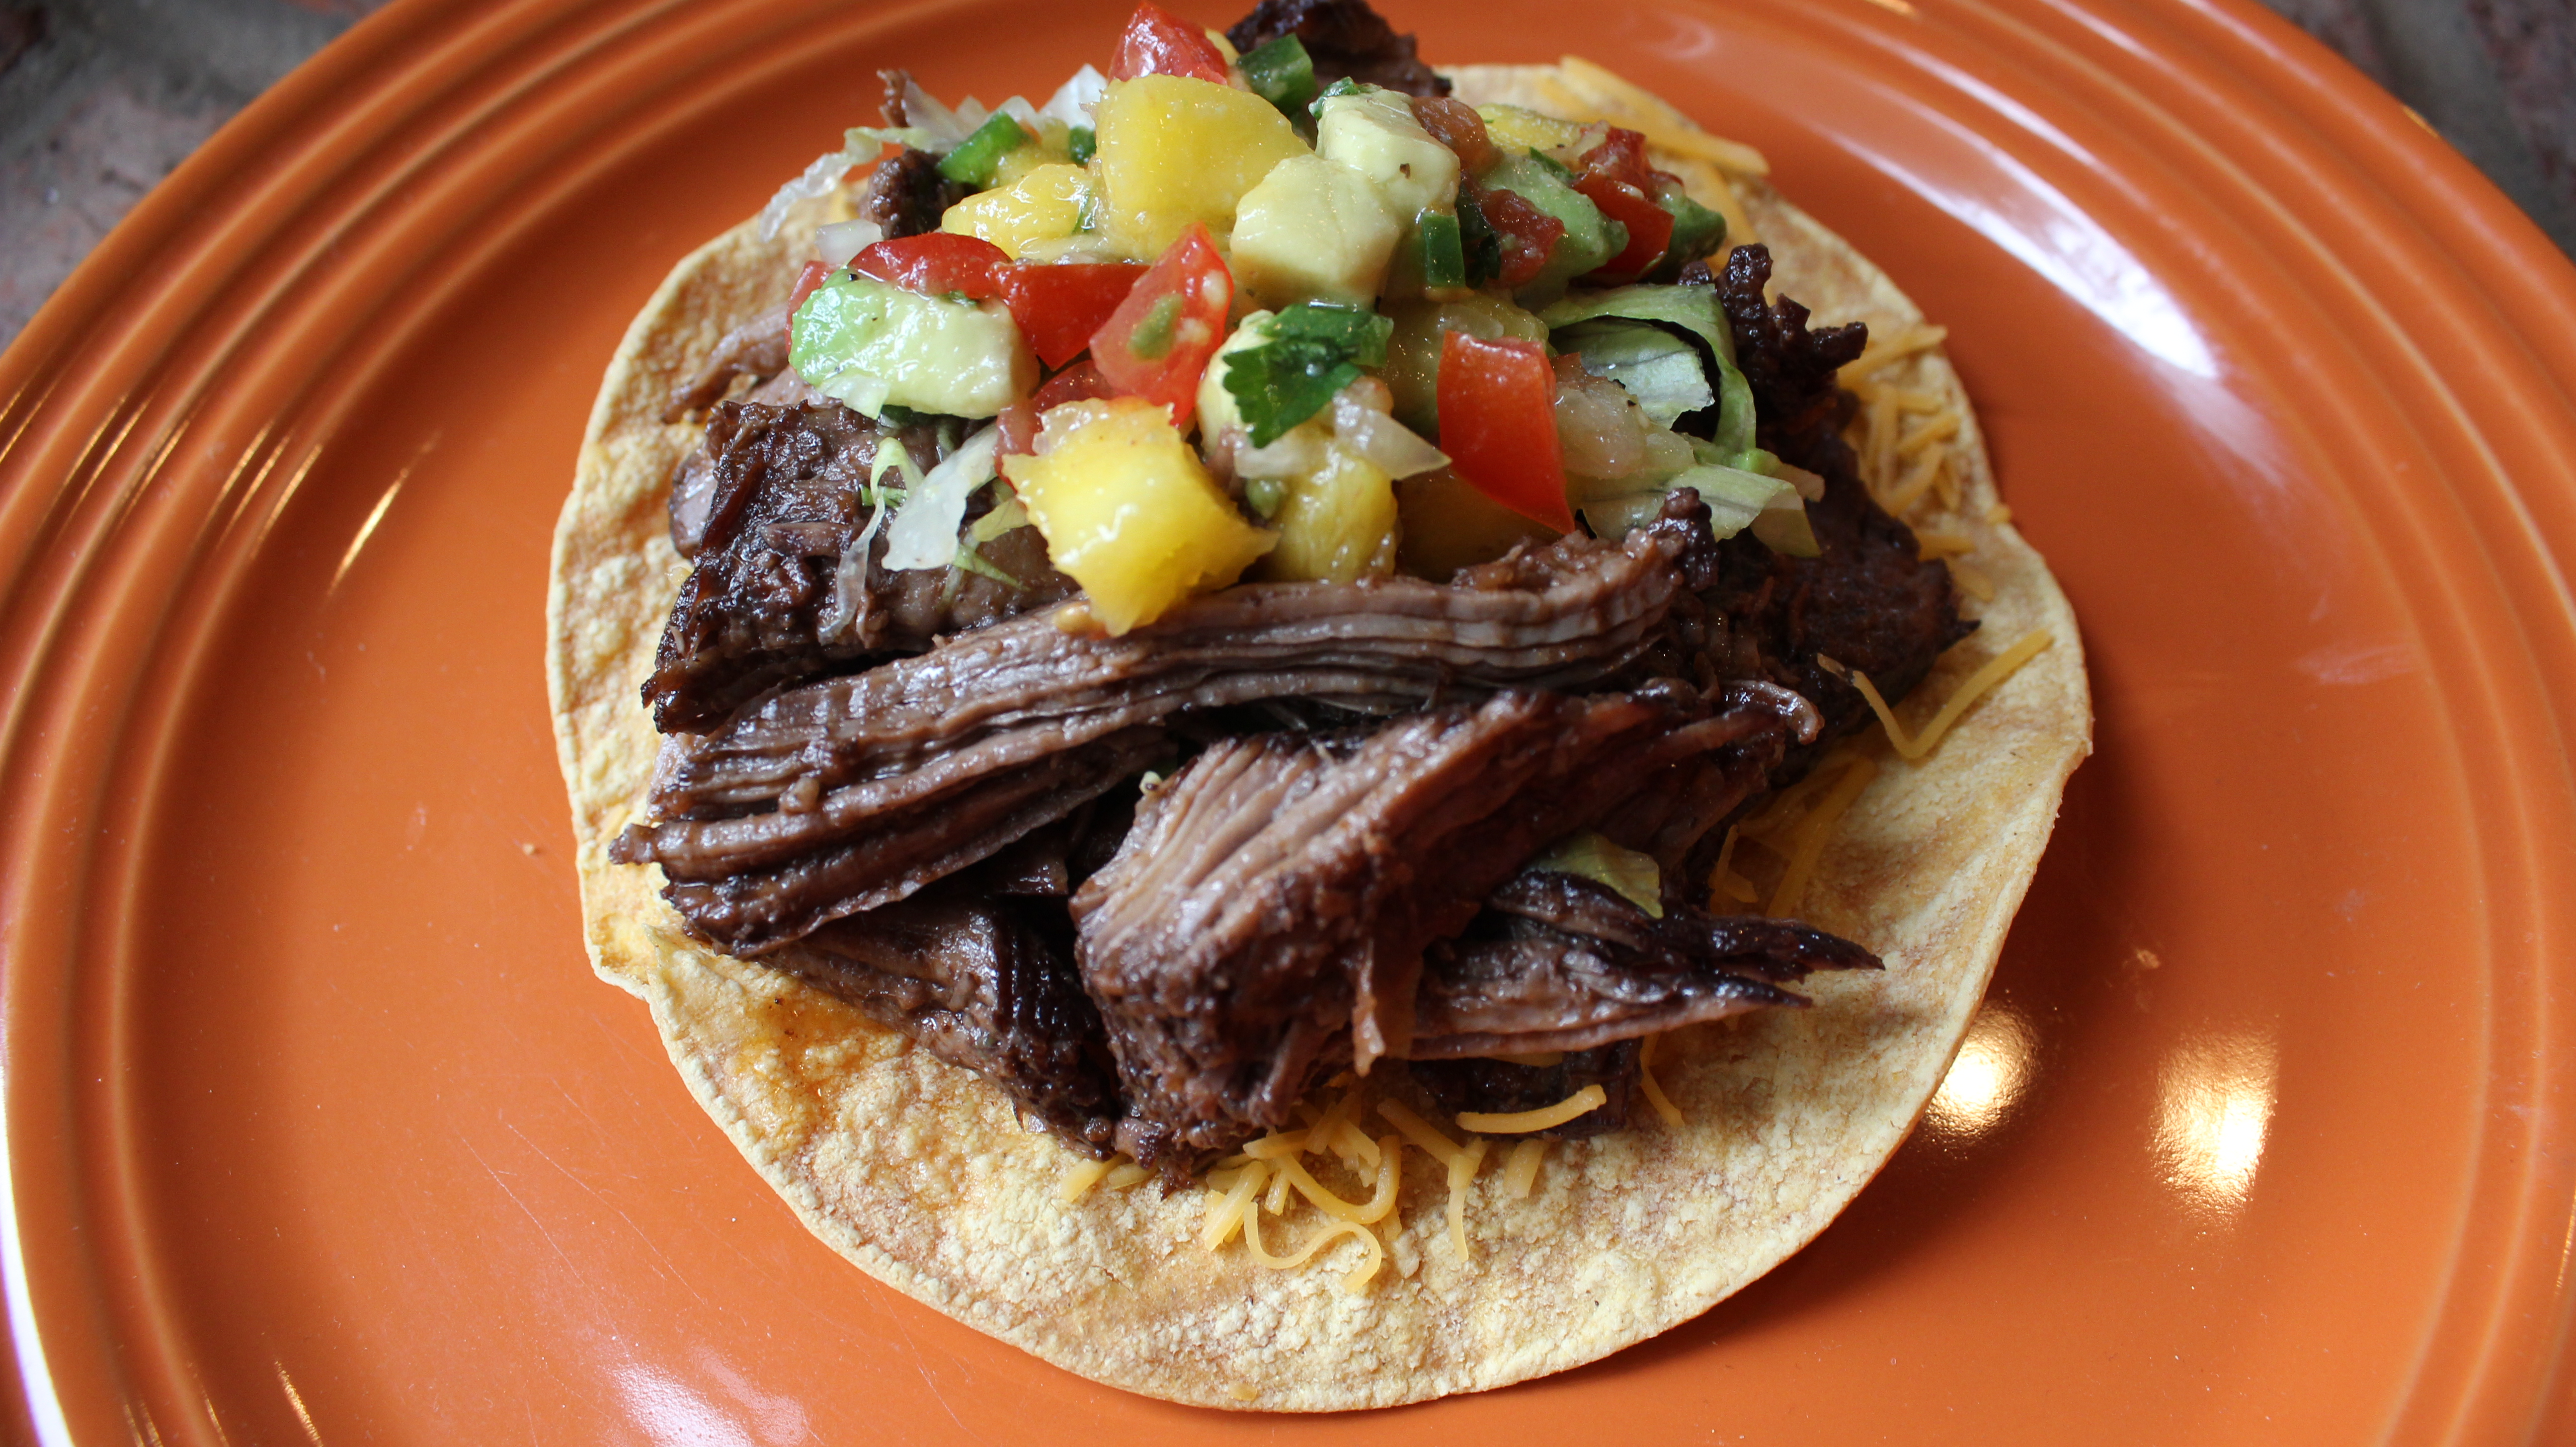
You can use your favorite hard taco shells to serve up the homemade pulled beef, corn and flour tortilla’s or even serve it on a bed of lettuce with shredded cheddar cheese and my mango salsa! I would also offer sour cream and Siracha in the side fixin’s and just let people go to town making their own creations. How fun is that?
You may just want to make my decadent Hershey’s Perfectly Chocolate Chocolate Cake for dessert! You won’t believe how EASY it is to make! You could also try my Chocolate Crackle Cookies that melt in your mouth. Then there always Fresh Berry Granita or Berries in a Dreamy Cream for dessert too. You’ll be able to actually relax and have lots of fun with your family and friends.
Ingredients for the Pulled Beef Taco’s:
3 1/2 lb. beef chuck roast (look for some good marbling)
1 bottle of red wine – Cabernet Sauvignon
1 bottle Trader Joe’s Salsa – Autentica
3 tbsn olive oil
Directions:
Pre-heat the oven to 350º
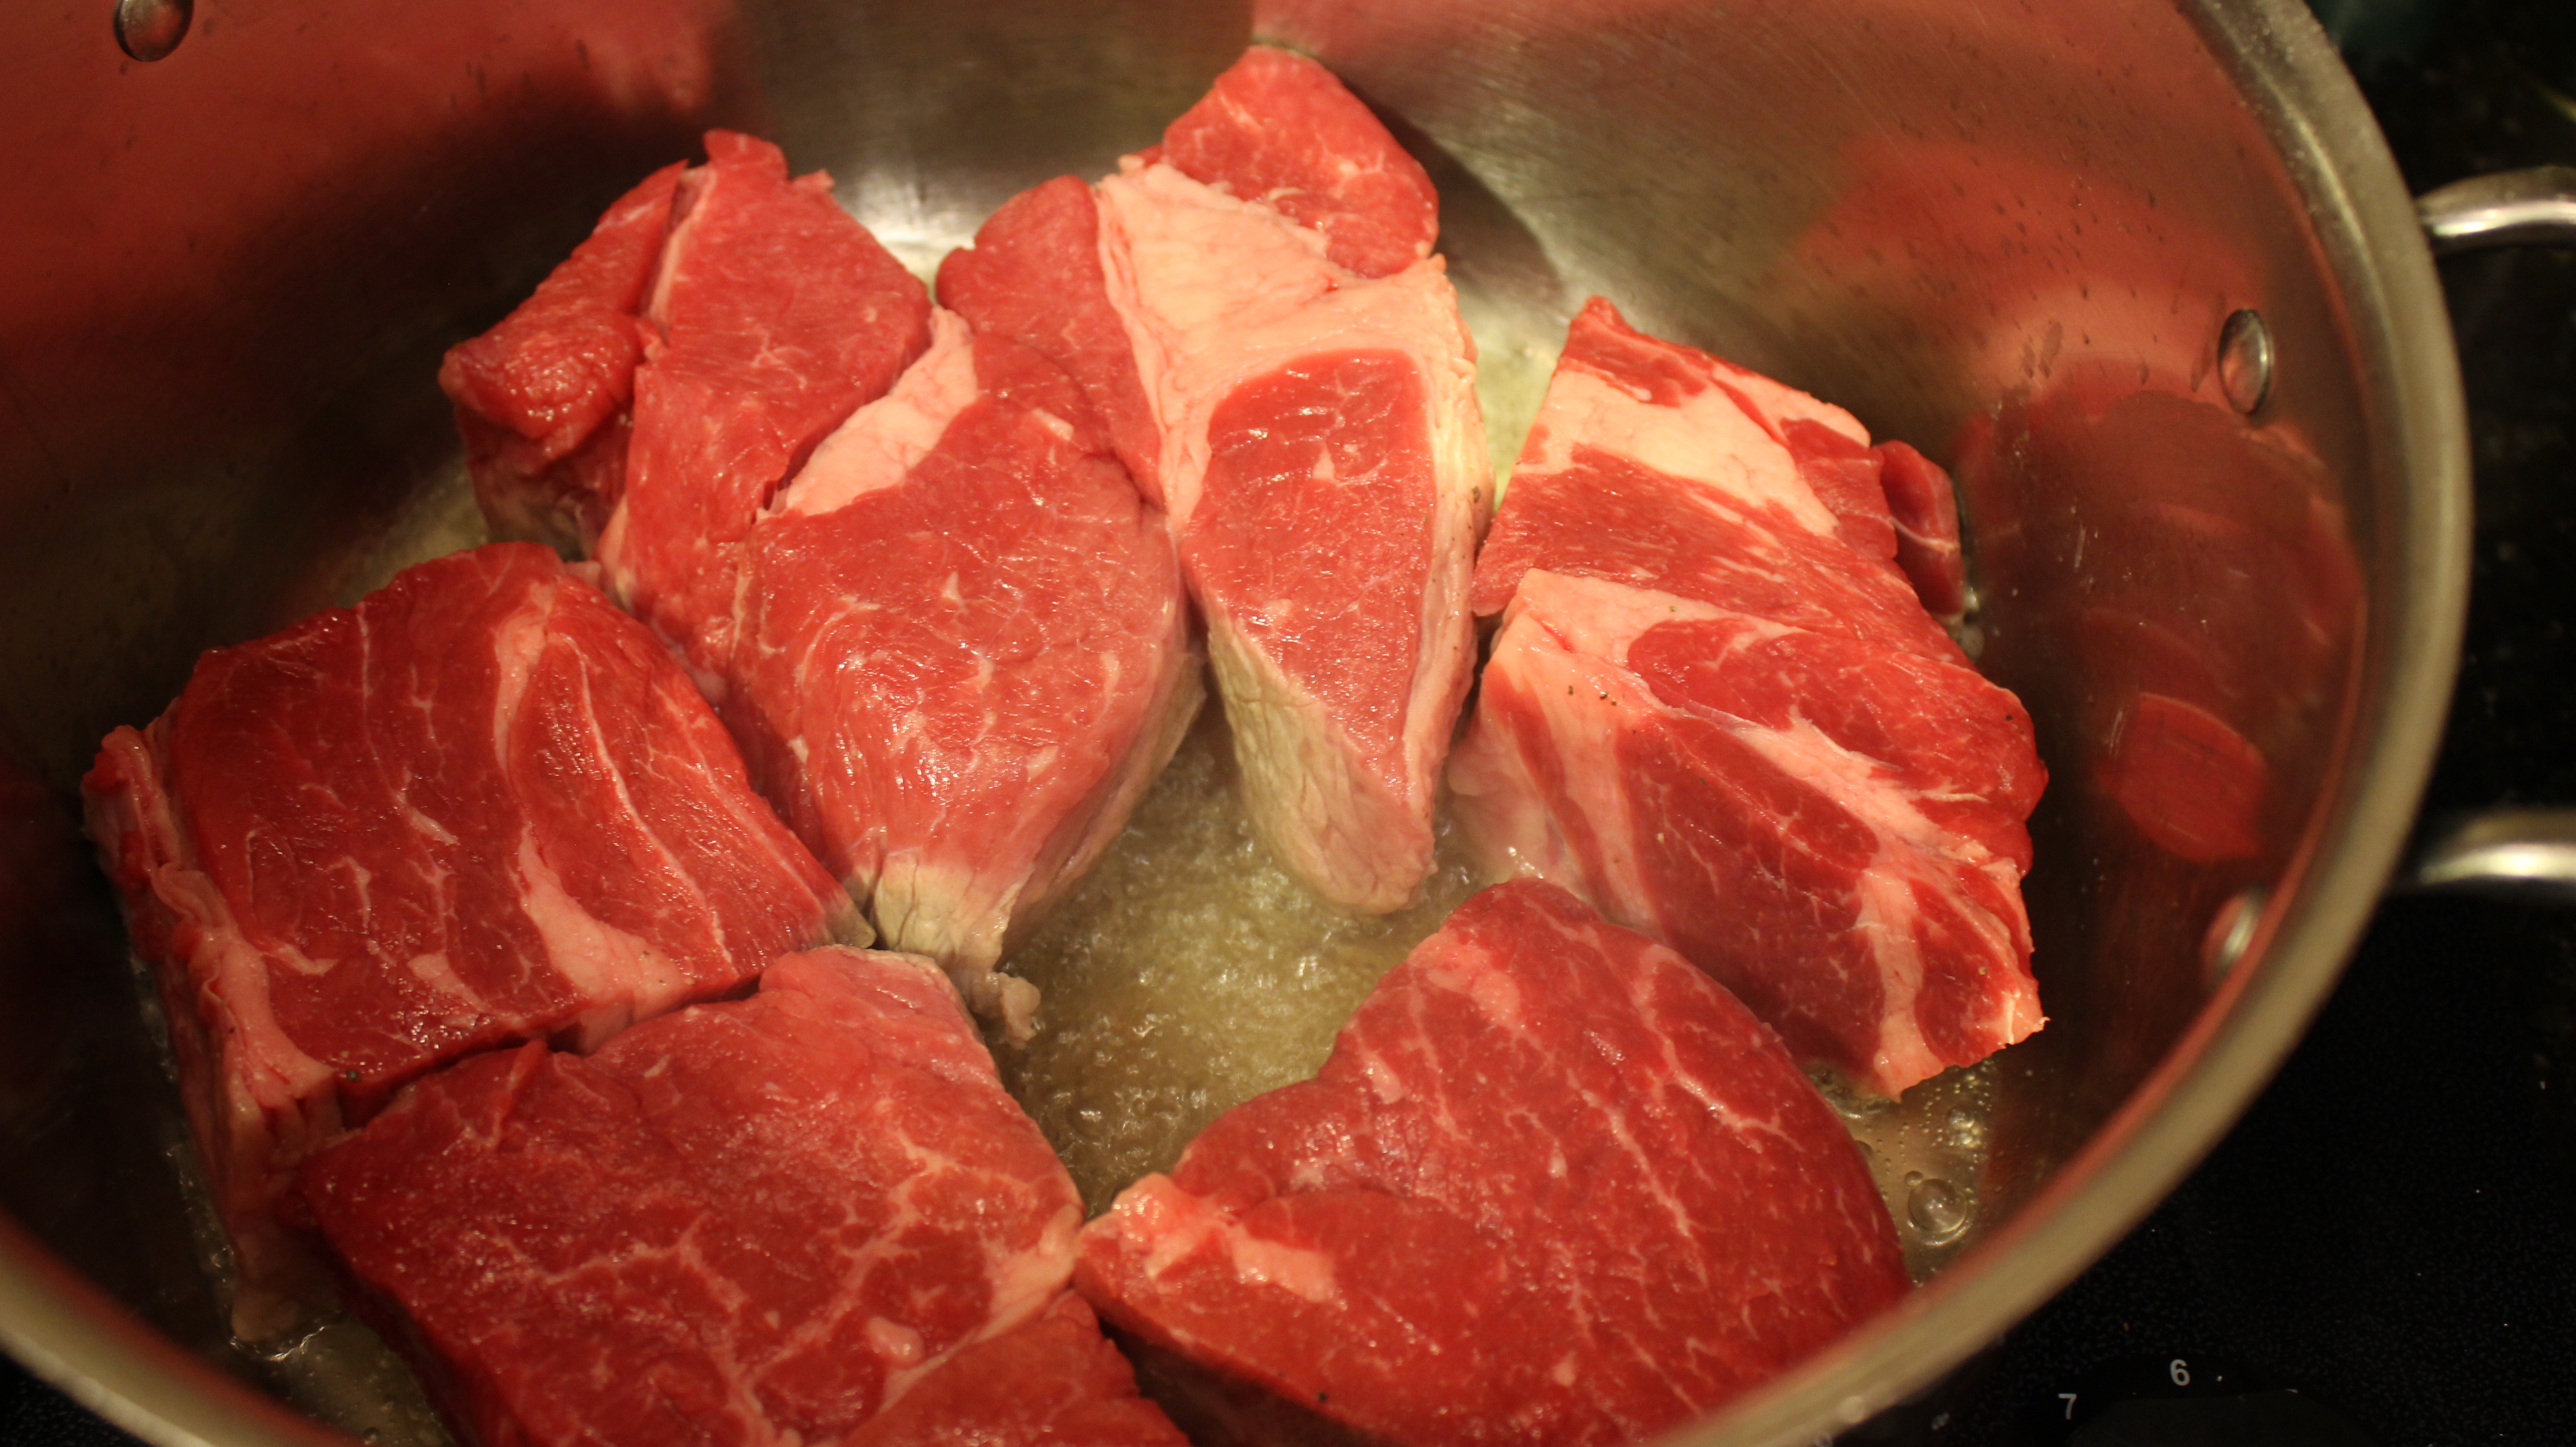
Slice the chuck roast into 6 pieces
Salt and pepper the pieces
Add 3 tbsn of olive oil to a large pan on med/high heat and begin to add the beef pieces
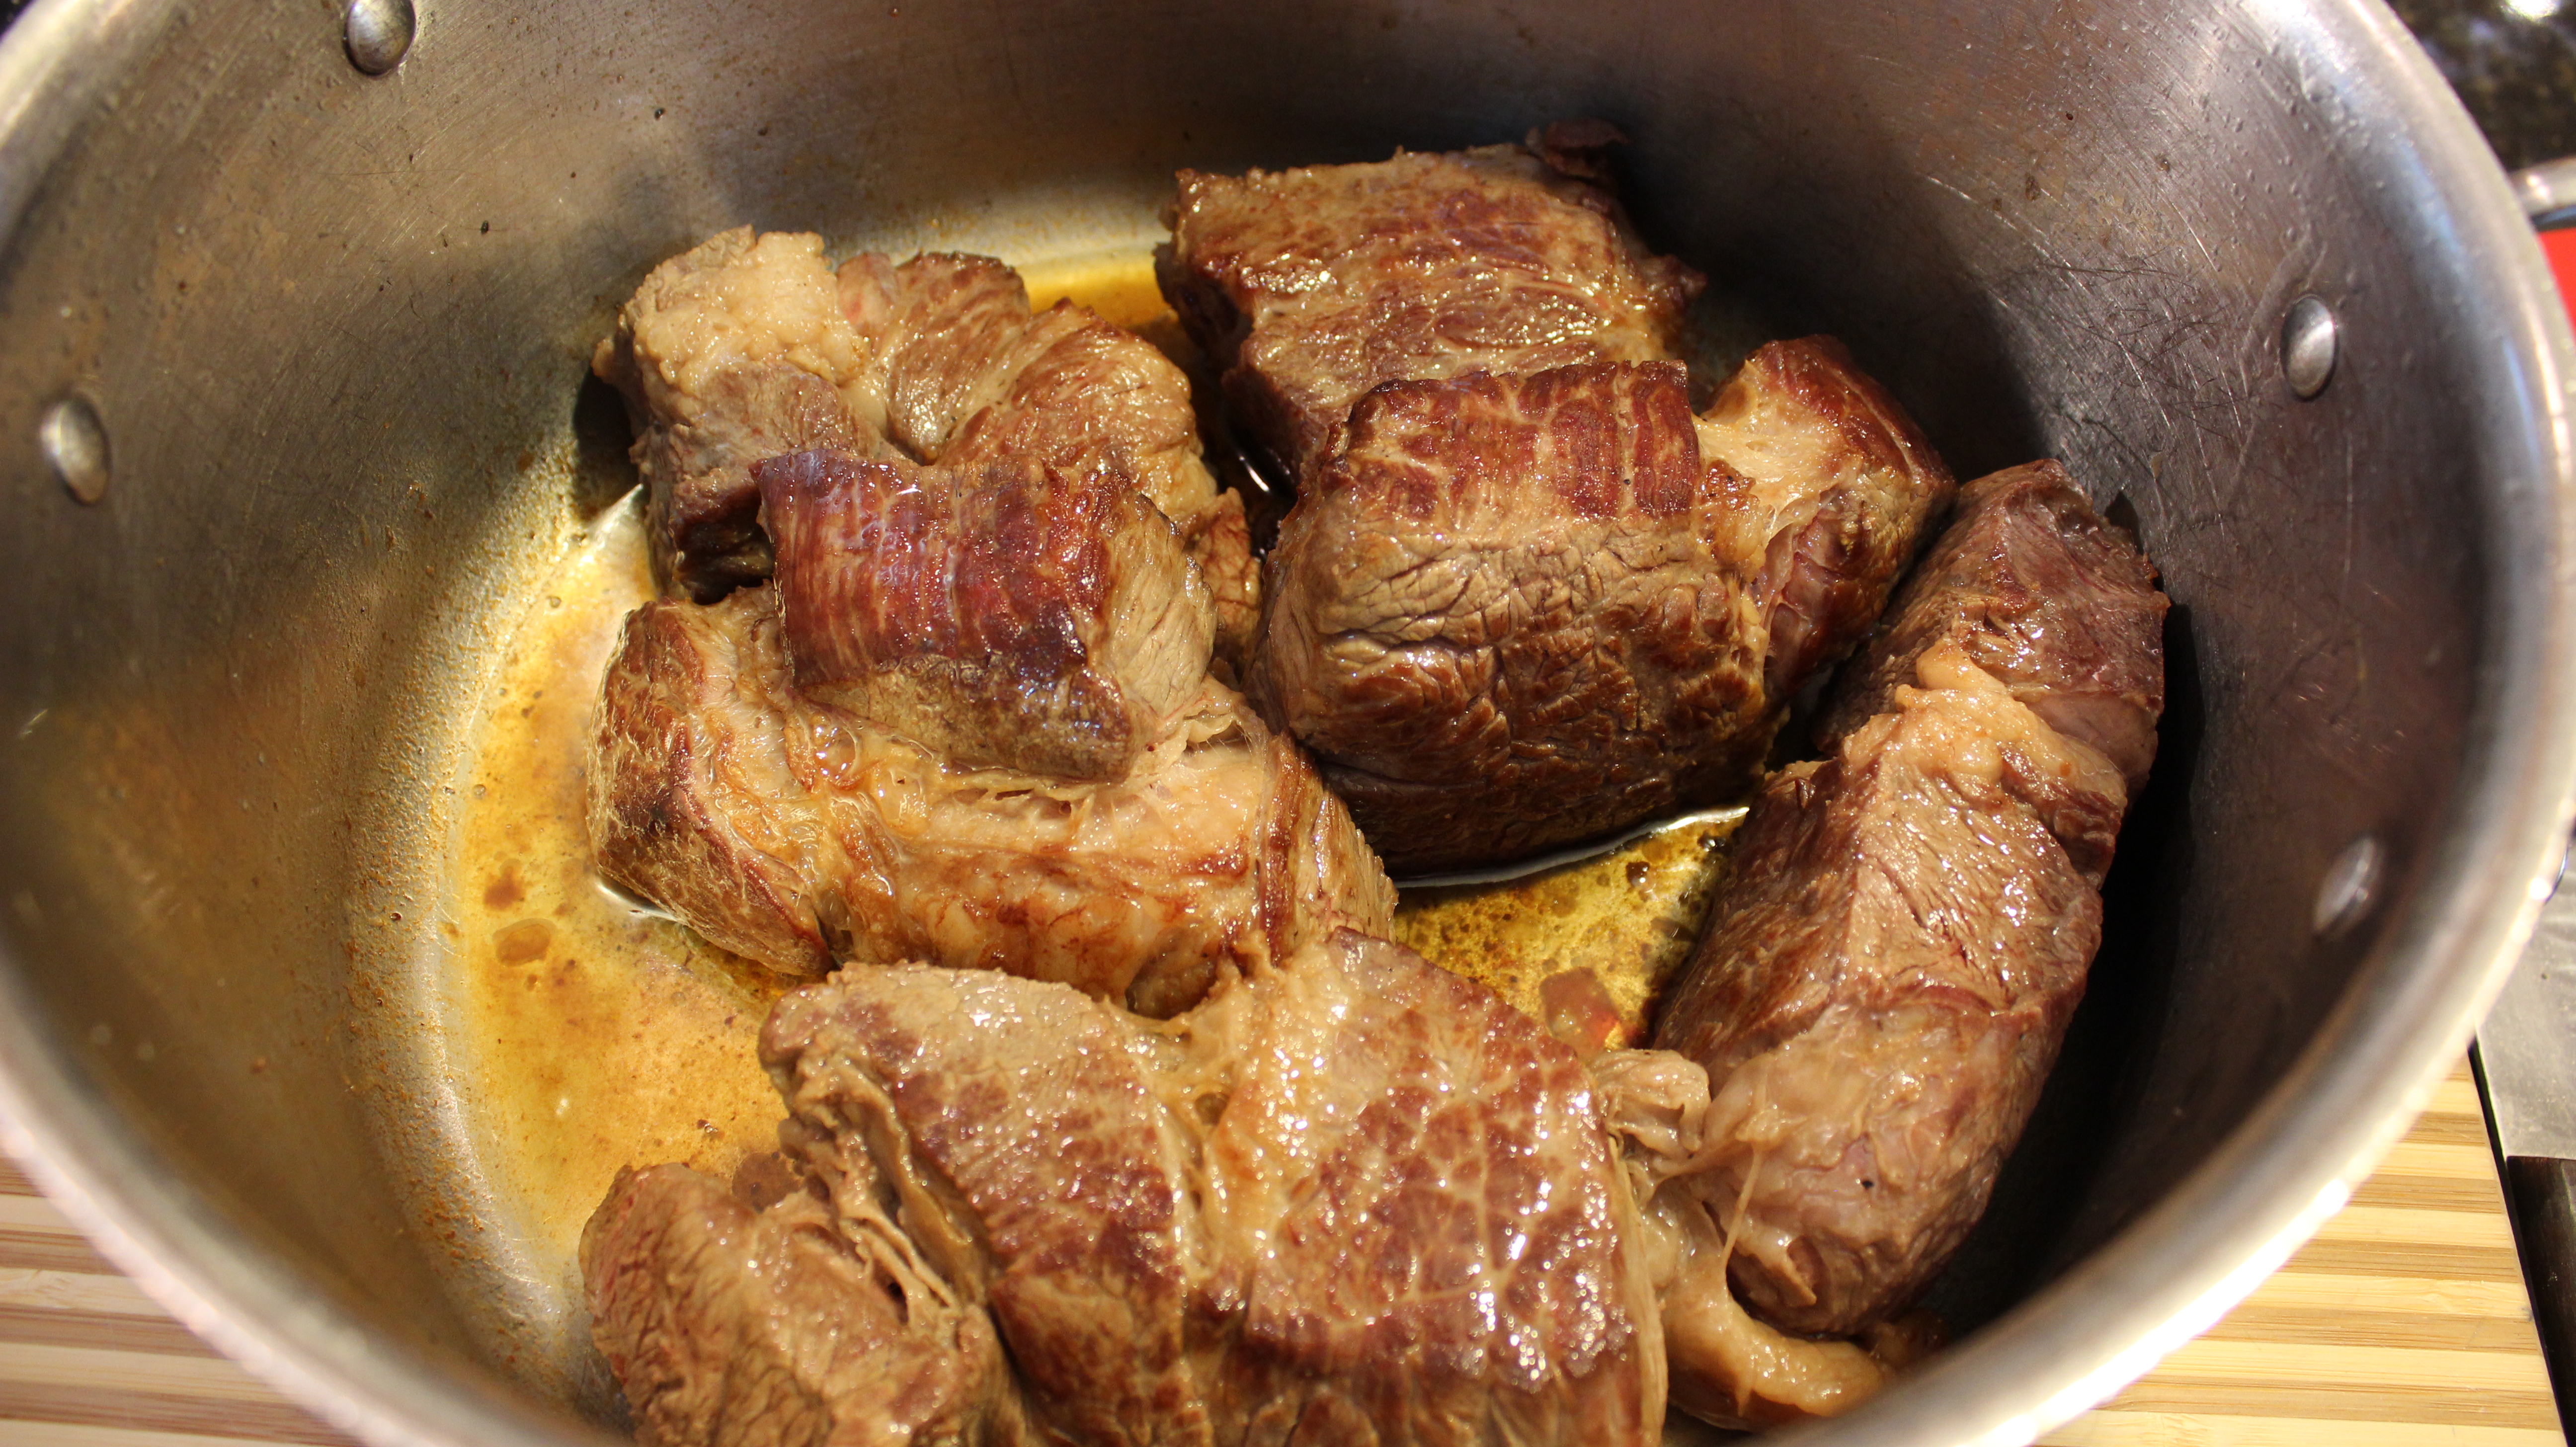
Turn up the heat to high and quickly sear all sides til browned – this takes 10 minutes
Add in 3/4 of the bottle of red wine (be careful of steam here) and the whole jar of salsa
Bring to a simmer and pop into the oven for 2 1/2 hrs.
Every hour turn the beef pieces over so the other sides can caramelize
At 2 1/2 hours take the braising meat out of the oven and begin to remove the beef to a dish wear you can start to pull apart the beef pieces
Tilt the braising pan to the side so that you can skim off the fat that rendered out of the meat
Pour the left over juice onto the pulled beef and serve with taco shells and my mango salsa…enjoy!
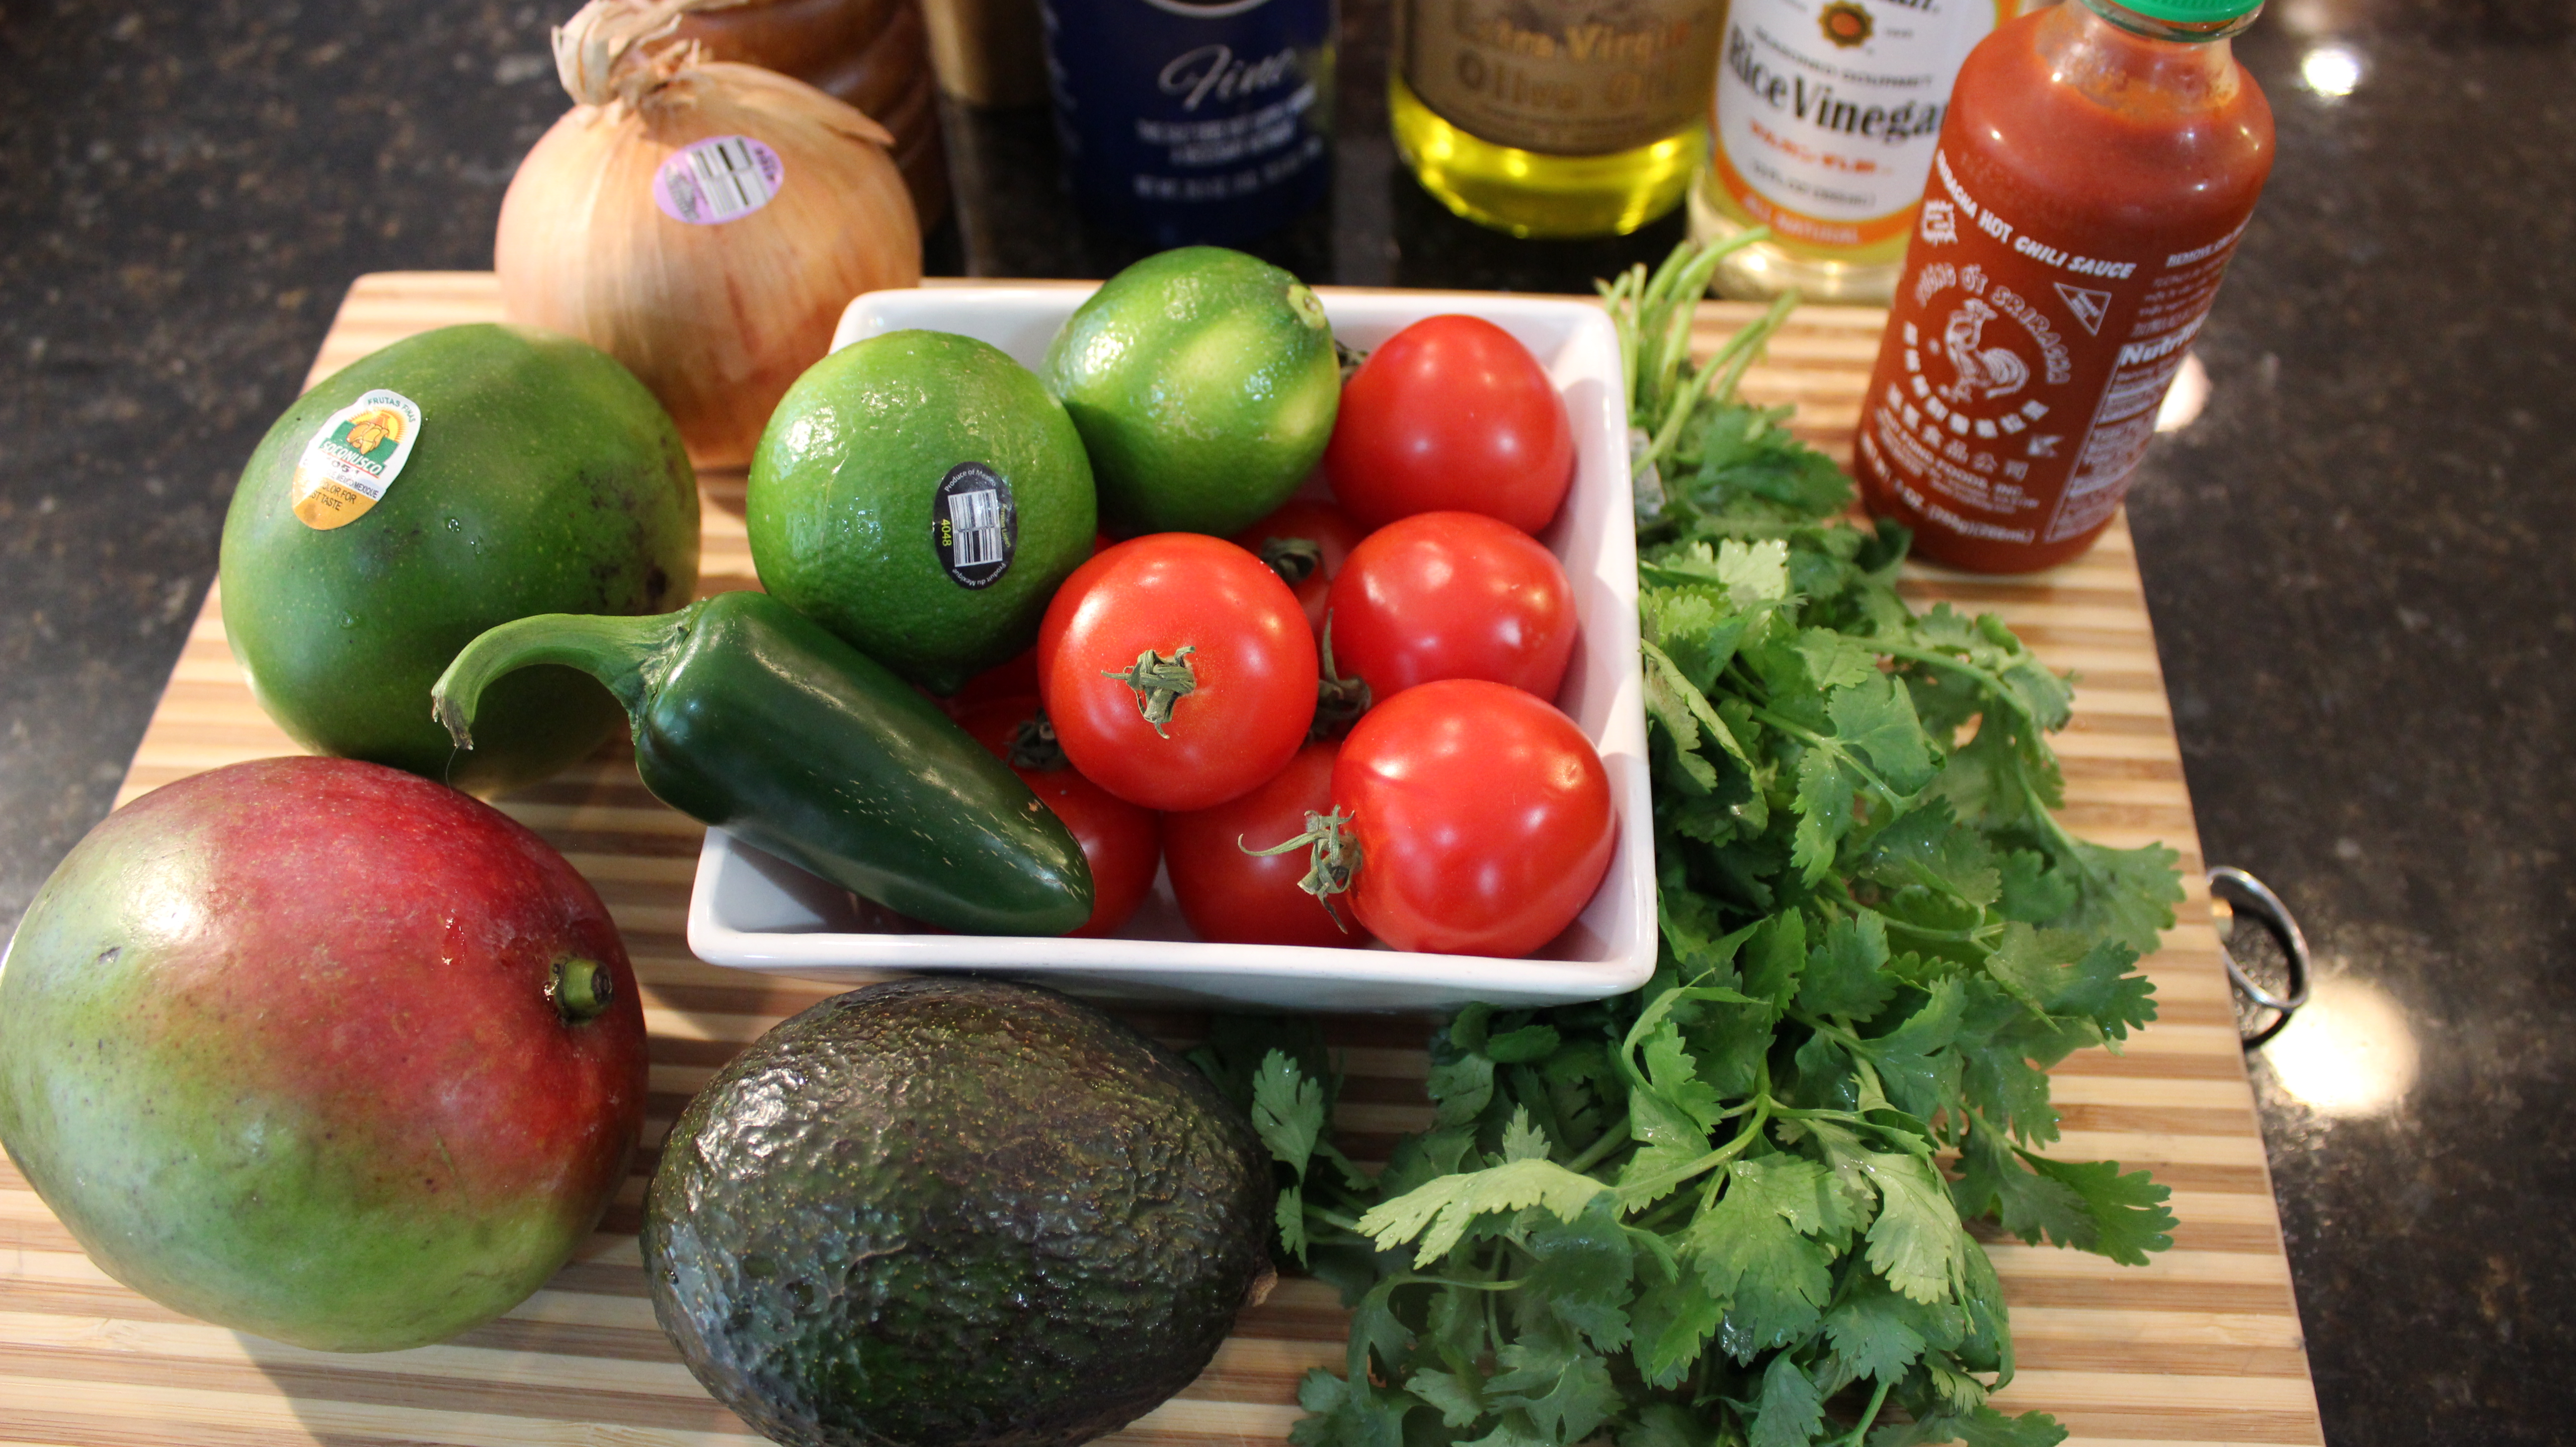
Add all of the ingredients to a large bowl and mix thoroughly.
We really love to eats this salsa with blue chips too
I have also served this salsa up on the tips of endive leaves, and or with a cooked shrimp on top of that ….yum!
I must warn you this salsa is highly addictive……consume at your own risk! LOL
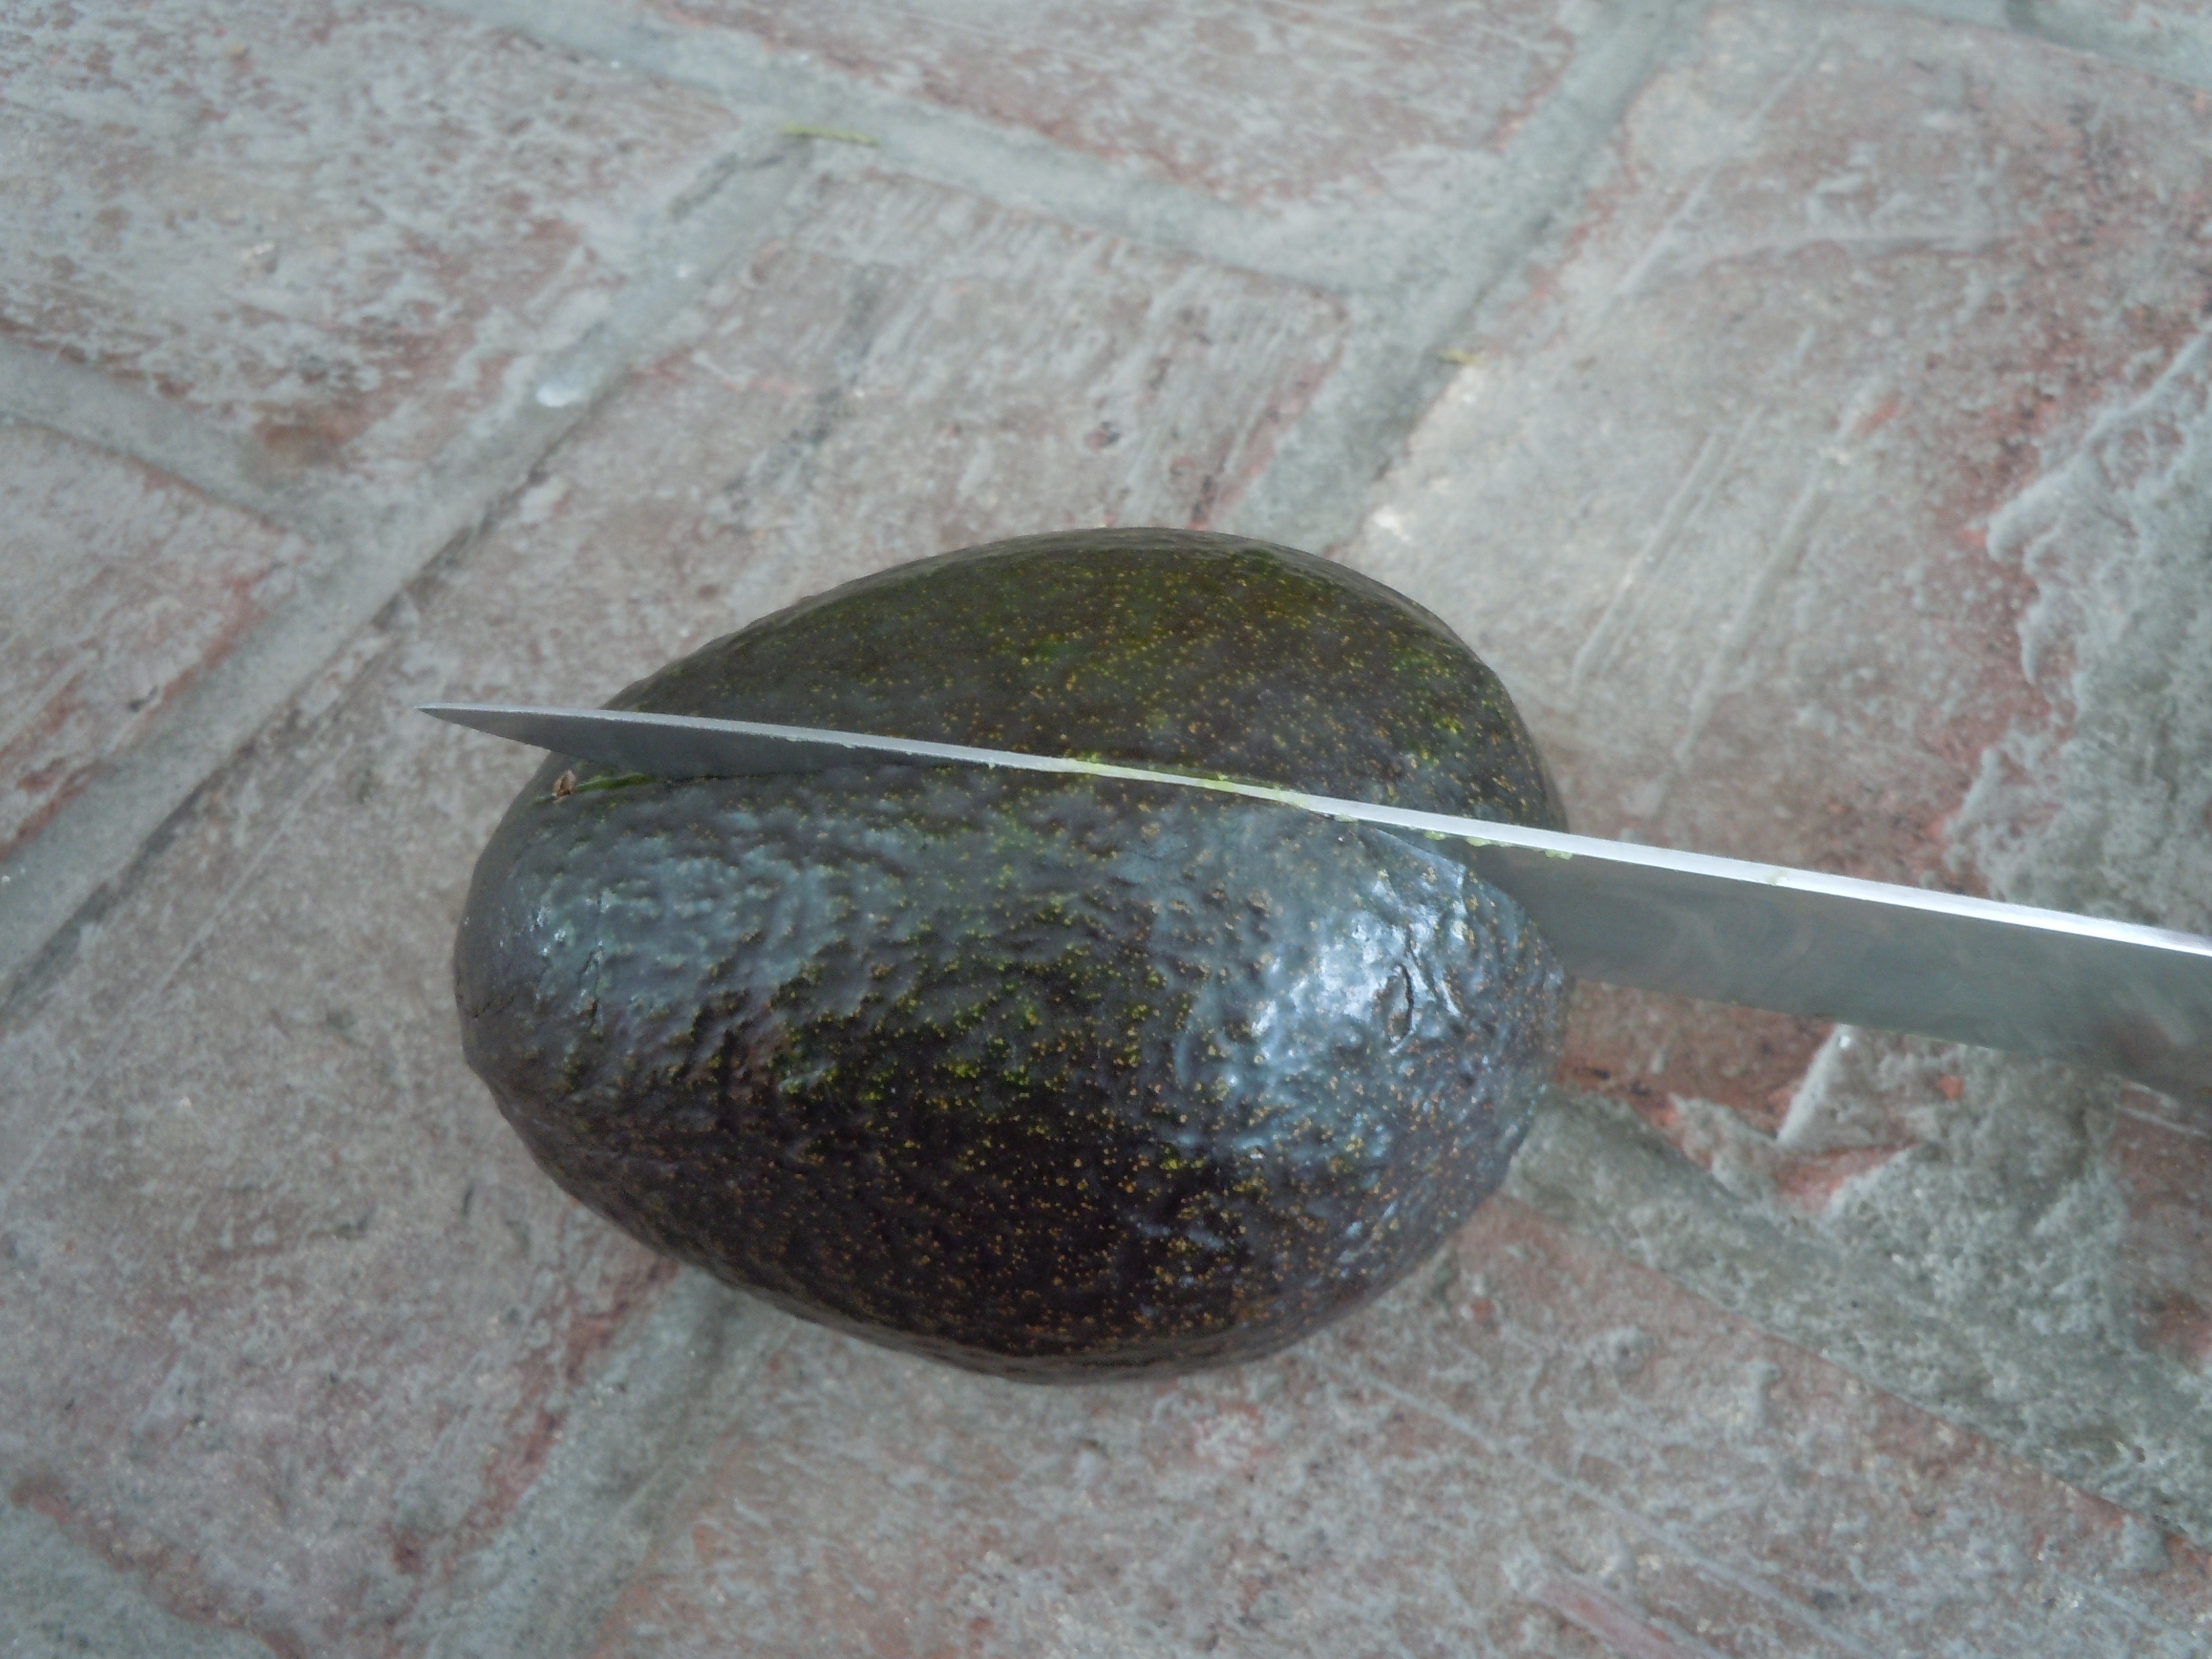
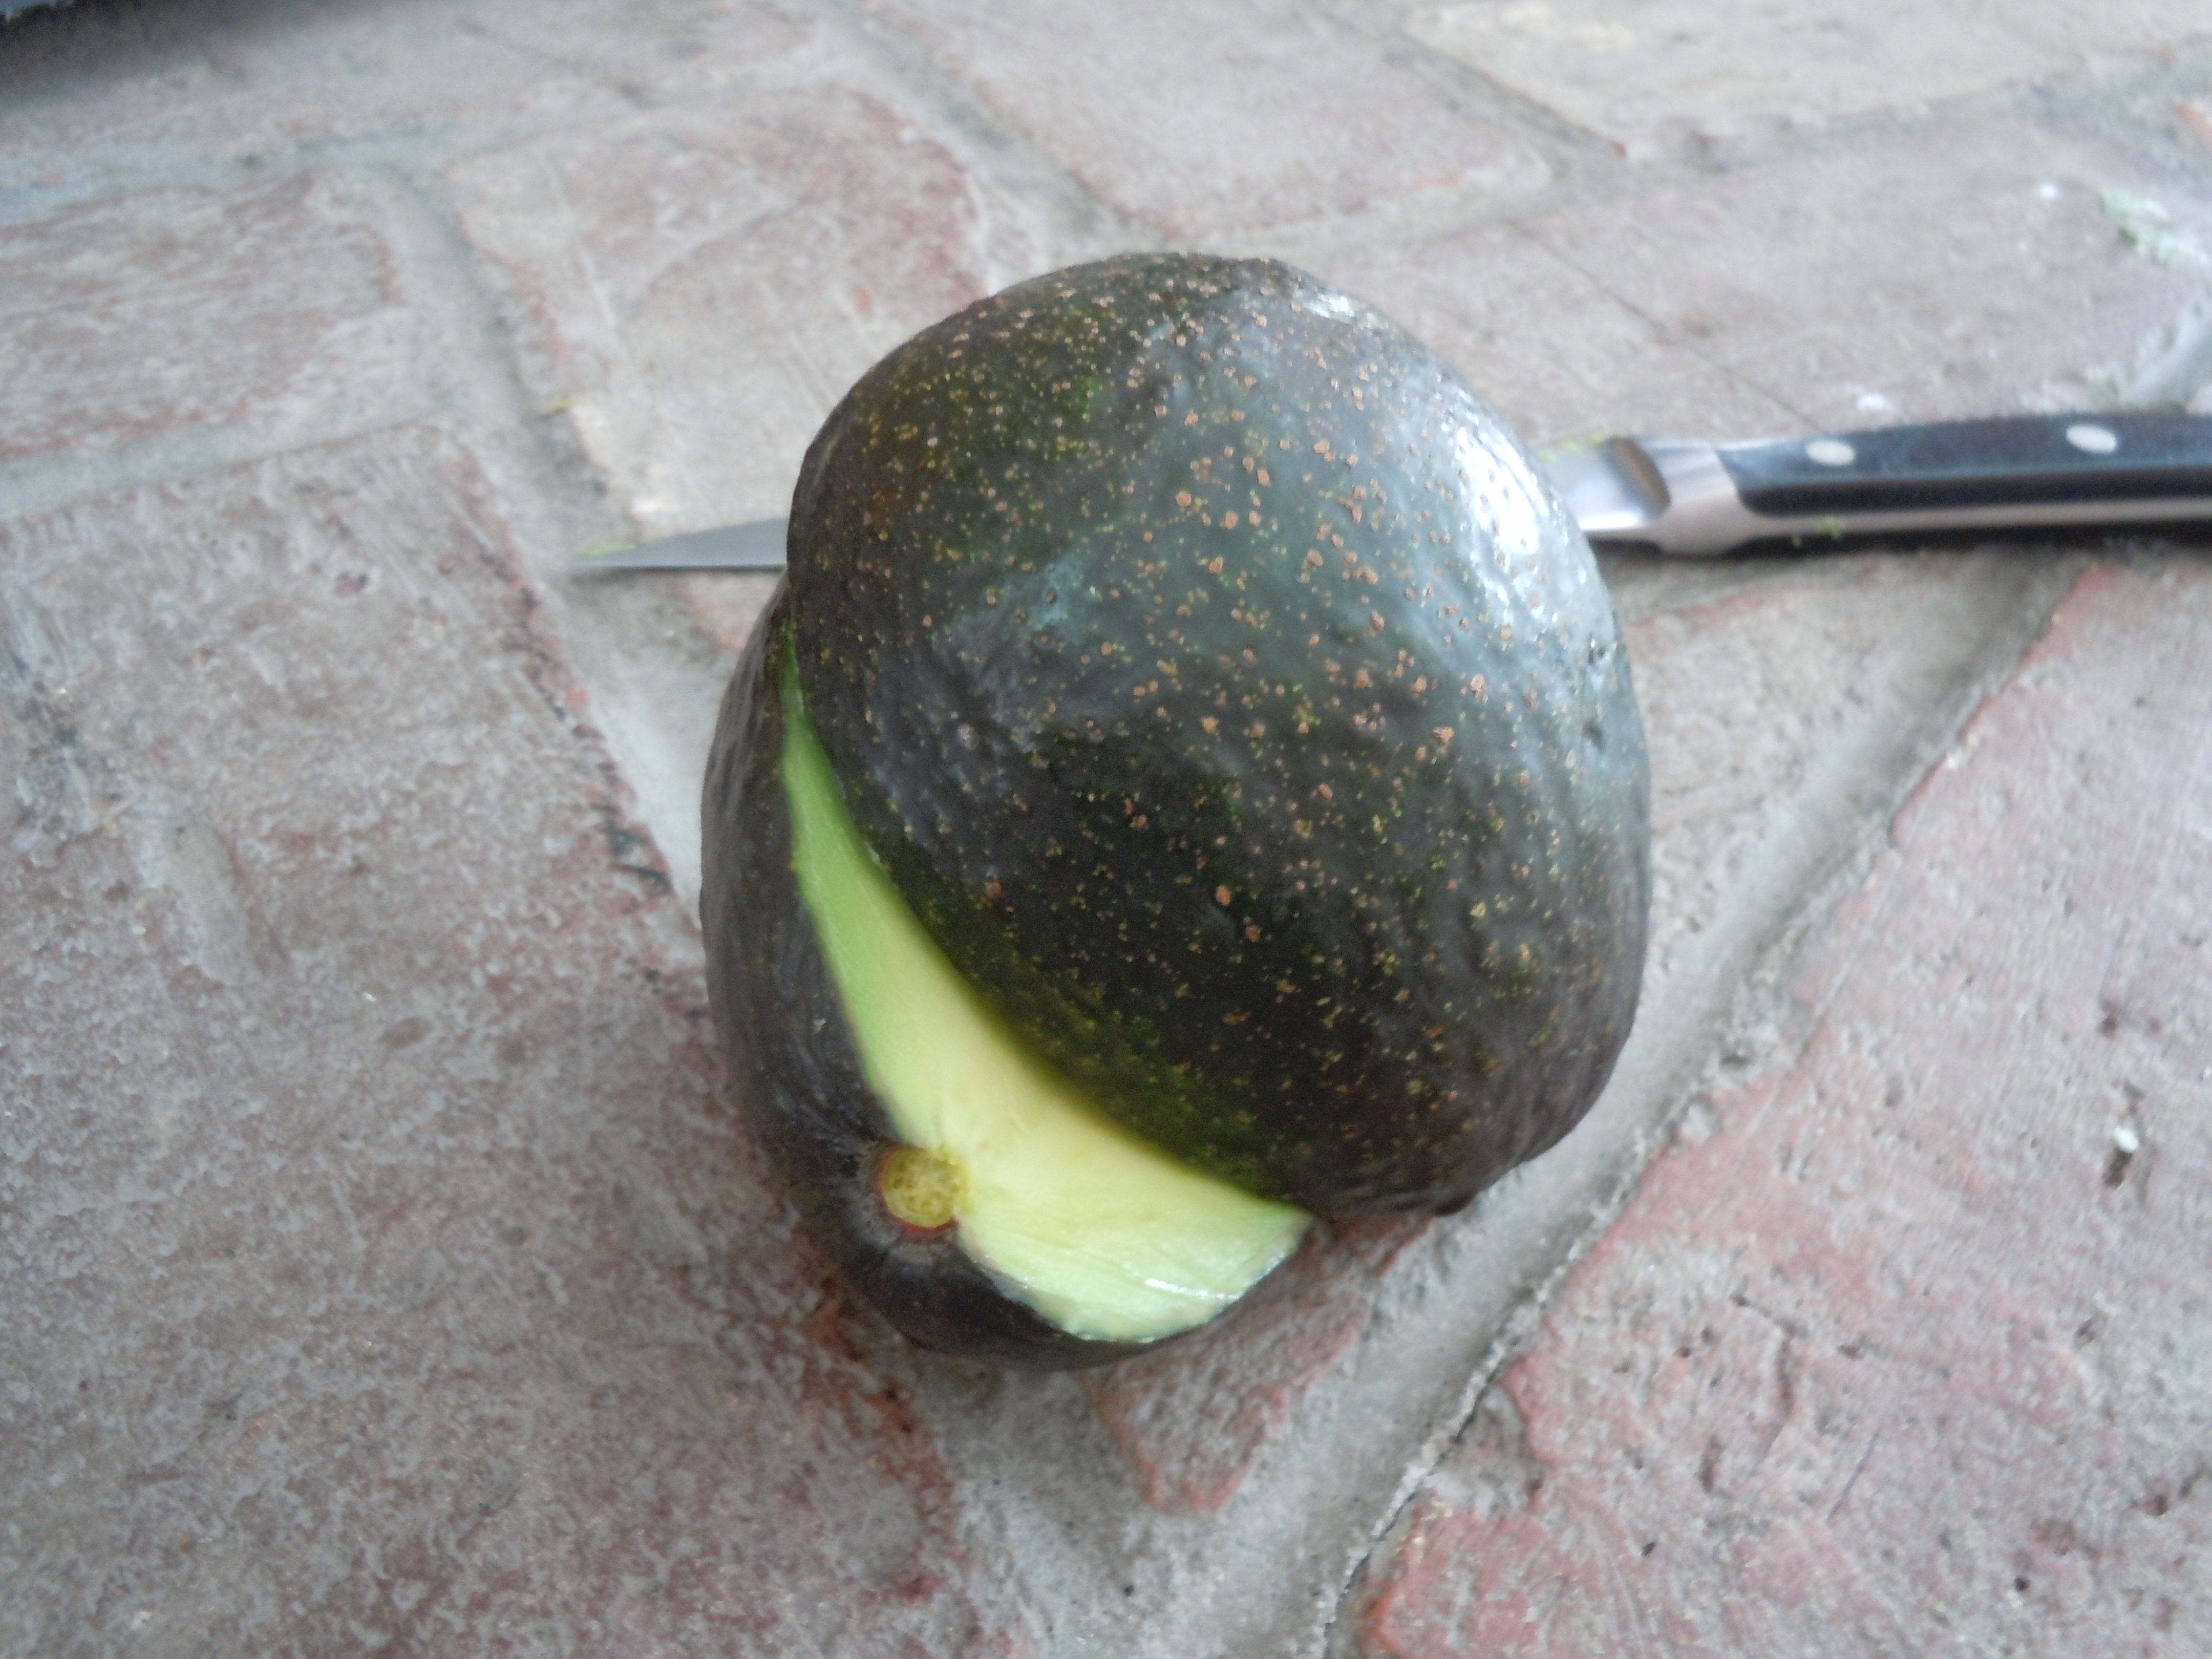
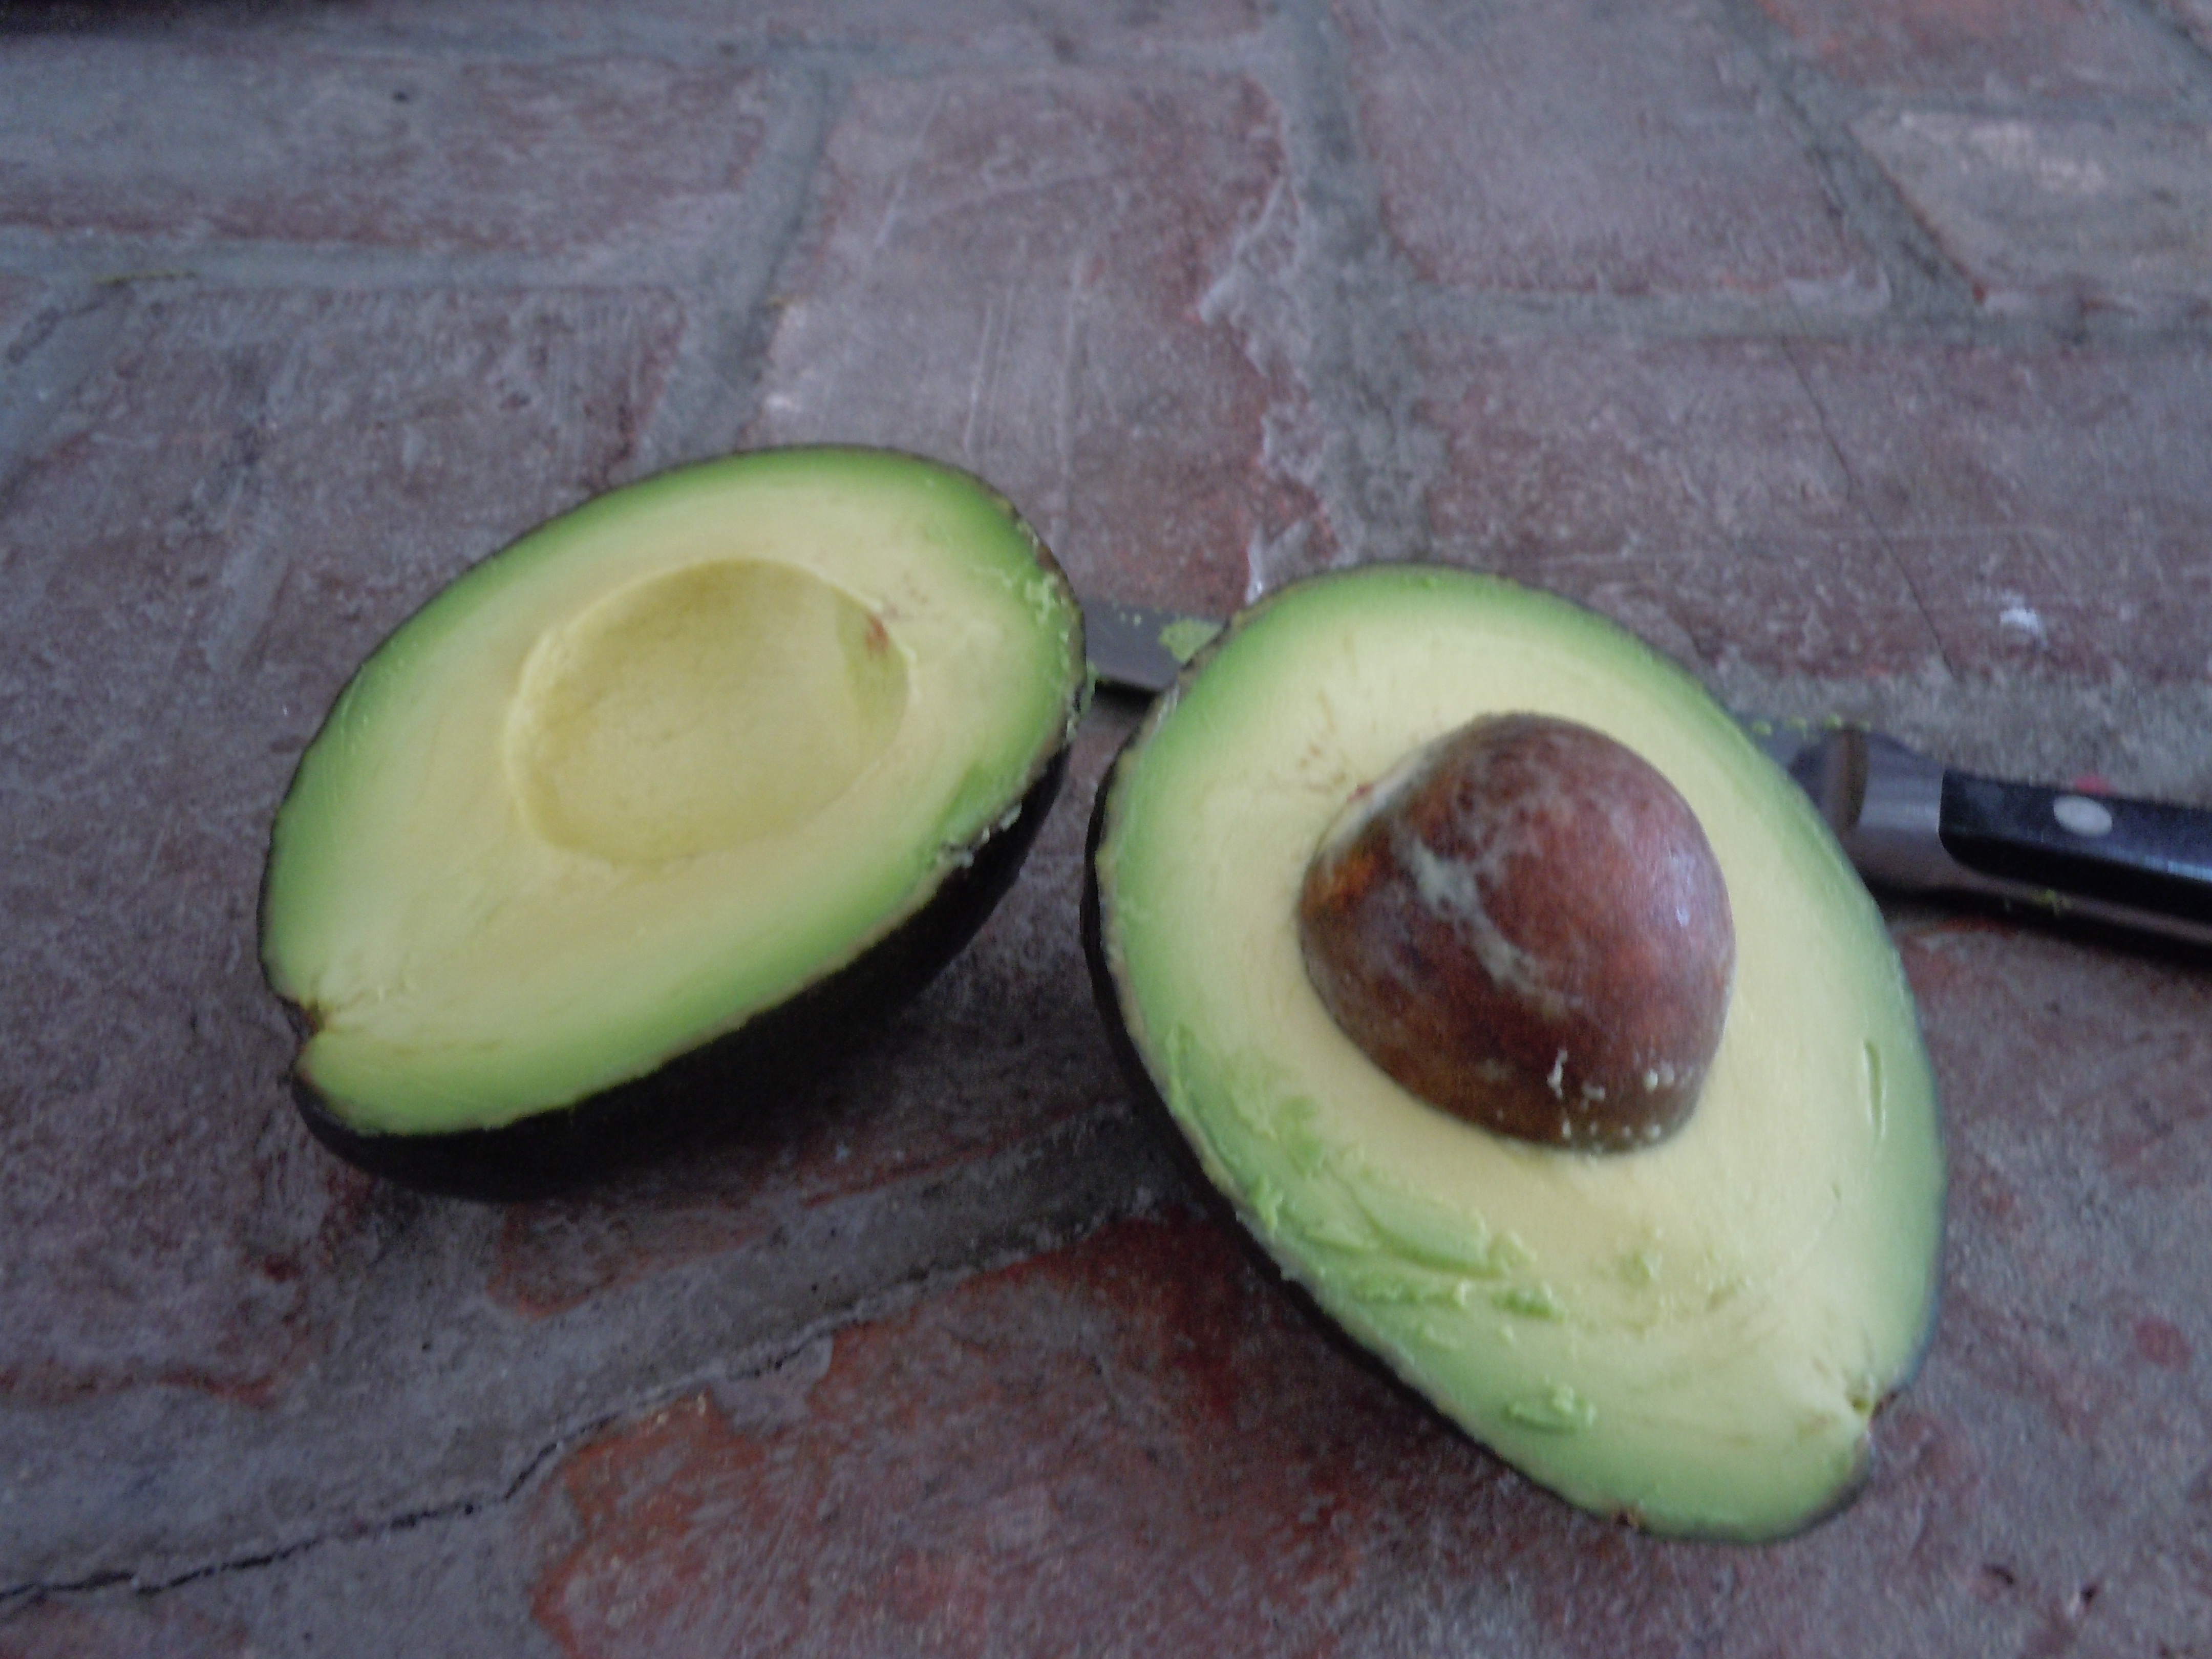
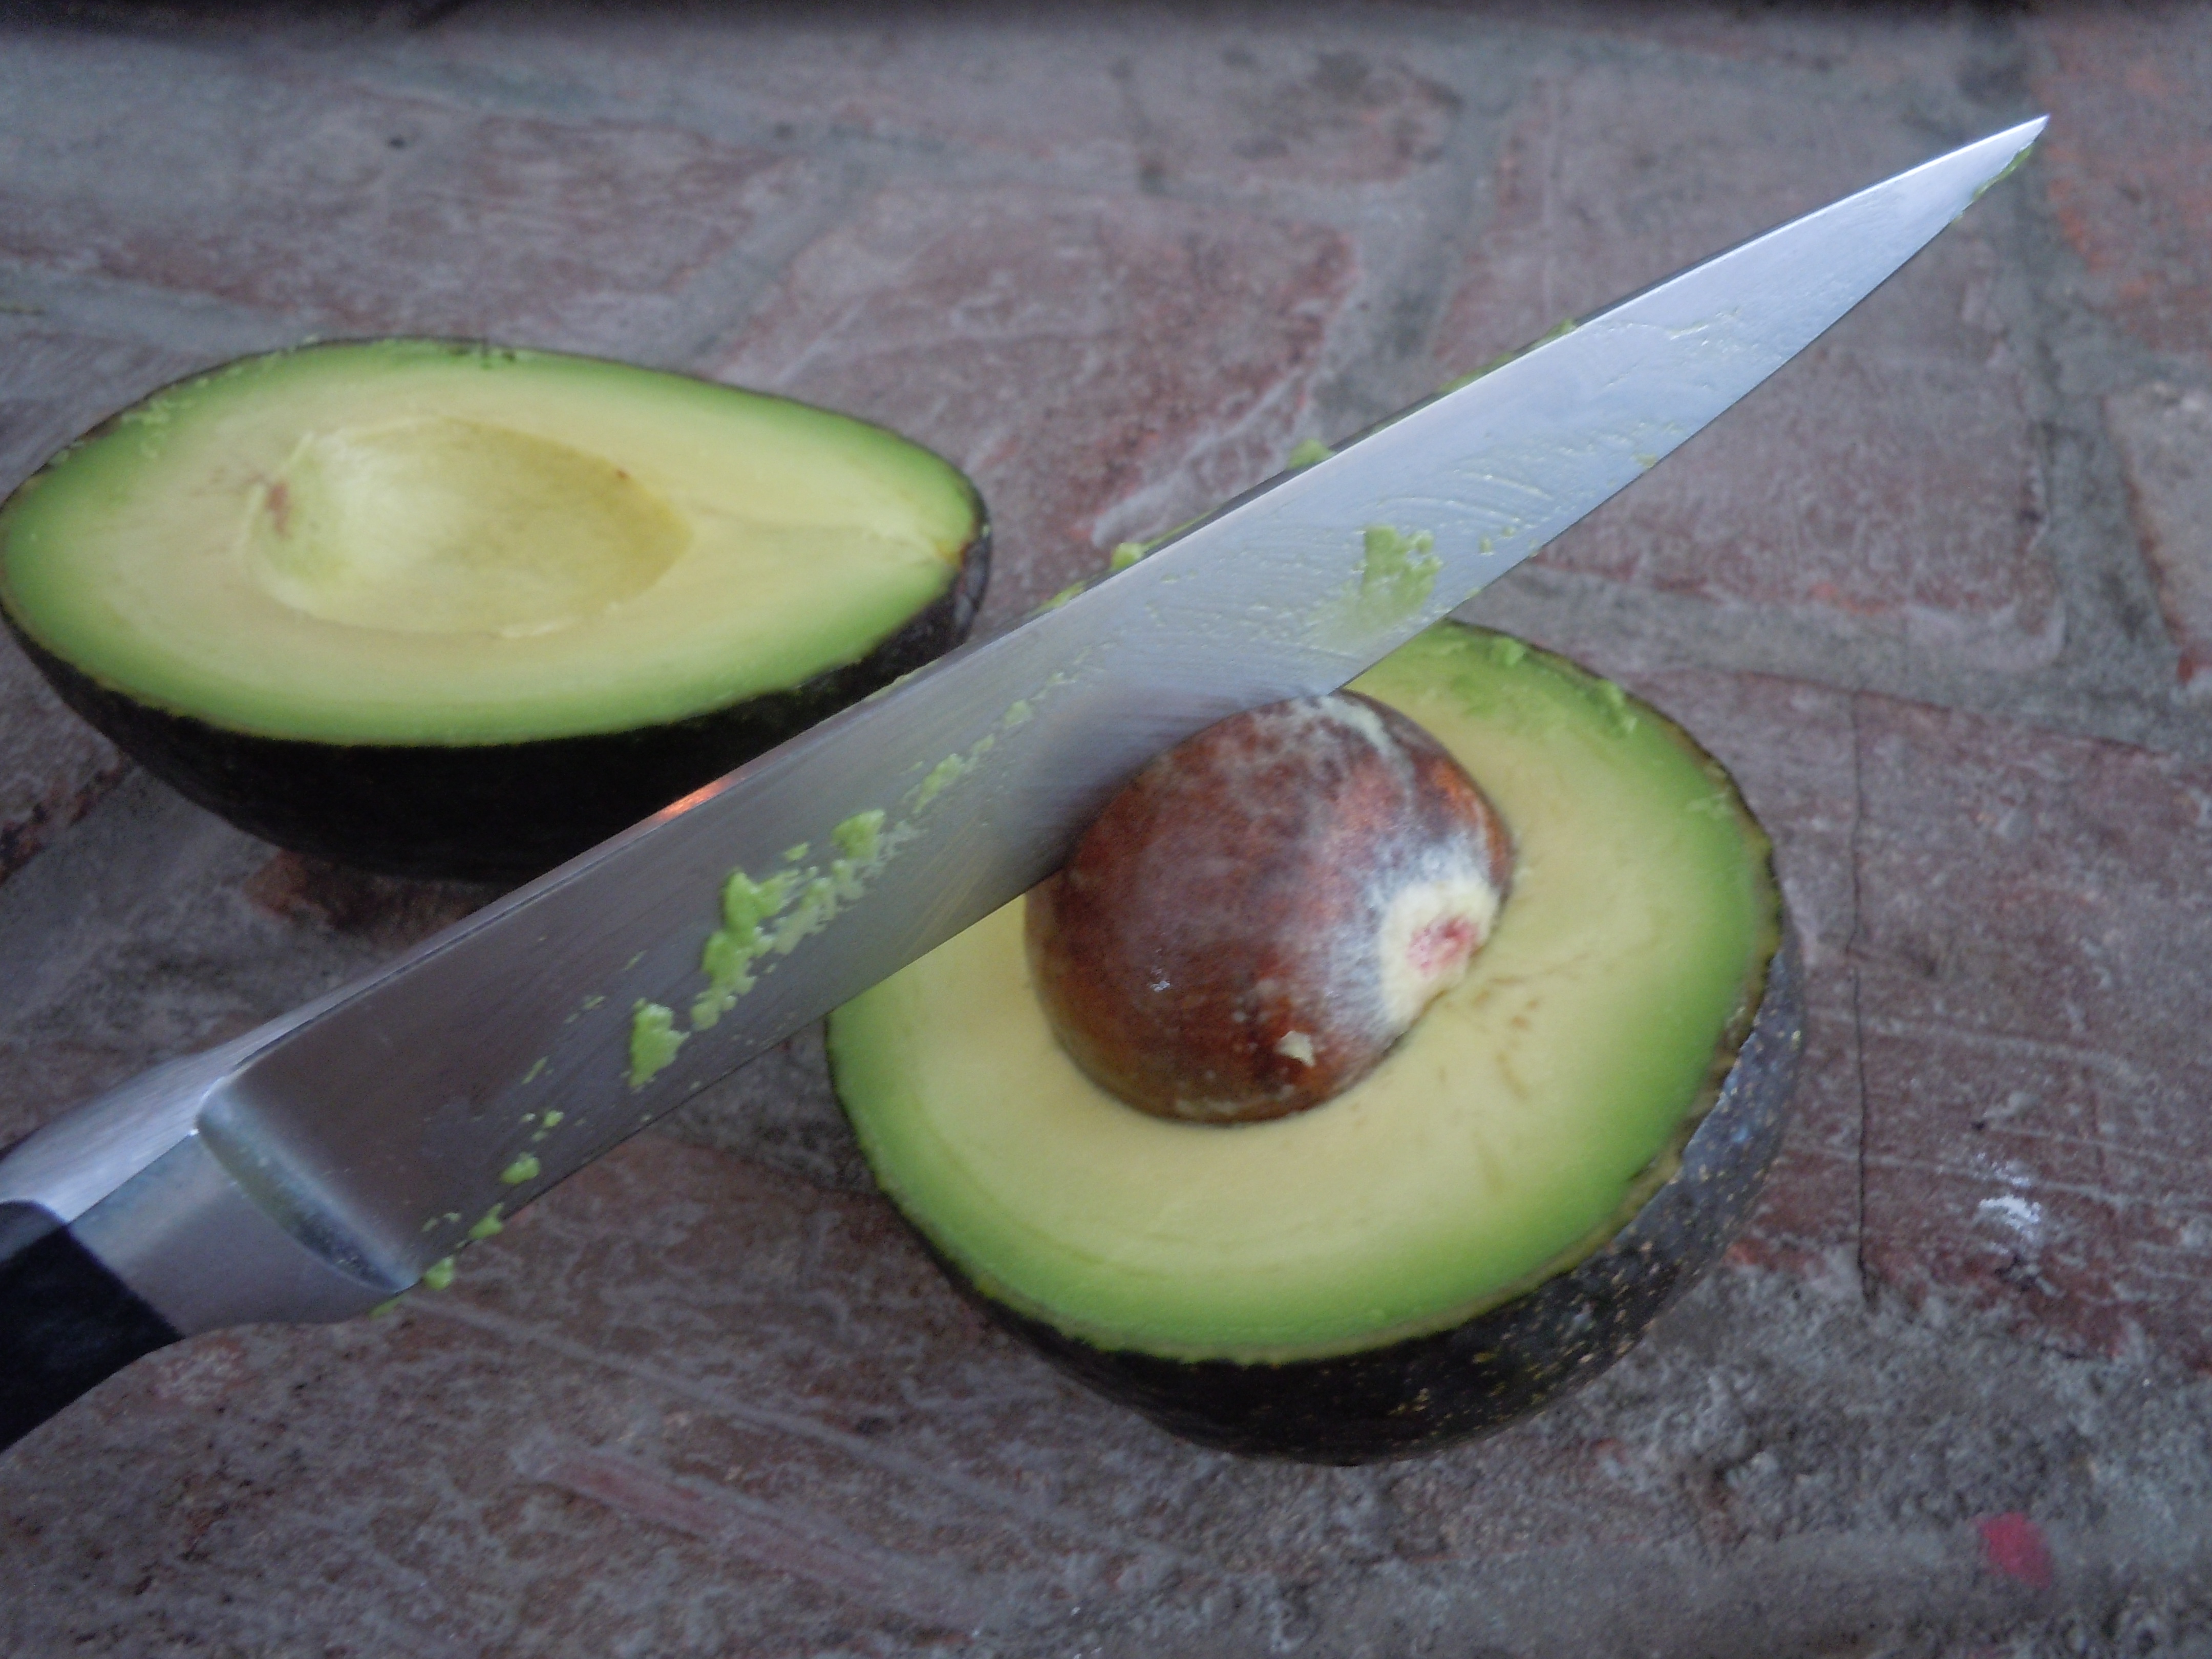
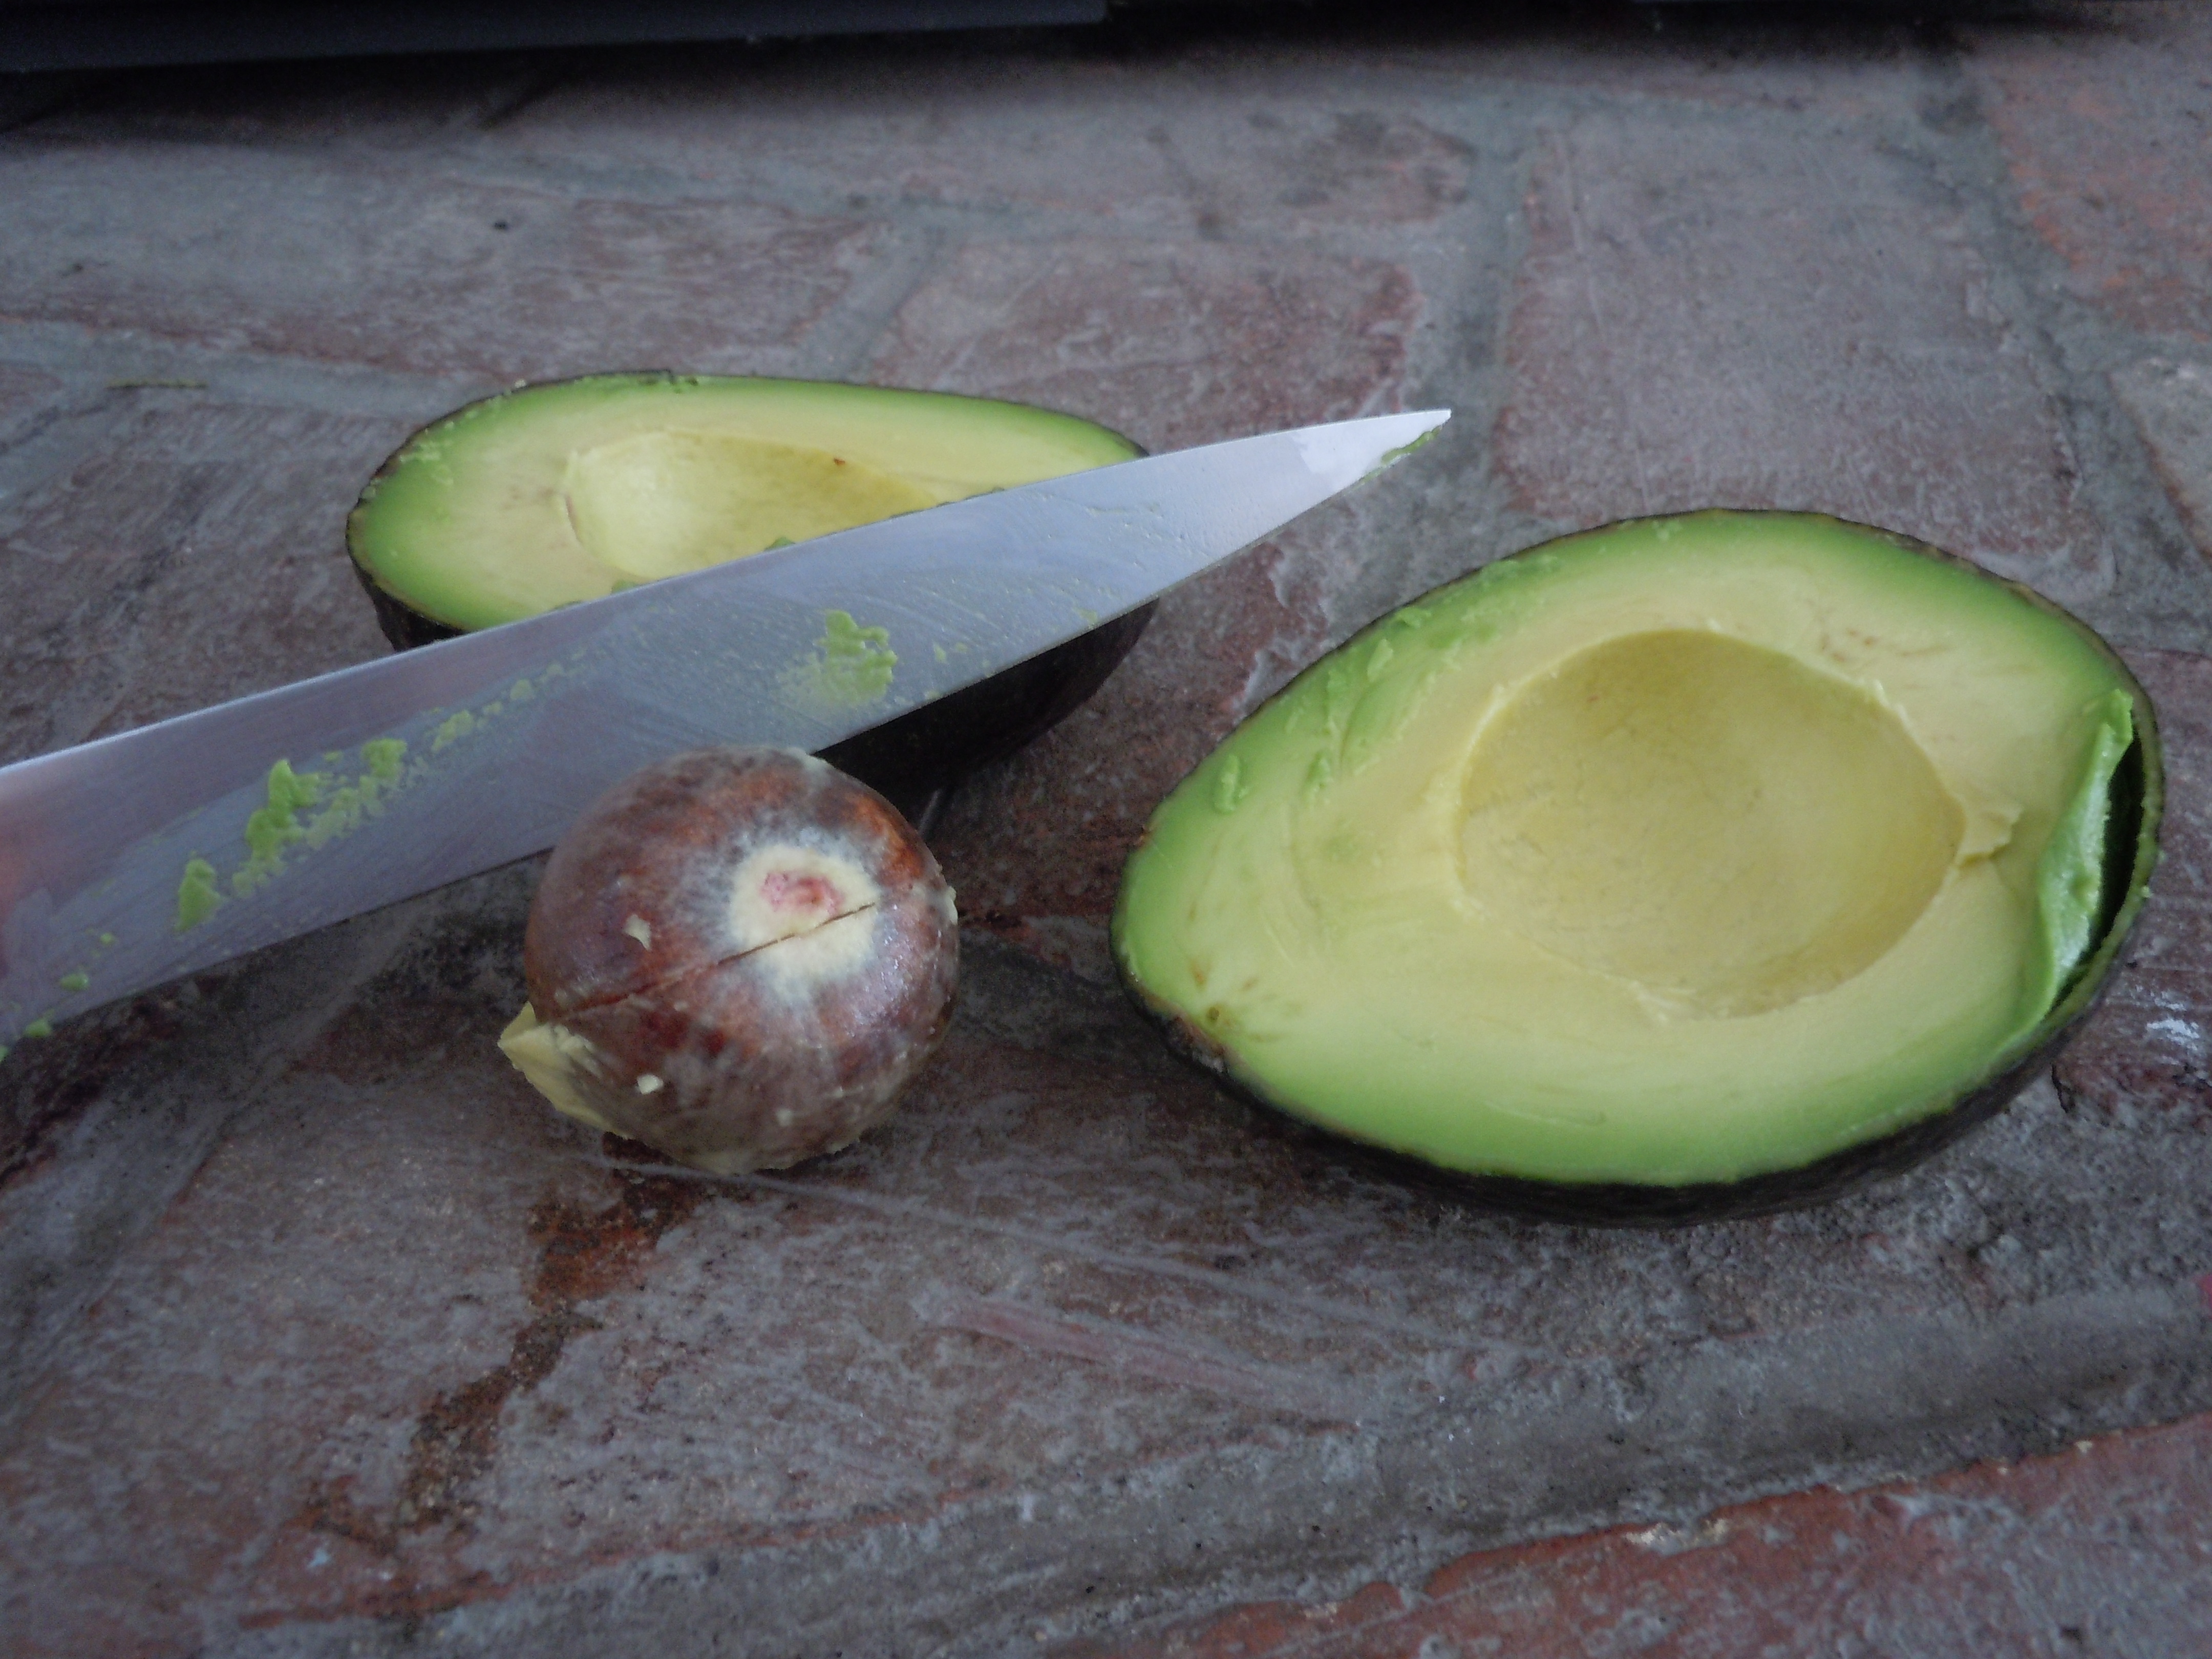
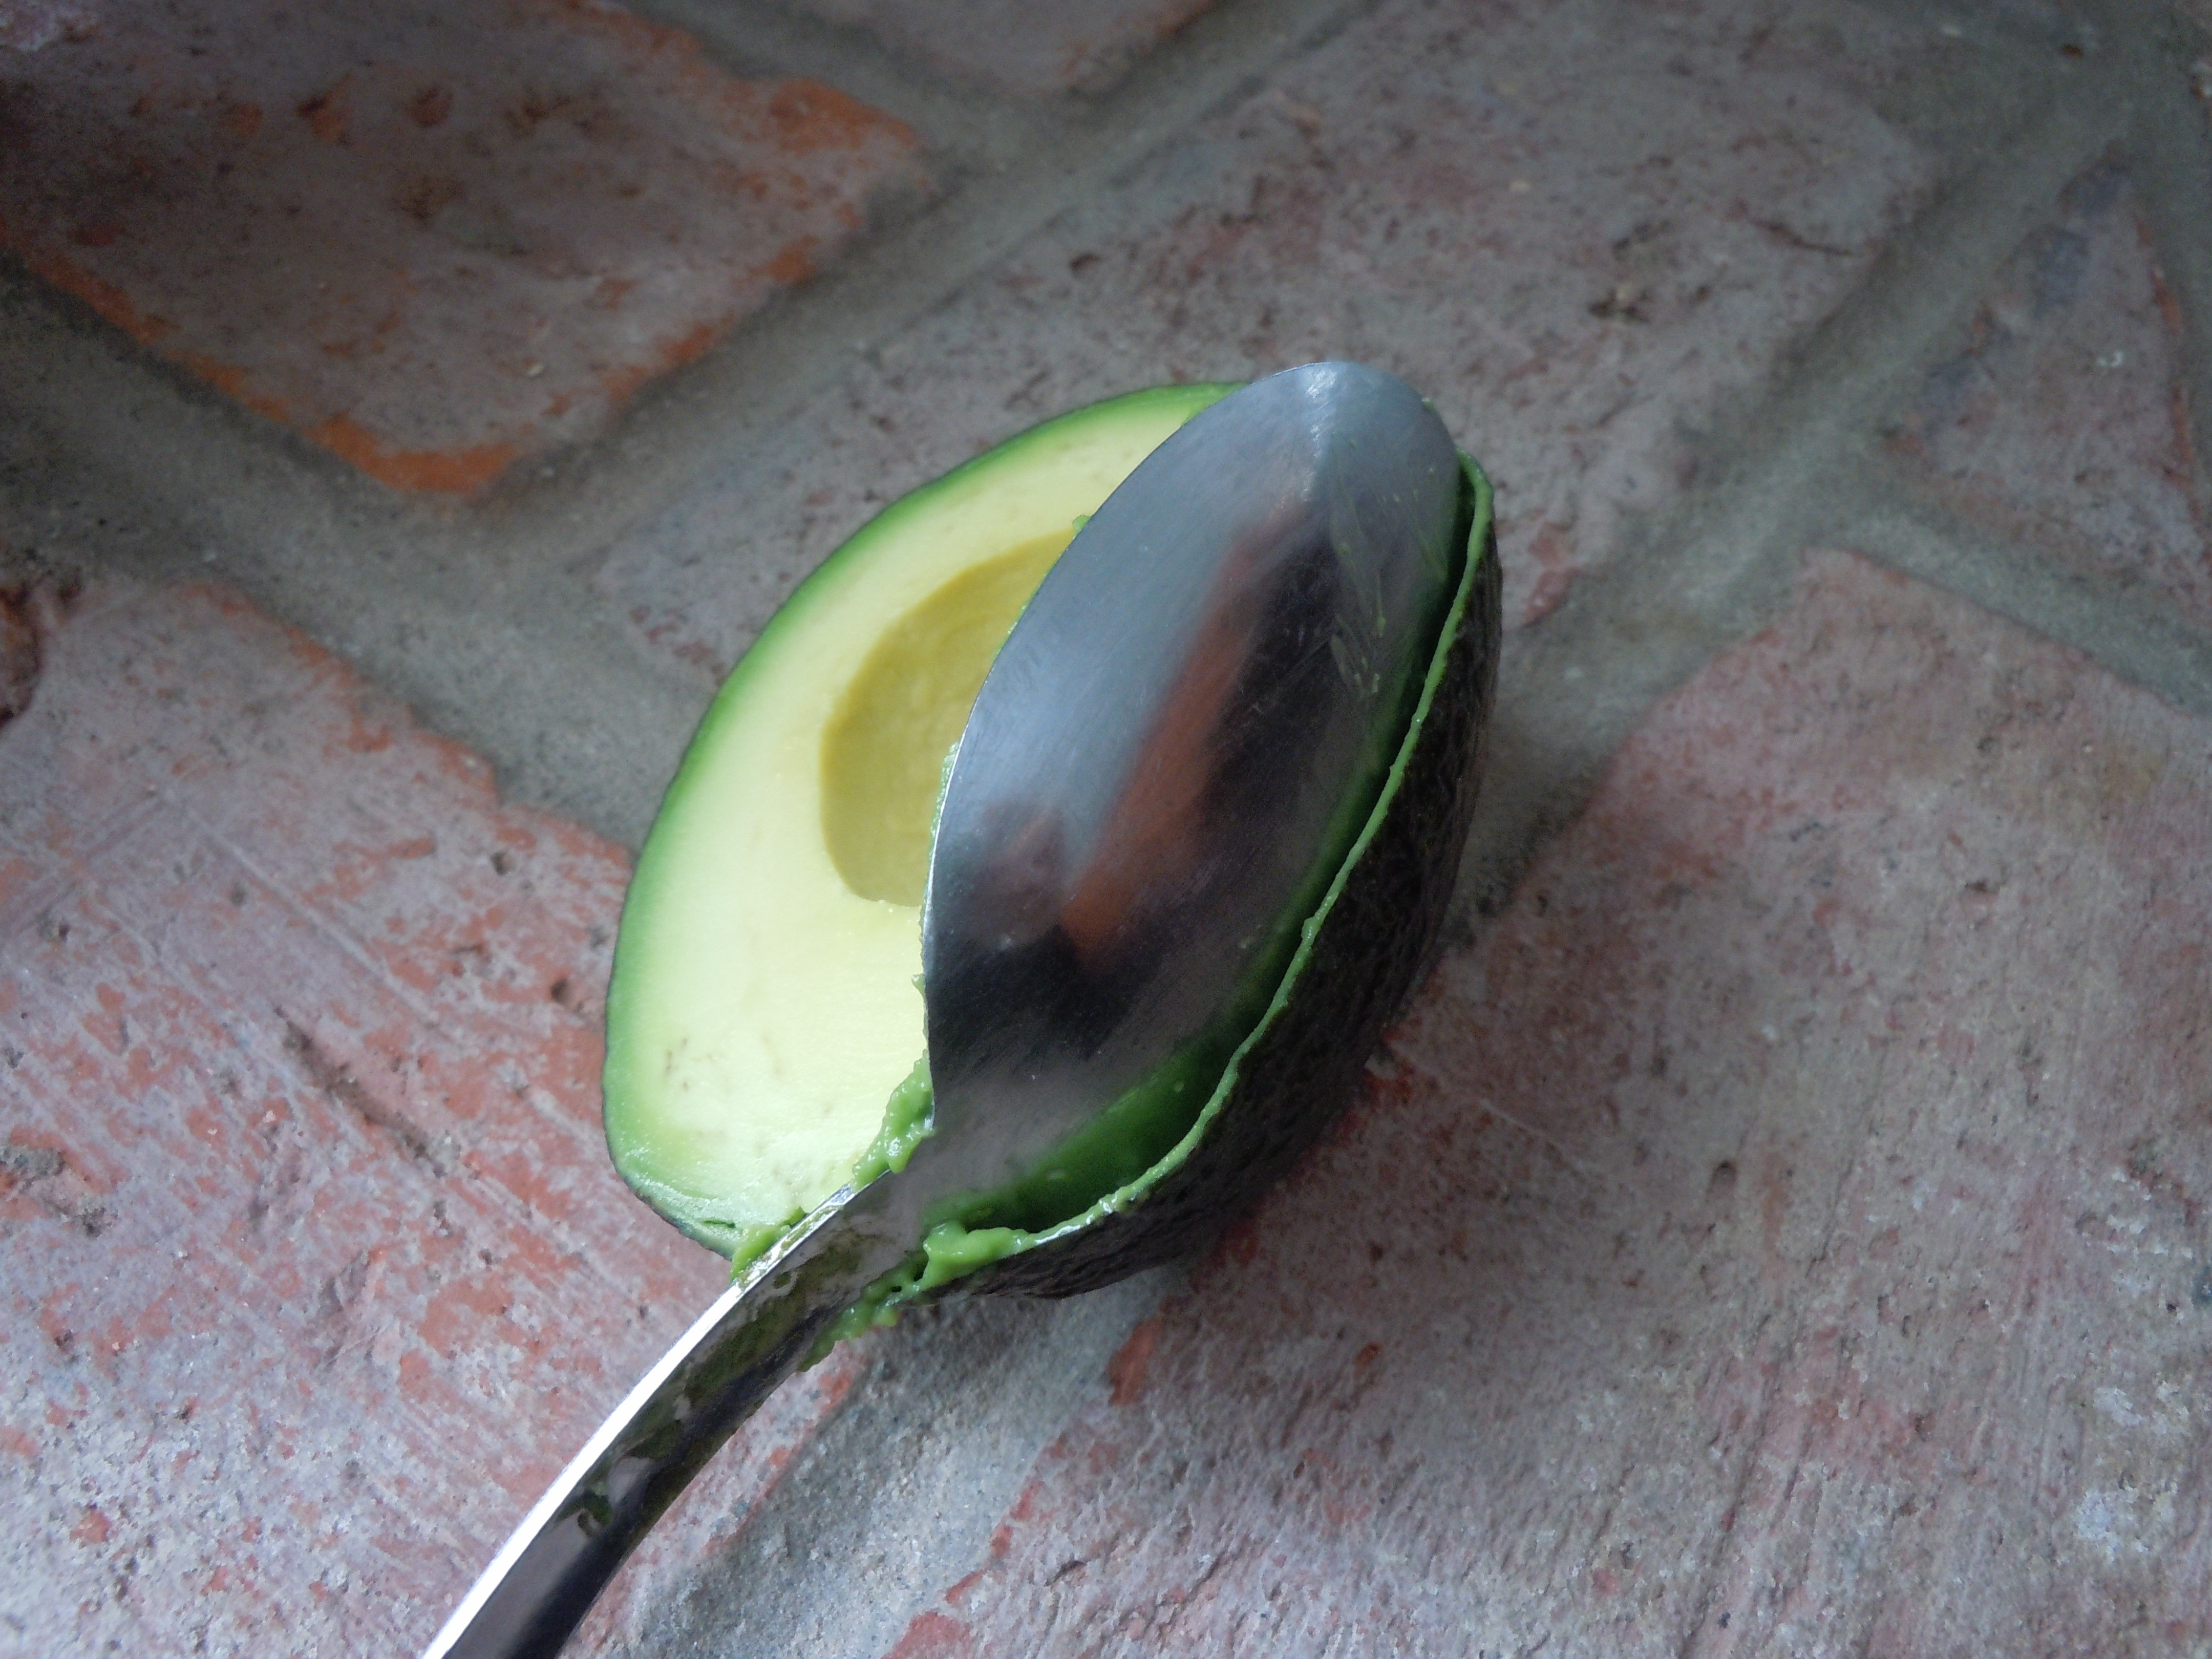
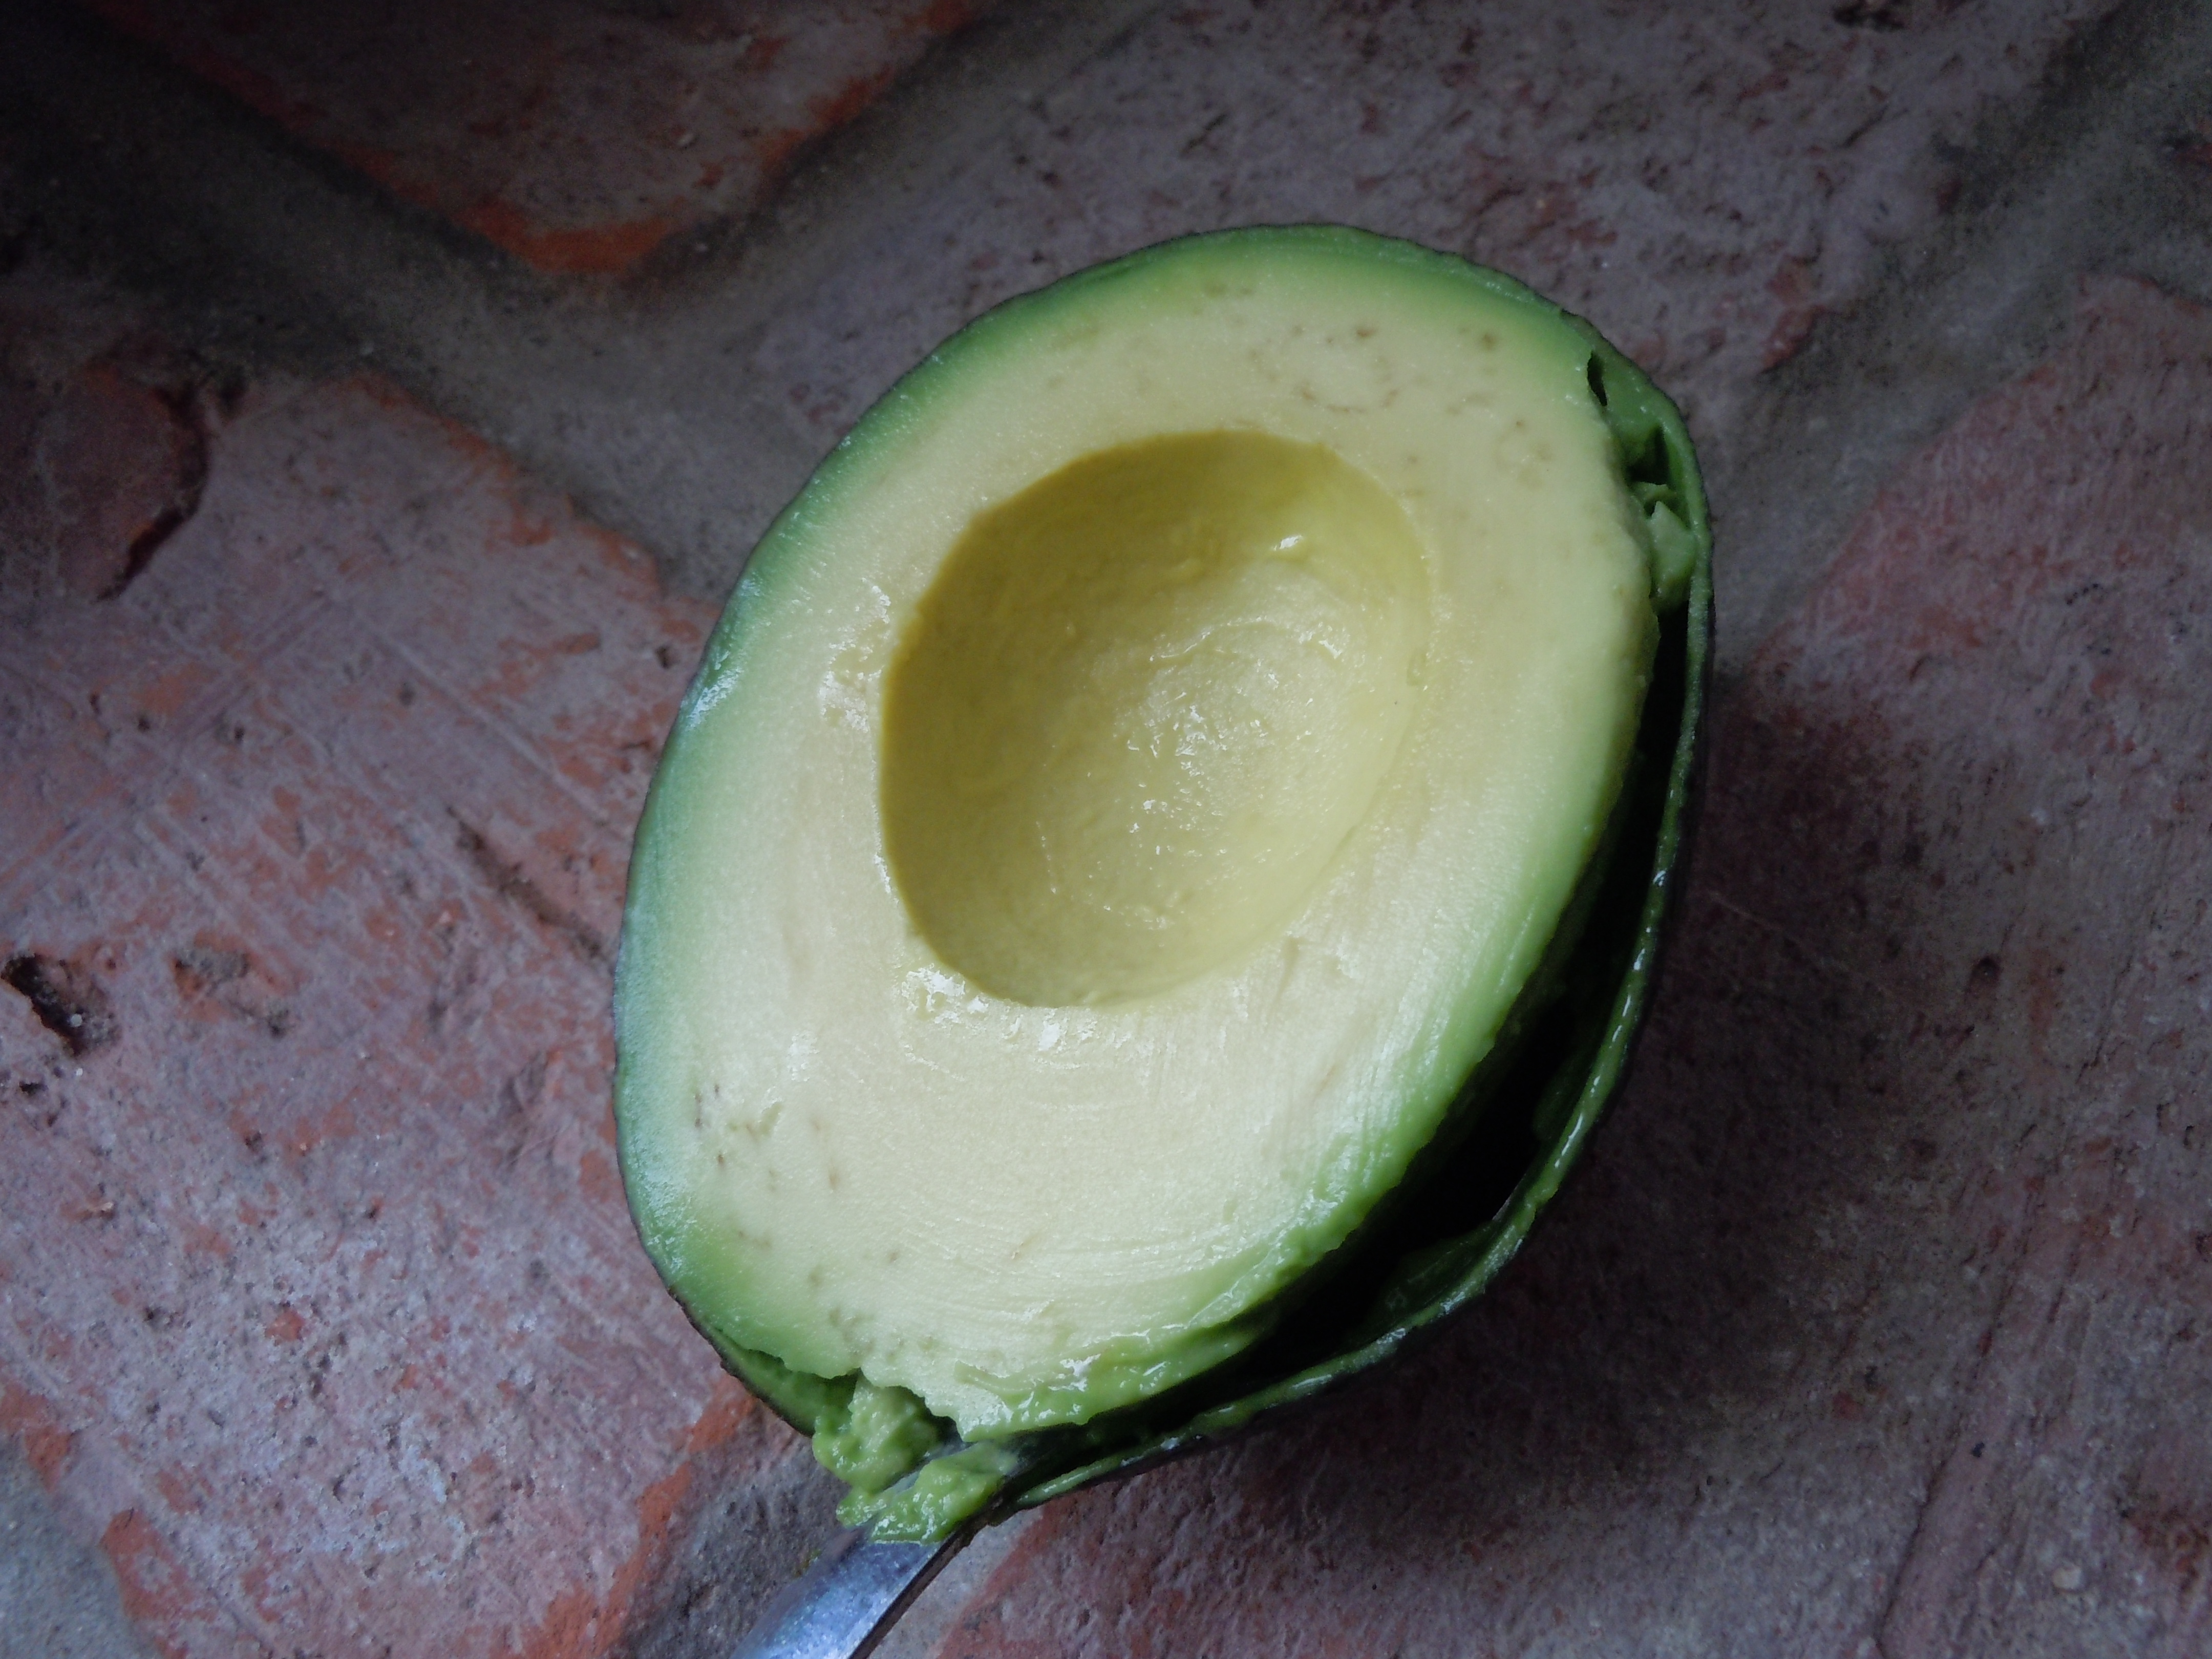
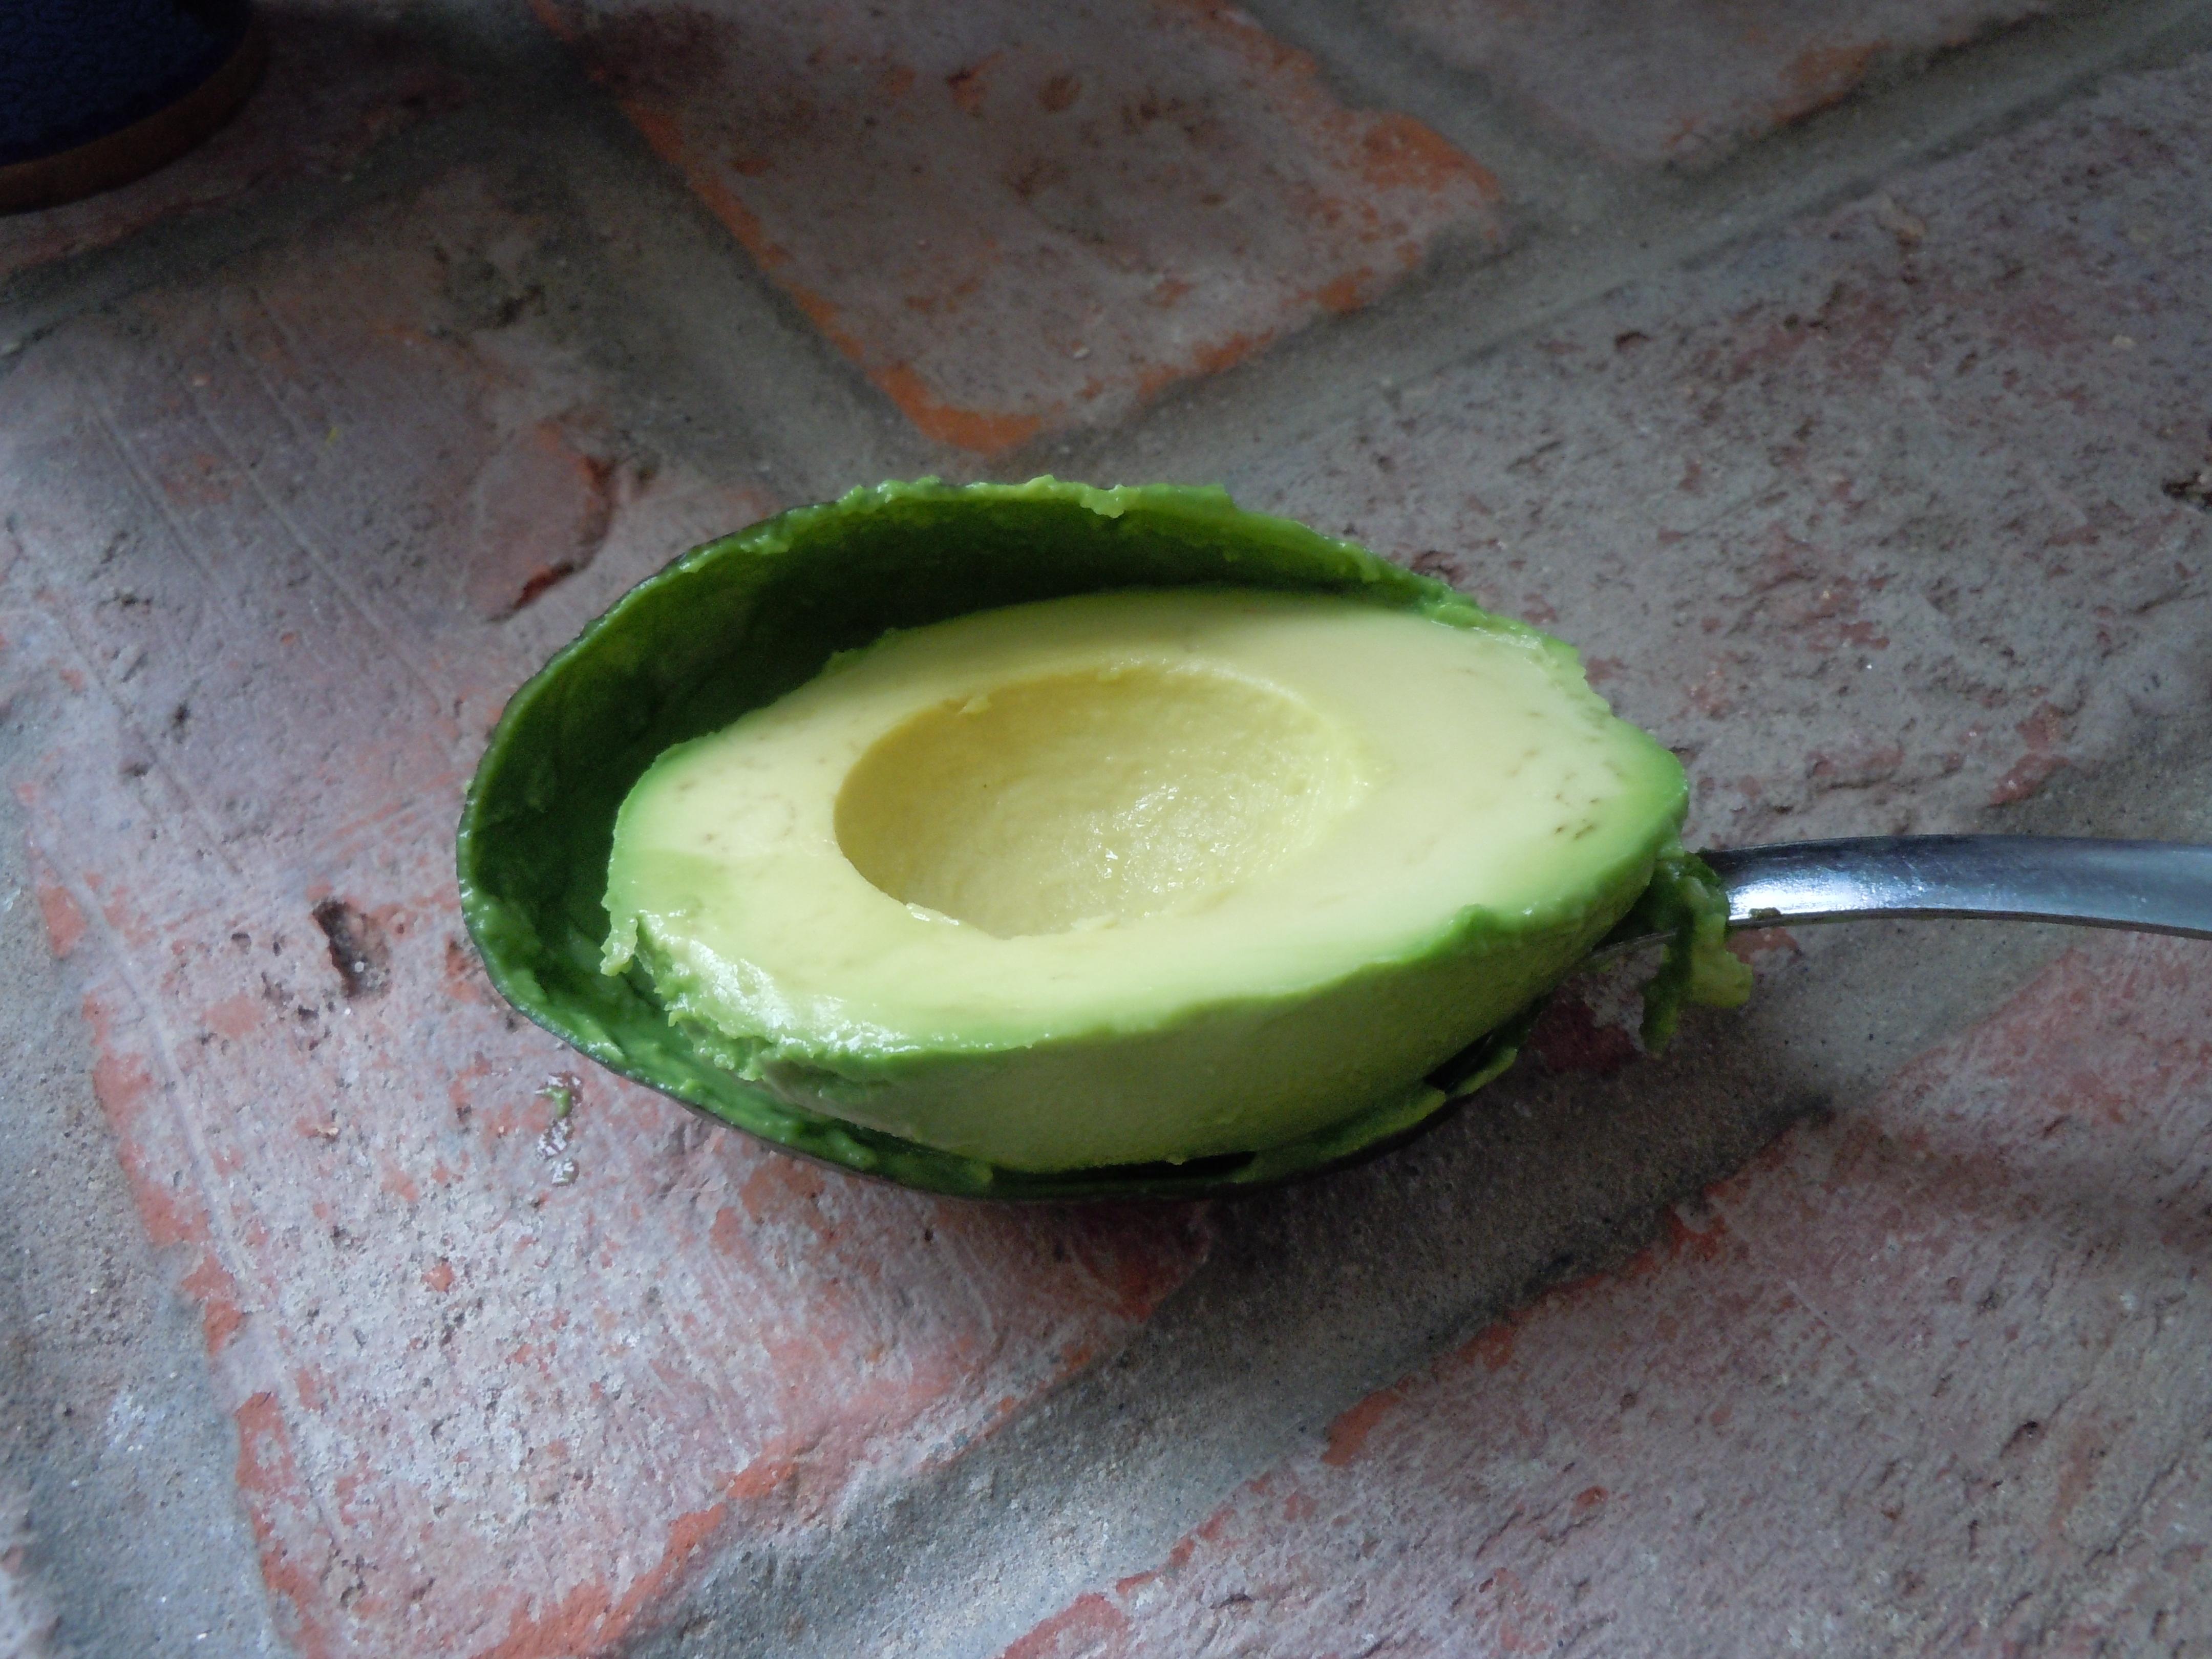
TIP: There is an easy way to get the pit out of a avocado which I have displayed in the pictures above. After running the knife around the flesh of the avocado against the edges of the inside pit… put the knife down and twist the avocado halves and pull apart. Then stick the knife into the pit and do the same thing holding on to the knife with one hand and carefully twist the avocado pit and it will pop right out. Then knock the pit off onto the board away from your hands. This can be a little tricky the first time so I would advise that this would be for an adult to try. Finally, Insert a large spoon and scoop the avocado along the edge of the avocado skin to remove avocado flesh.
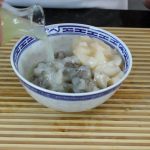
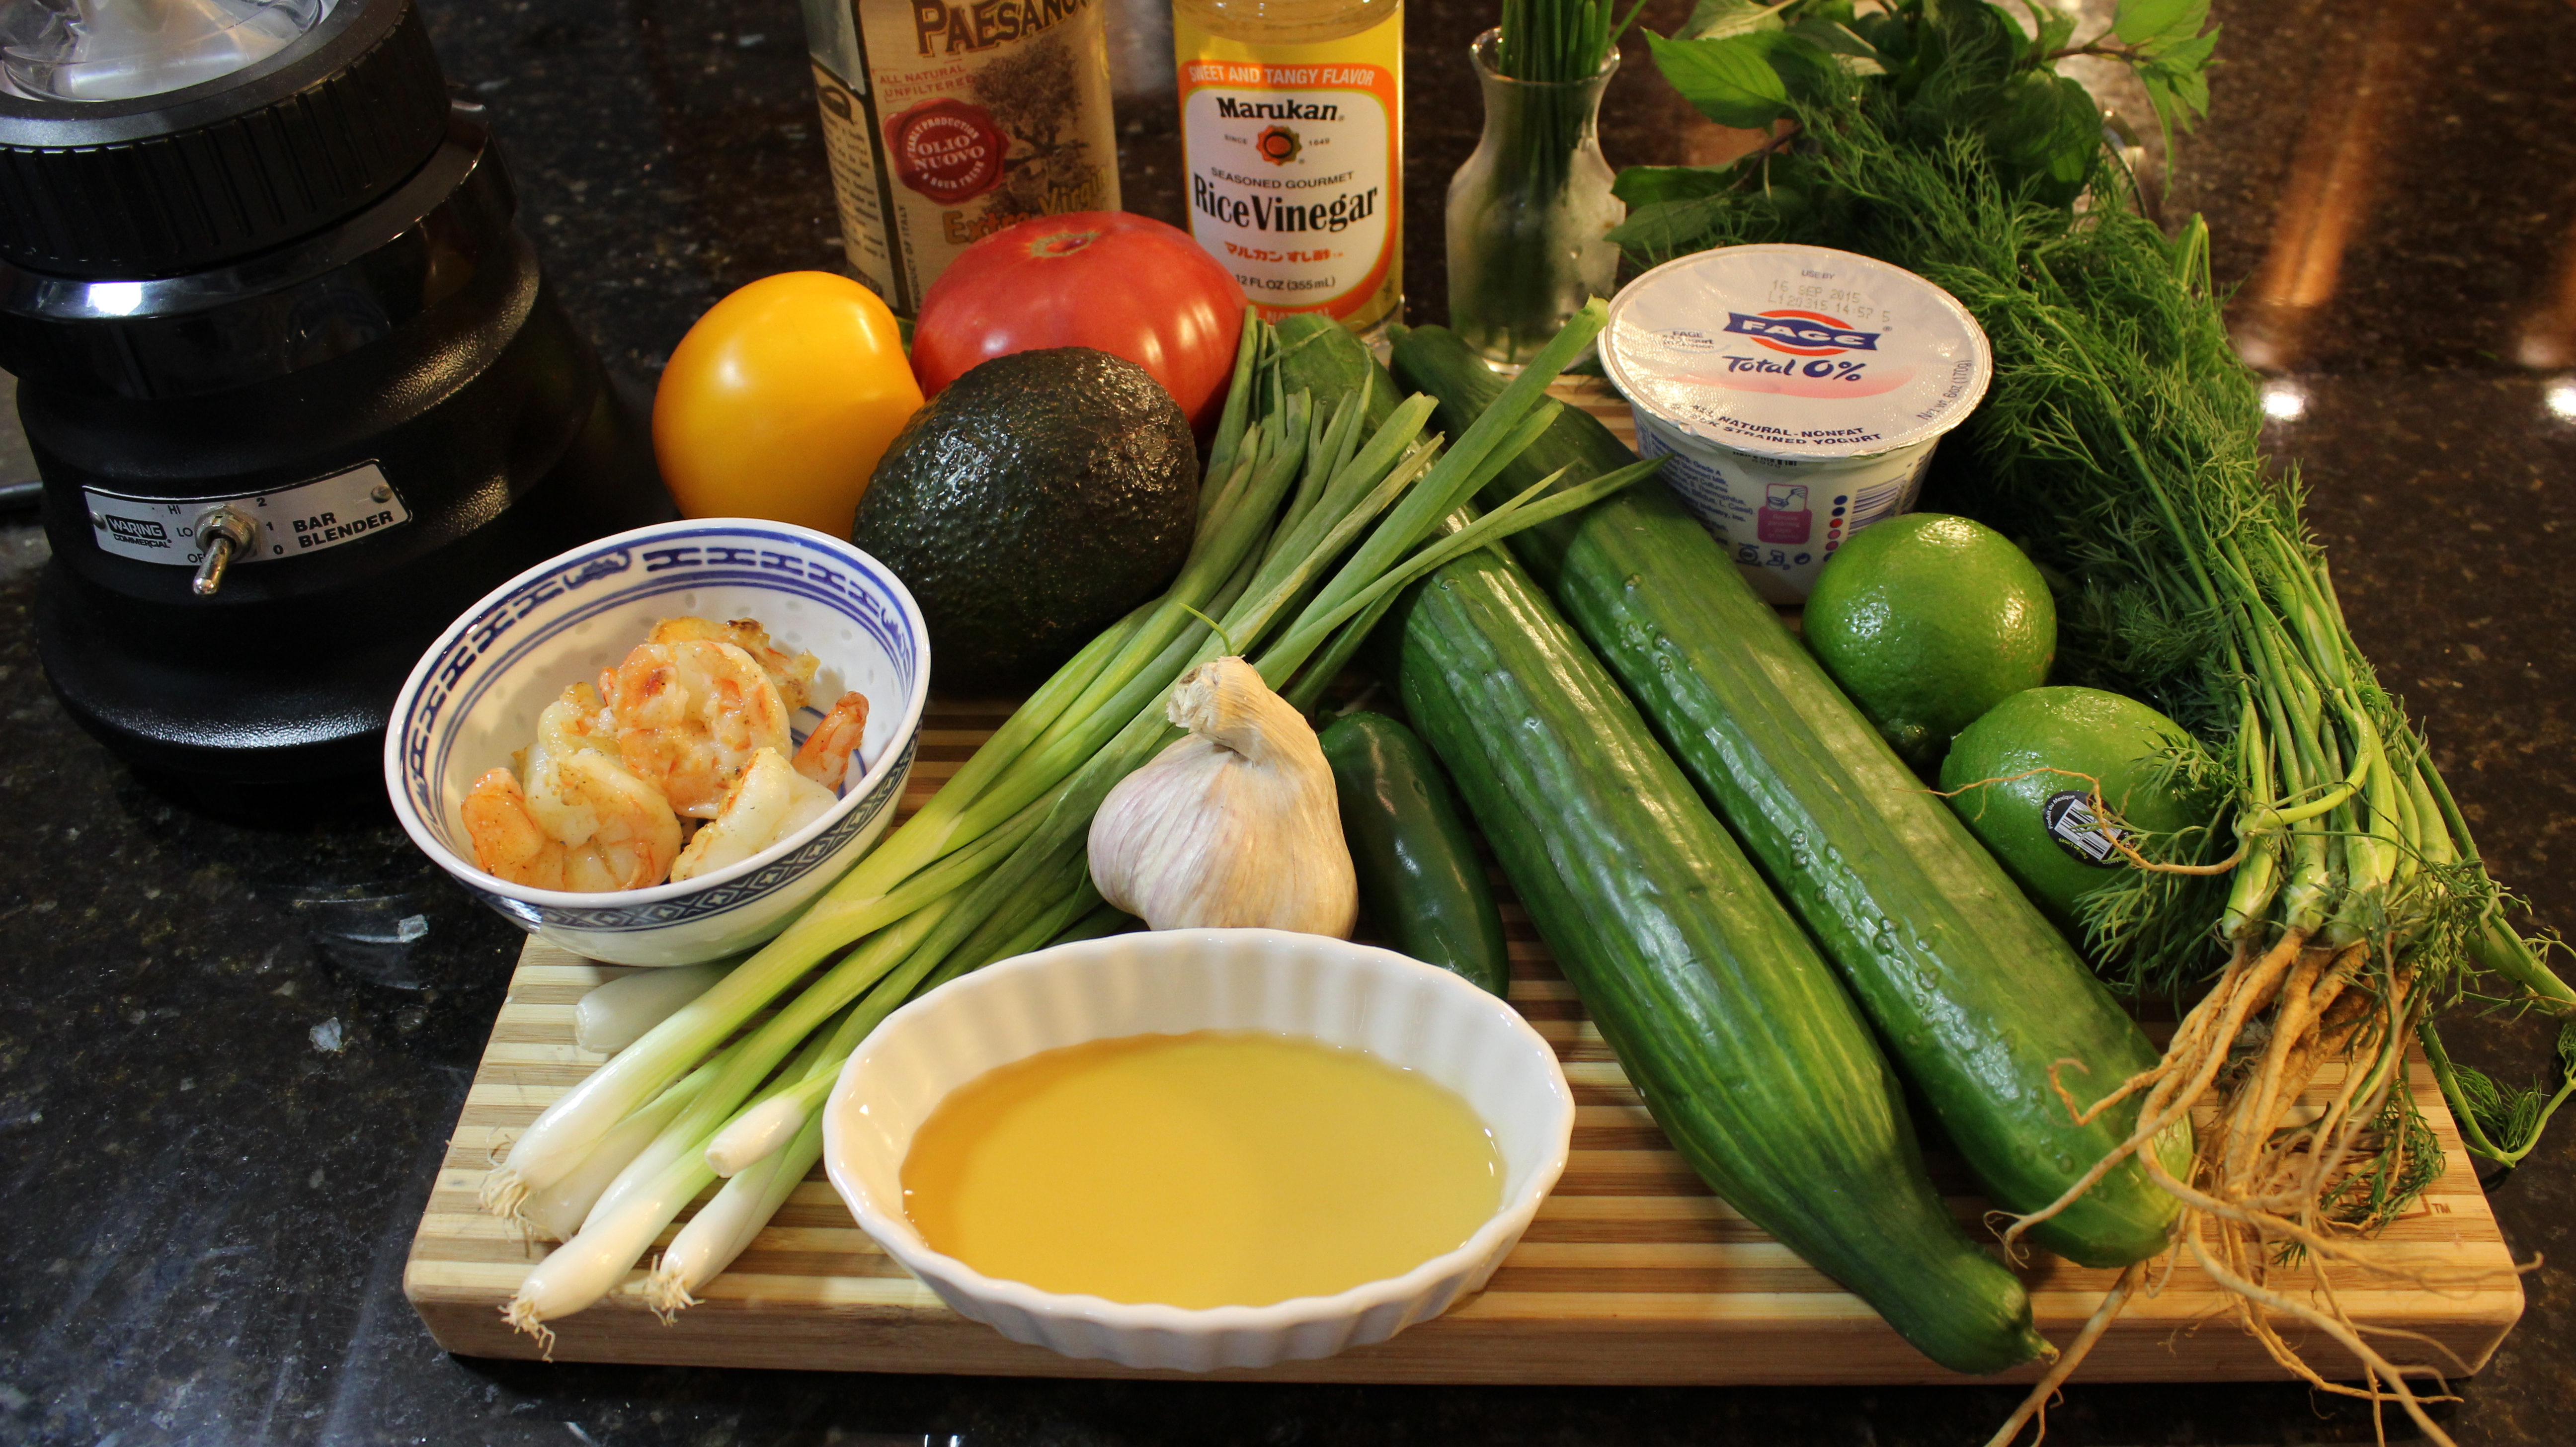
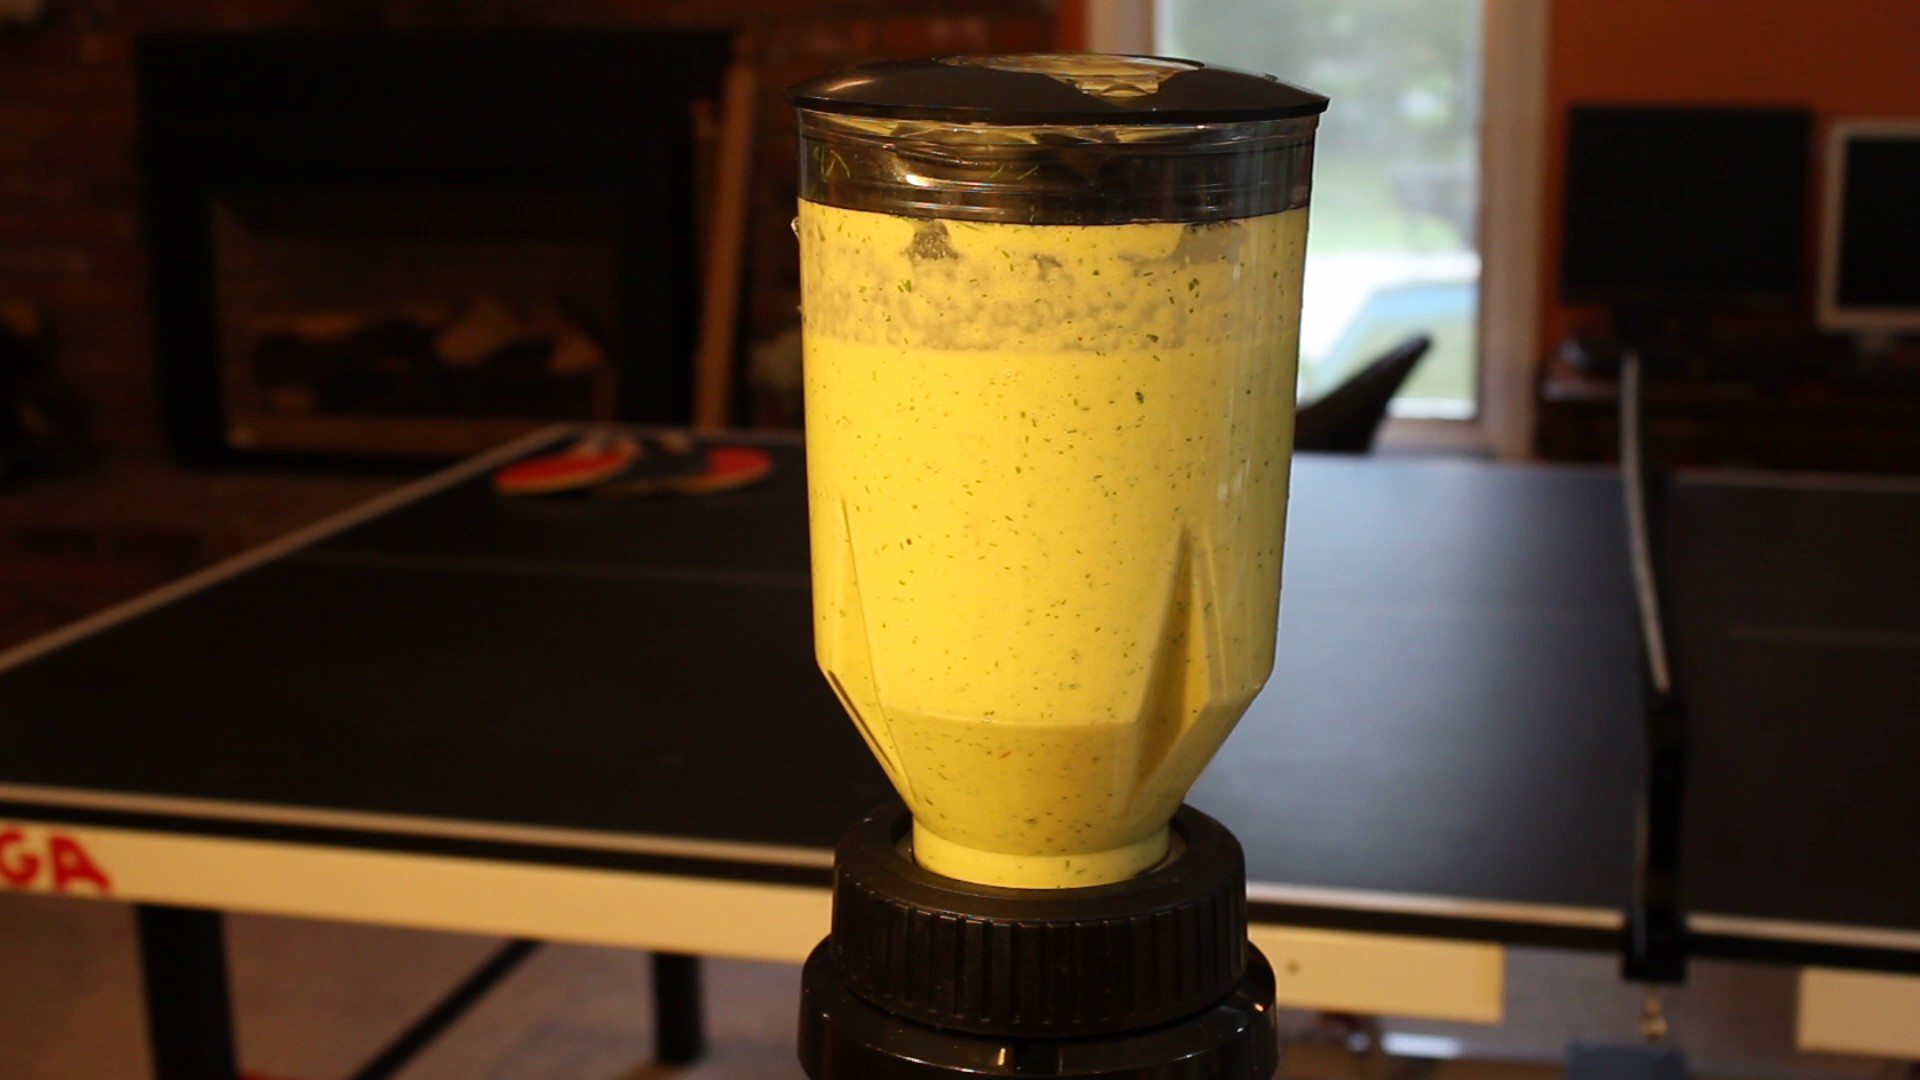
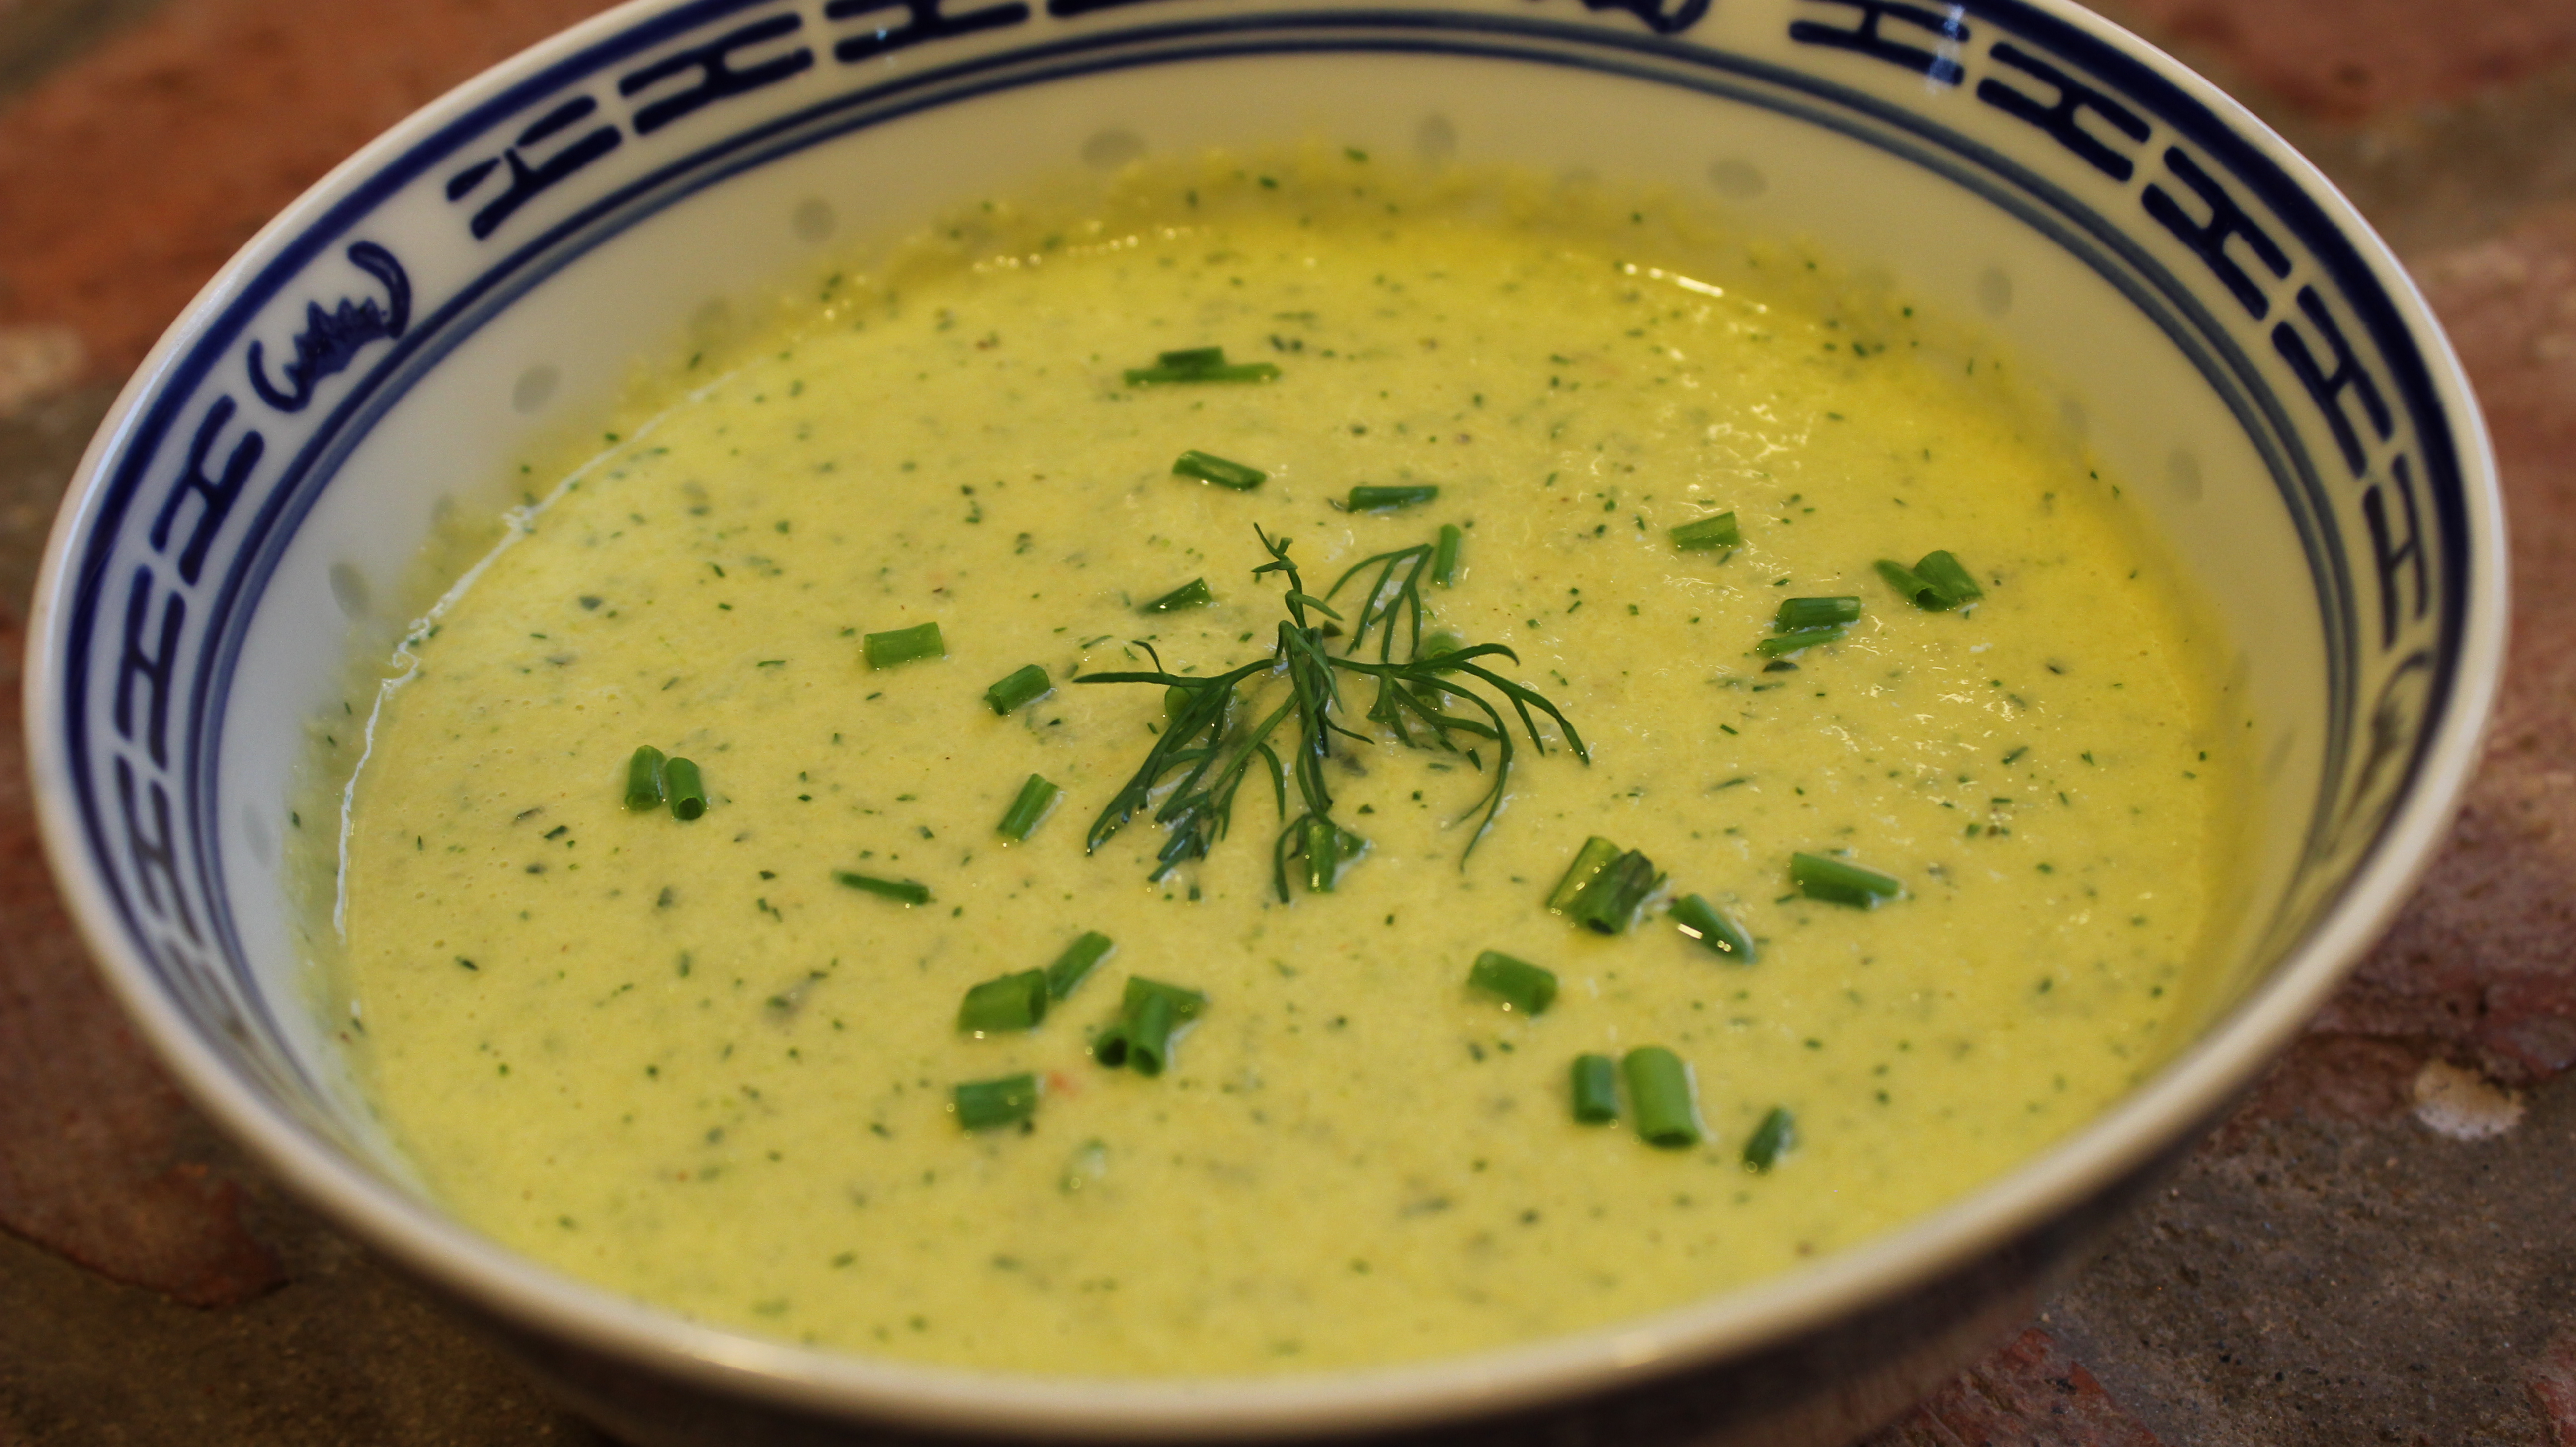
This homemade cold cucumber soup is out of this world! It has texture and flavors that won’t stop! Not one of the flavors in this soup over powers another, it’s the perfect balance. You actually find yourself trying to distinguish between them only because you are aware of all the fresh vegetables and herbs that went into this amazing cold soup.
Being a born and raised East Coaster I have to say I have never been a big “cold soup” kind of person. With our unbearably cold winters we have here I really appreciate a very hot bowl of soup to warm the bones. So when ever I’m making this cold cucumber soup I’m slightly biased going in, not willing to give merit where it is due, until I take my first spoonful and it all changes!
My cold cucumber soup completely stands on it’s own and is very satisfying not to mention the medicinal qualities that cucumbers offer. Cucumber’s can reduce puffiness, help to eliminate toxins in your body and we all know that slice’s of cucumber over your eyes can help to reduce dark circles! Some of the vitamin’s cucumber’s offer are A, C and folic acid and minerals of potassium and magnesium. All and all this homemade cold cucumber soup is a win win situation.
This homemade cold cucumber soup would be great for lunch with a side sandwich or grill up some shrimp like I did in the show. One of my favorite accents to this soup are seared scallops cut in half and placed right in the center on the soup. You can check out in my “Seared Scallop Show” to see exactly how to make the scallops.
King crab meat is also a lovely topping to this cold cucumber soup and was a big hit when I presented this soup this way to the tasting judges at my second MasterChef open casting call in NYC this past March (2016)! All of the MasterChef casting call judges didn’t have any critique for my soup during the tasting phase…they just said “they really, really loved it!” When I made my cucumber soup for the MasterChef casting call I added fresh fennel to the recipe to change it up and give it that je ne sais qua…that extra special something!
2 European cucumbers peeled and cubed – 4 1/2 cups – you do not need to remove seeds with the European cucumbers
If you are using regular cucumbers, peel and slice down the middle and remove the seeds scooping them out with a small spoon and cut into chunks
3 ex-lg green onions or 5 small sliced in 1″ pieces from green tips to whitish green stems
1/4 cup of diced cherry tomatoes OR diced heirloom tomatoes
½ an avocado cut in chunks
1 jalapeño chopped (take out seeds)
1 lg garlic clove put through garlic press
1 cup plus 2 tbsp Greek Yogurt – whole milk
1/3 cup fresh dill
1/4 cup fresh mint leaves
1 Tbsp of honey
1/4 cup of seasoned rice vinegar
juice from 1 lime
1/4 cup olive oil
1/2 tsp salt – to taste – (NOTE: I said 1 tsp in the show but I meant to say 1/2 tsp!)
1/4 tsp finely ground pepper
-FOR COLD CUCUMBER & FENNEL SOUP …ADD:
1 cup cut up fresh FENNEL …for a change up try this with the FENNEL – YUM!
chopped fresh chives for garnish
seared scallops , cooked Lobster, Shrimp, or Crab to top the soup in the center
Directions:
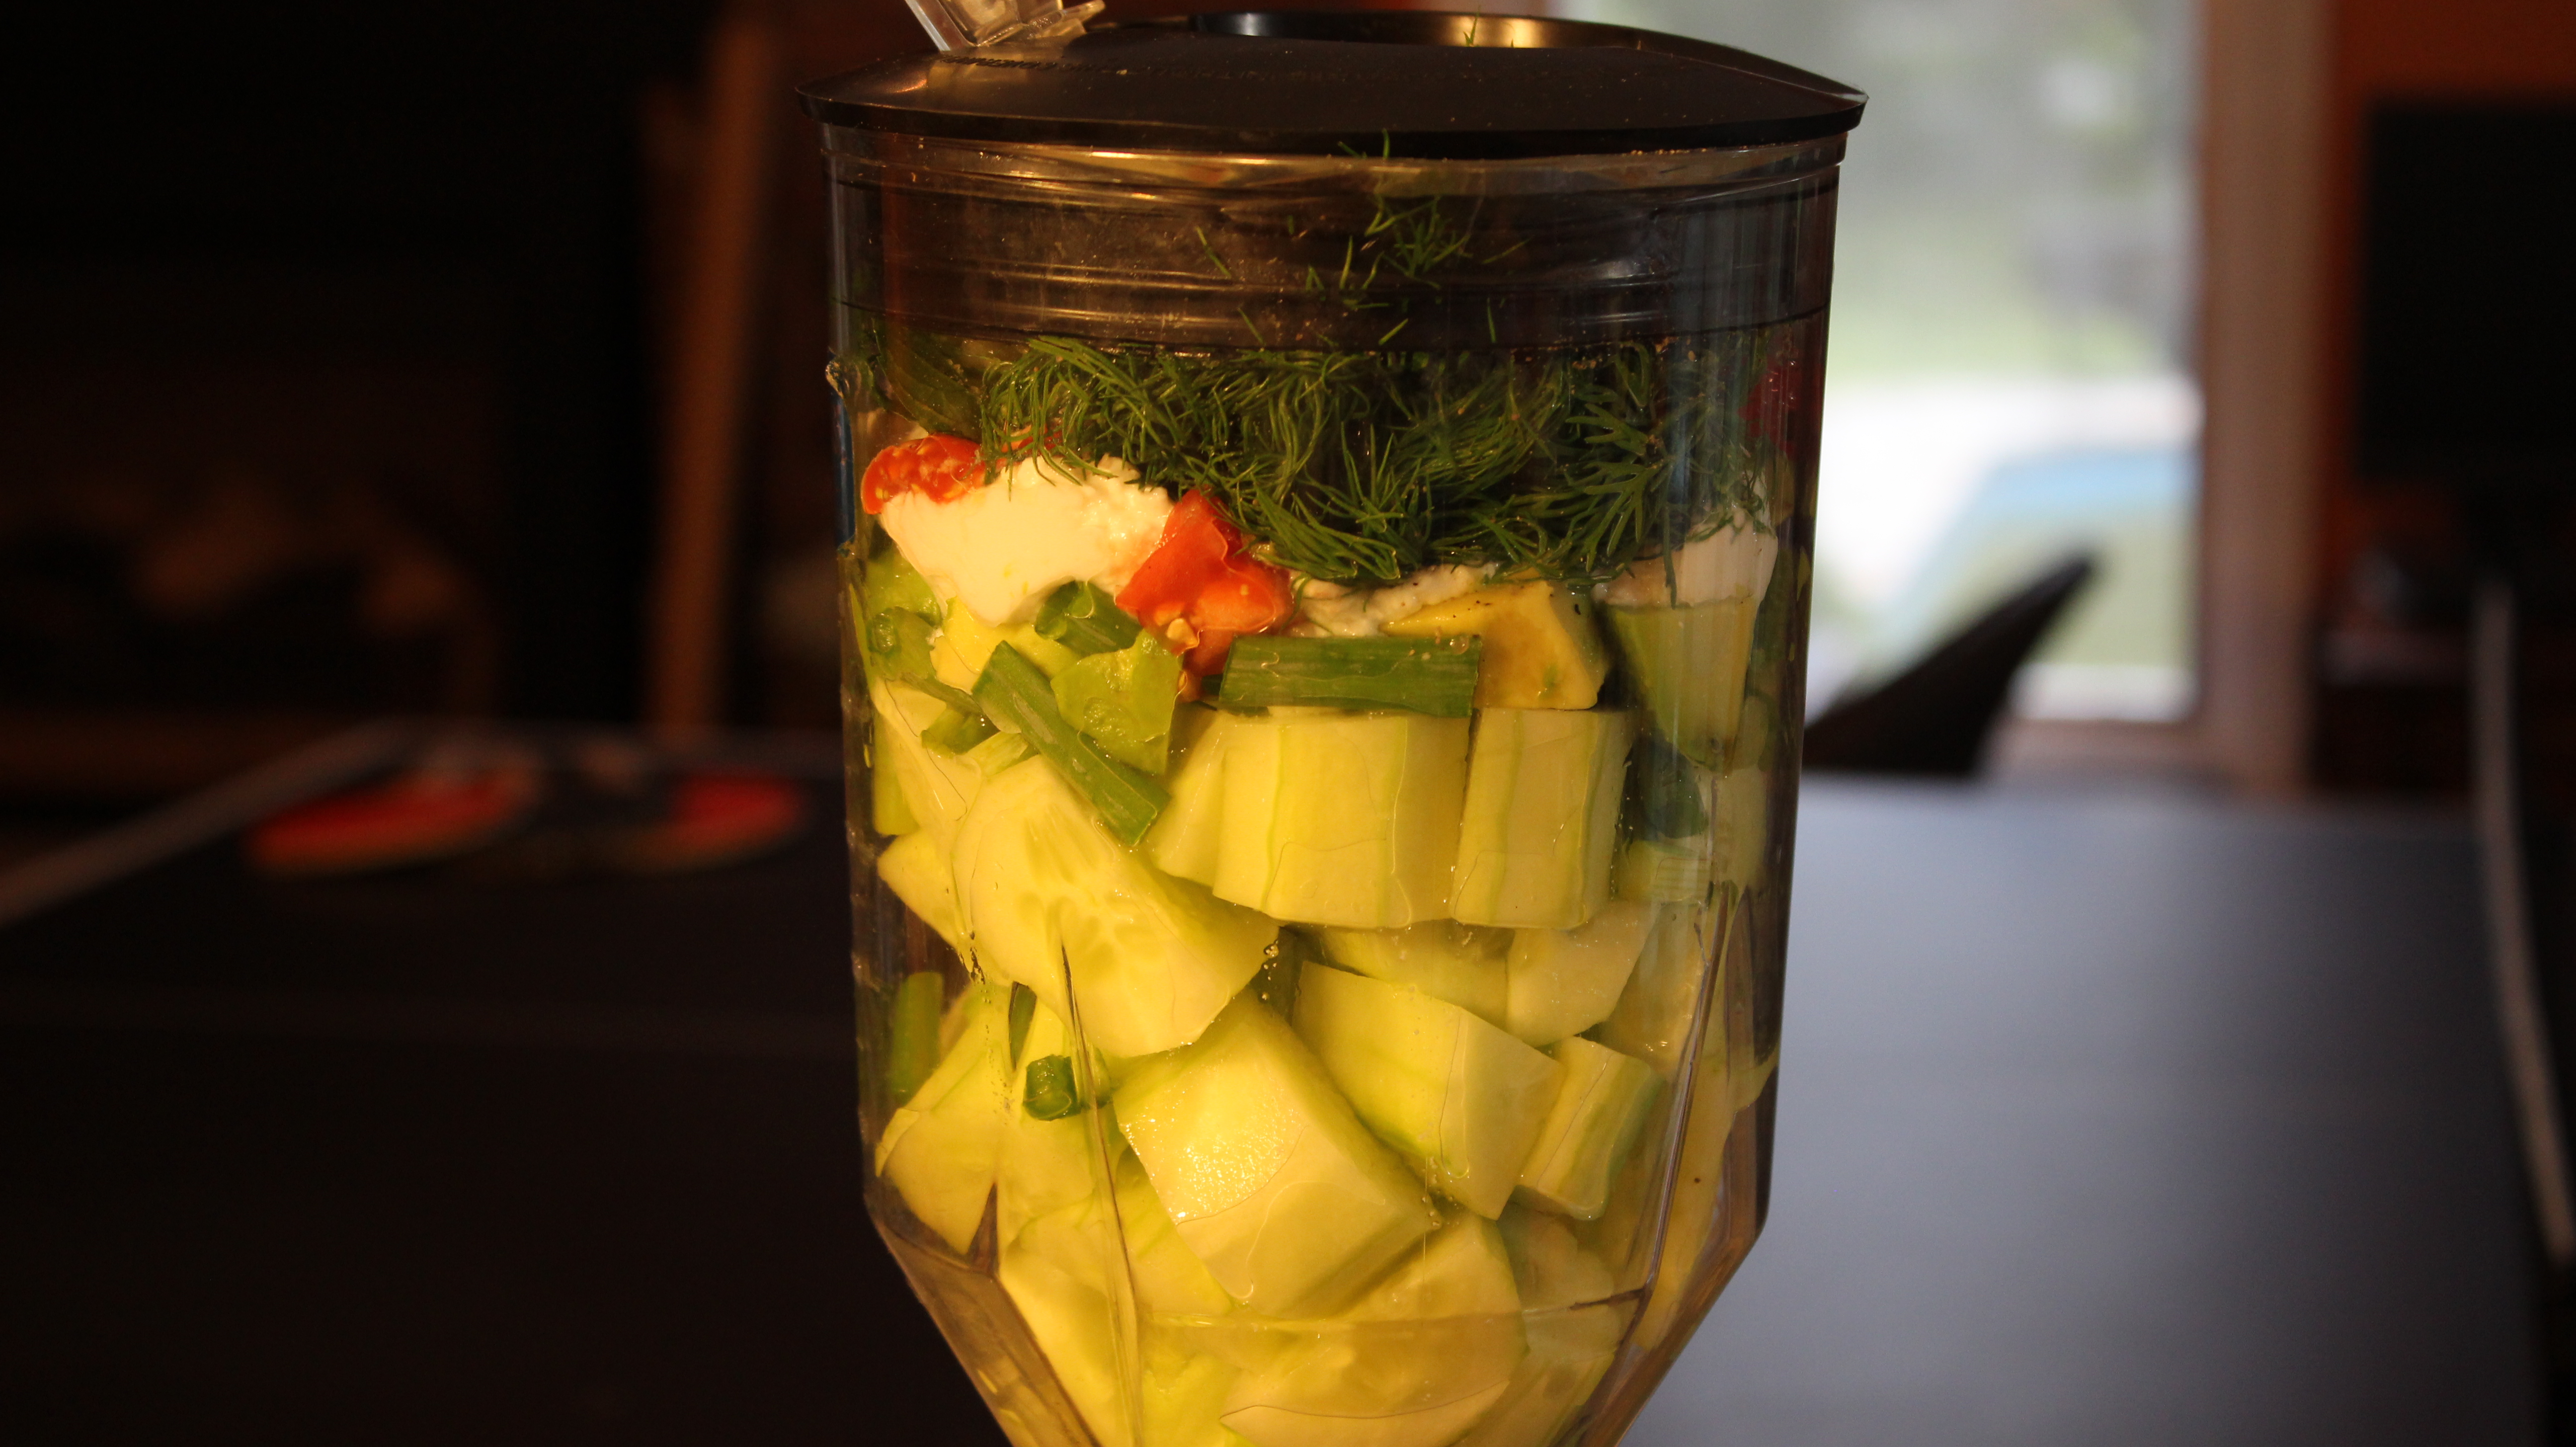
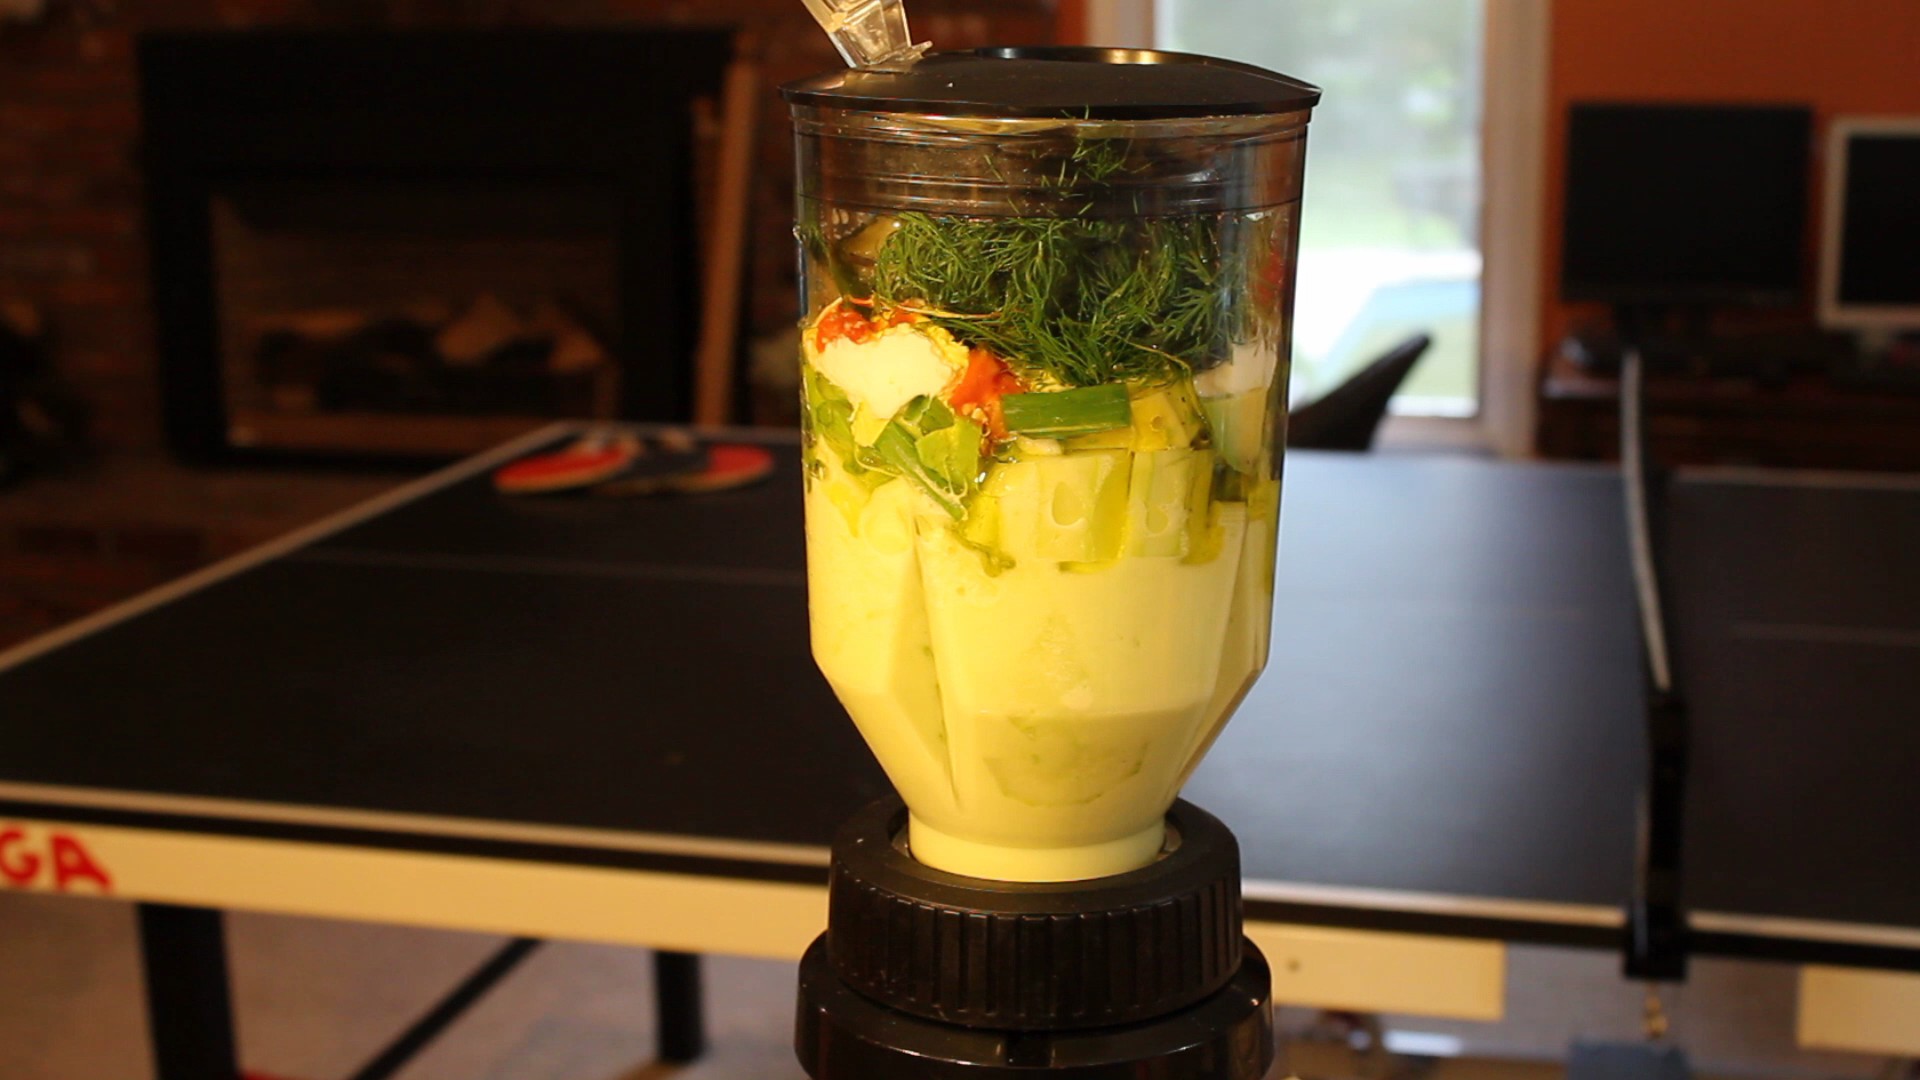
Add all the ingredients in the list above to your blender except olive oil
Begin to puree while slowly pouring in olive oil through the opening at the top
Continue to puree for 20-30 seconds
Be patient, all the vegetables in the cucumber soup will begin to slowly puree
Stop and scrape down any herbs or vegetables stuck on the side’s and pulse for 10 more seconds
Chill in the refrigerator for 1 hour
Serve with a sprinkle of dill, finely chopped tomato, cucumber and avocado
Top the center of the soup with seared scallops – room temperature cooked lobster, king crab meat, or shrimp AND then a drizzle of extra virgin olive oil
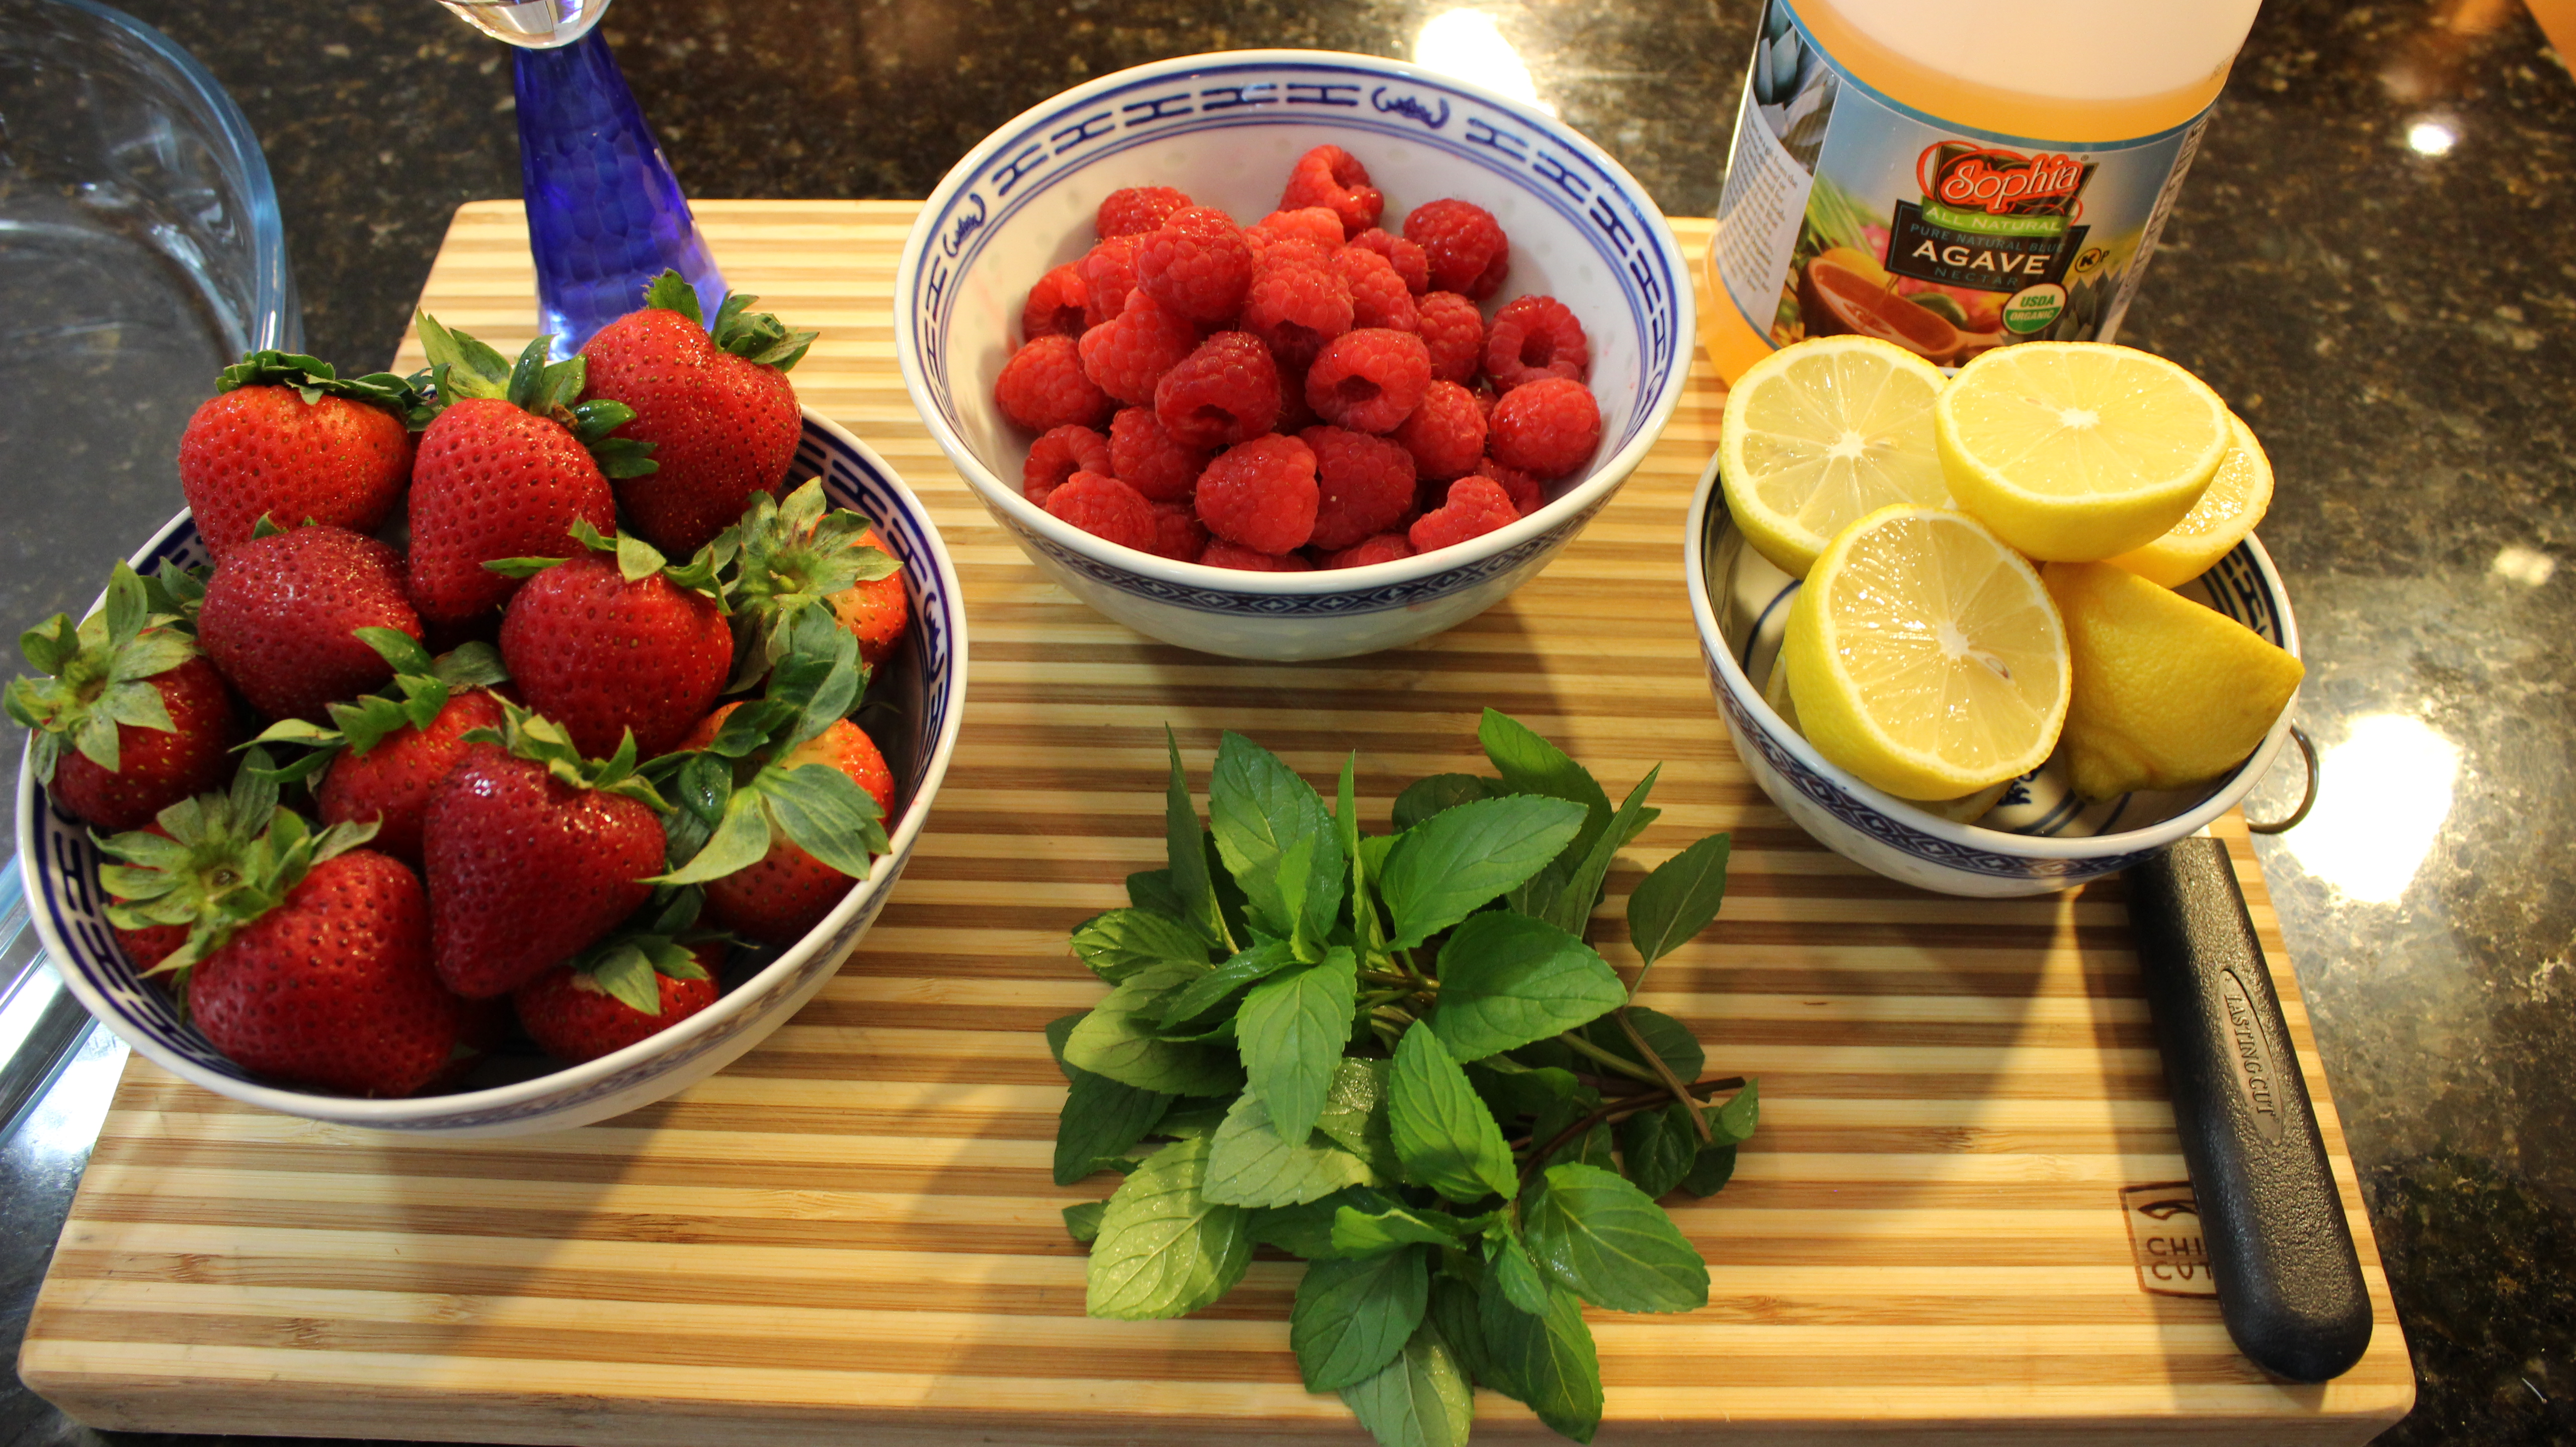
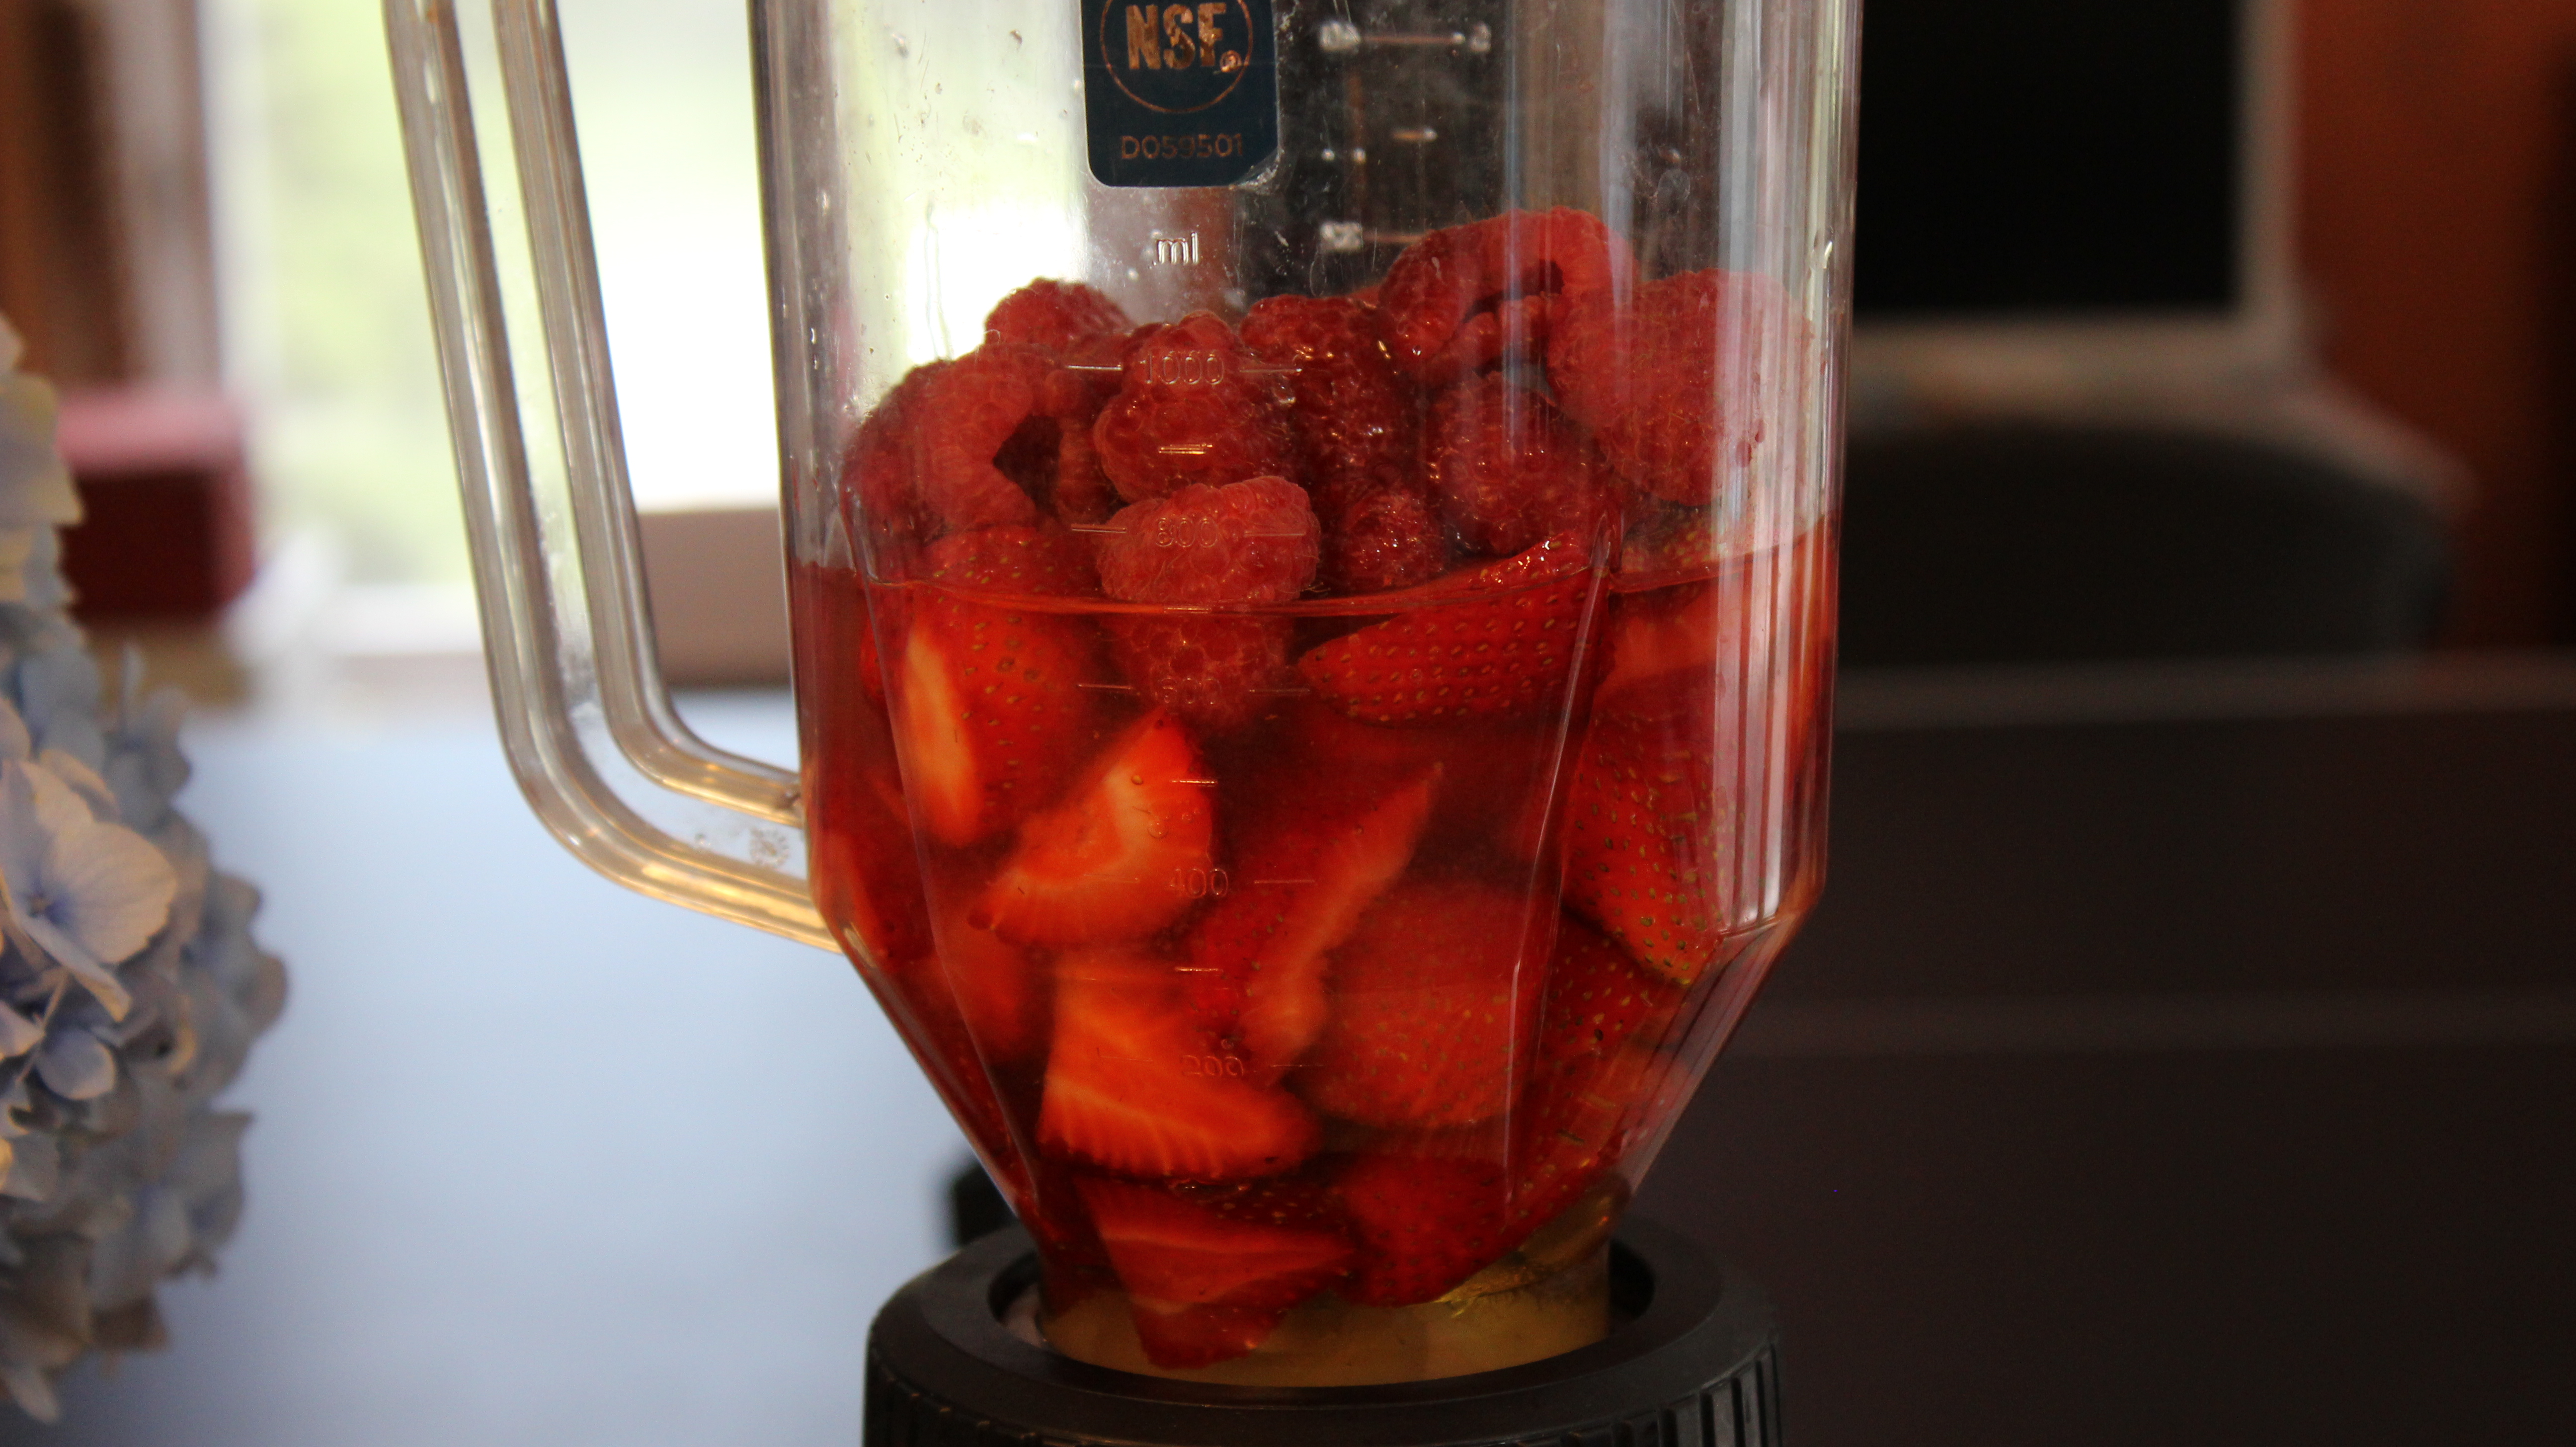
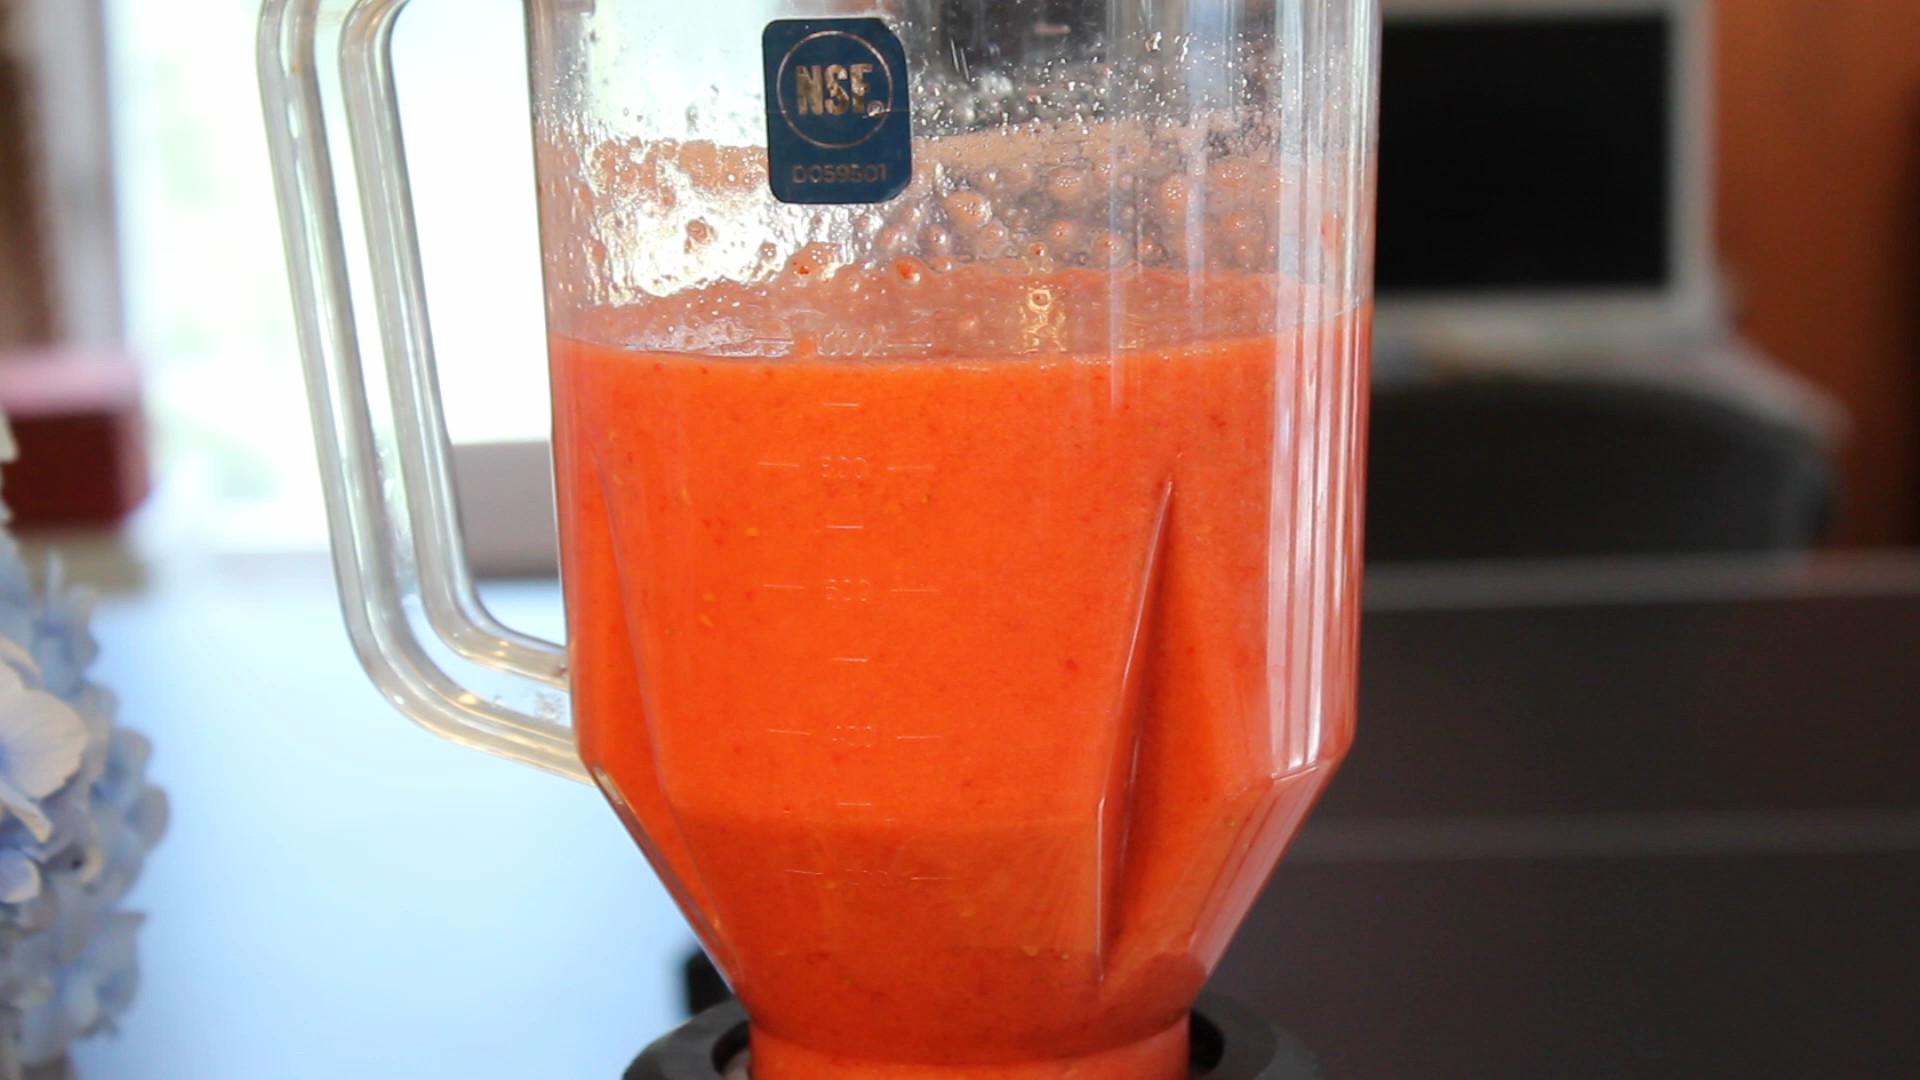
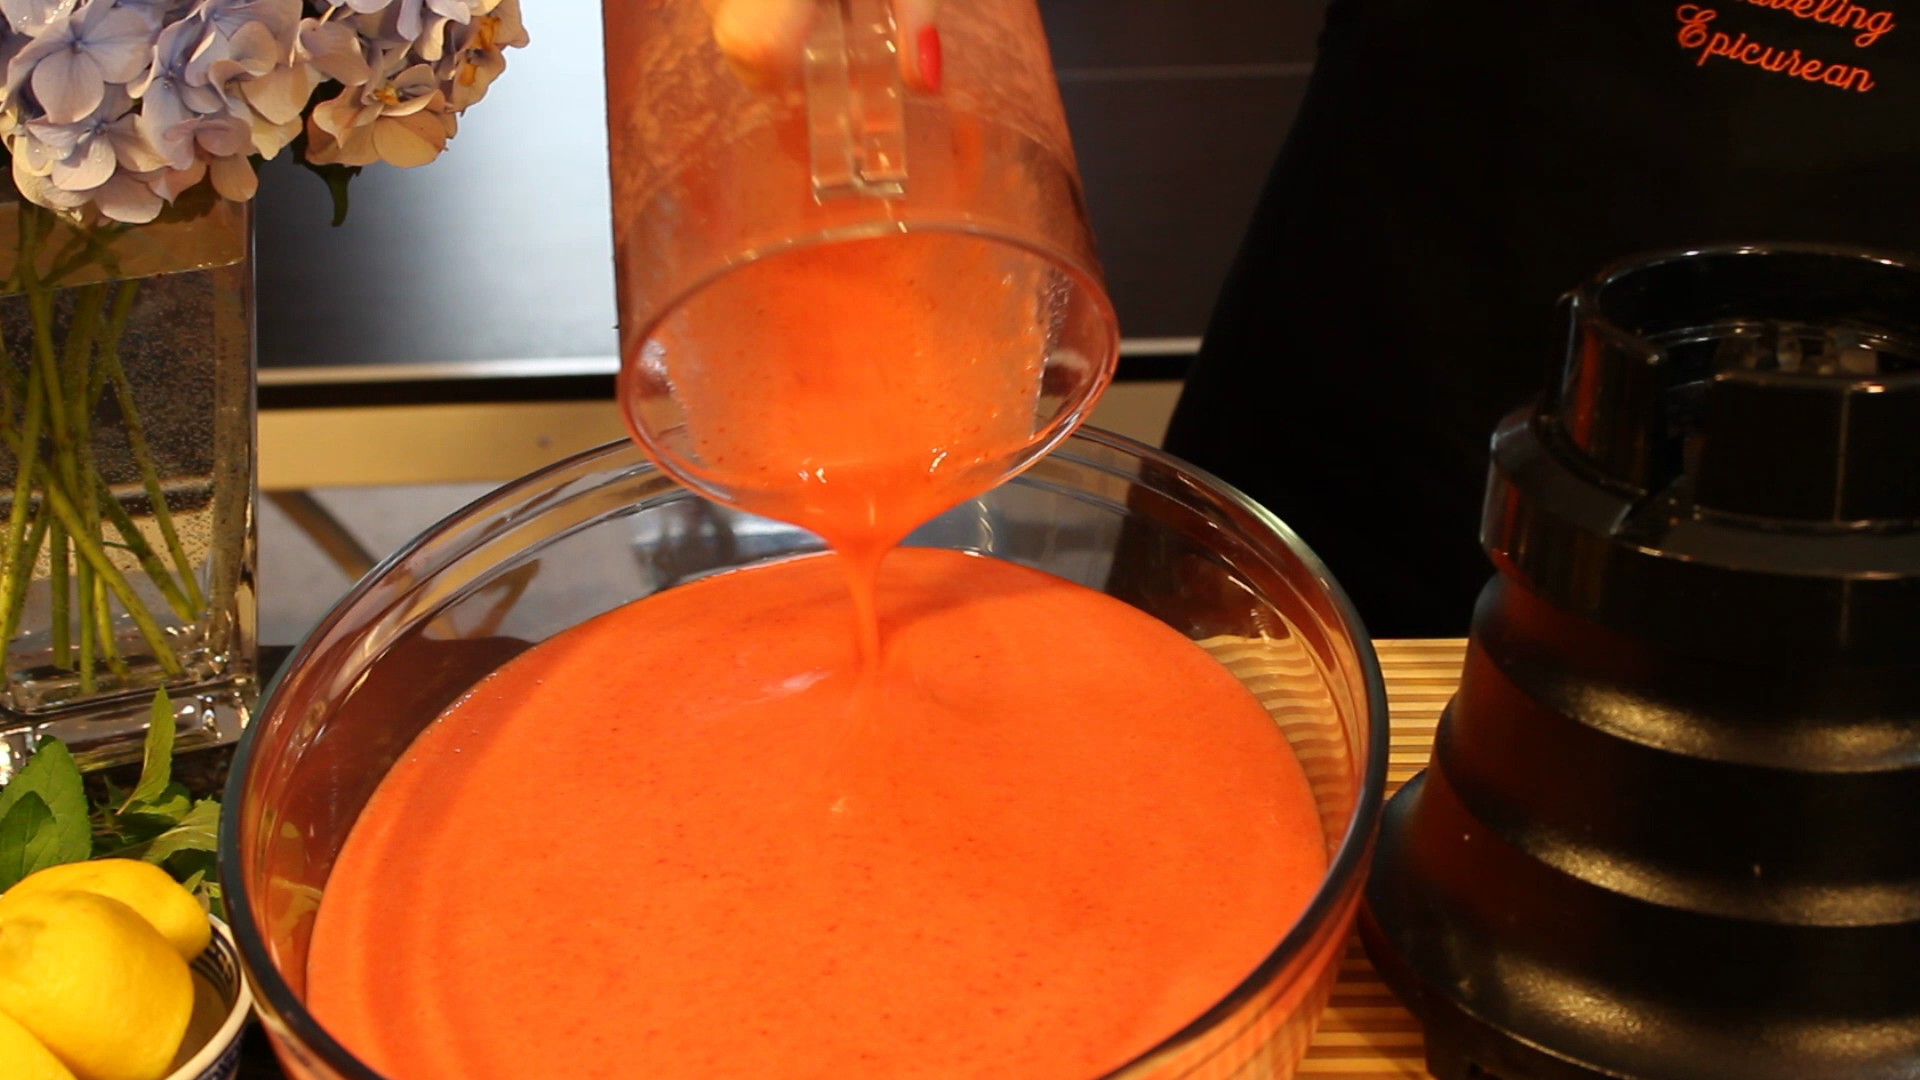
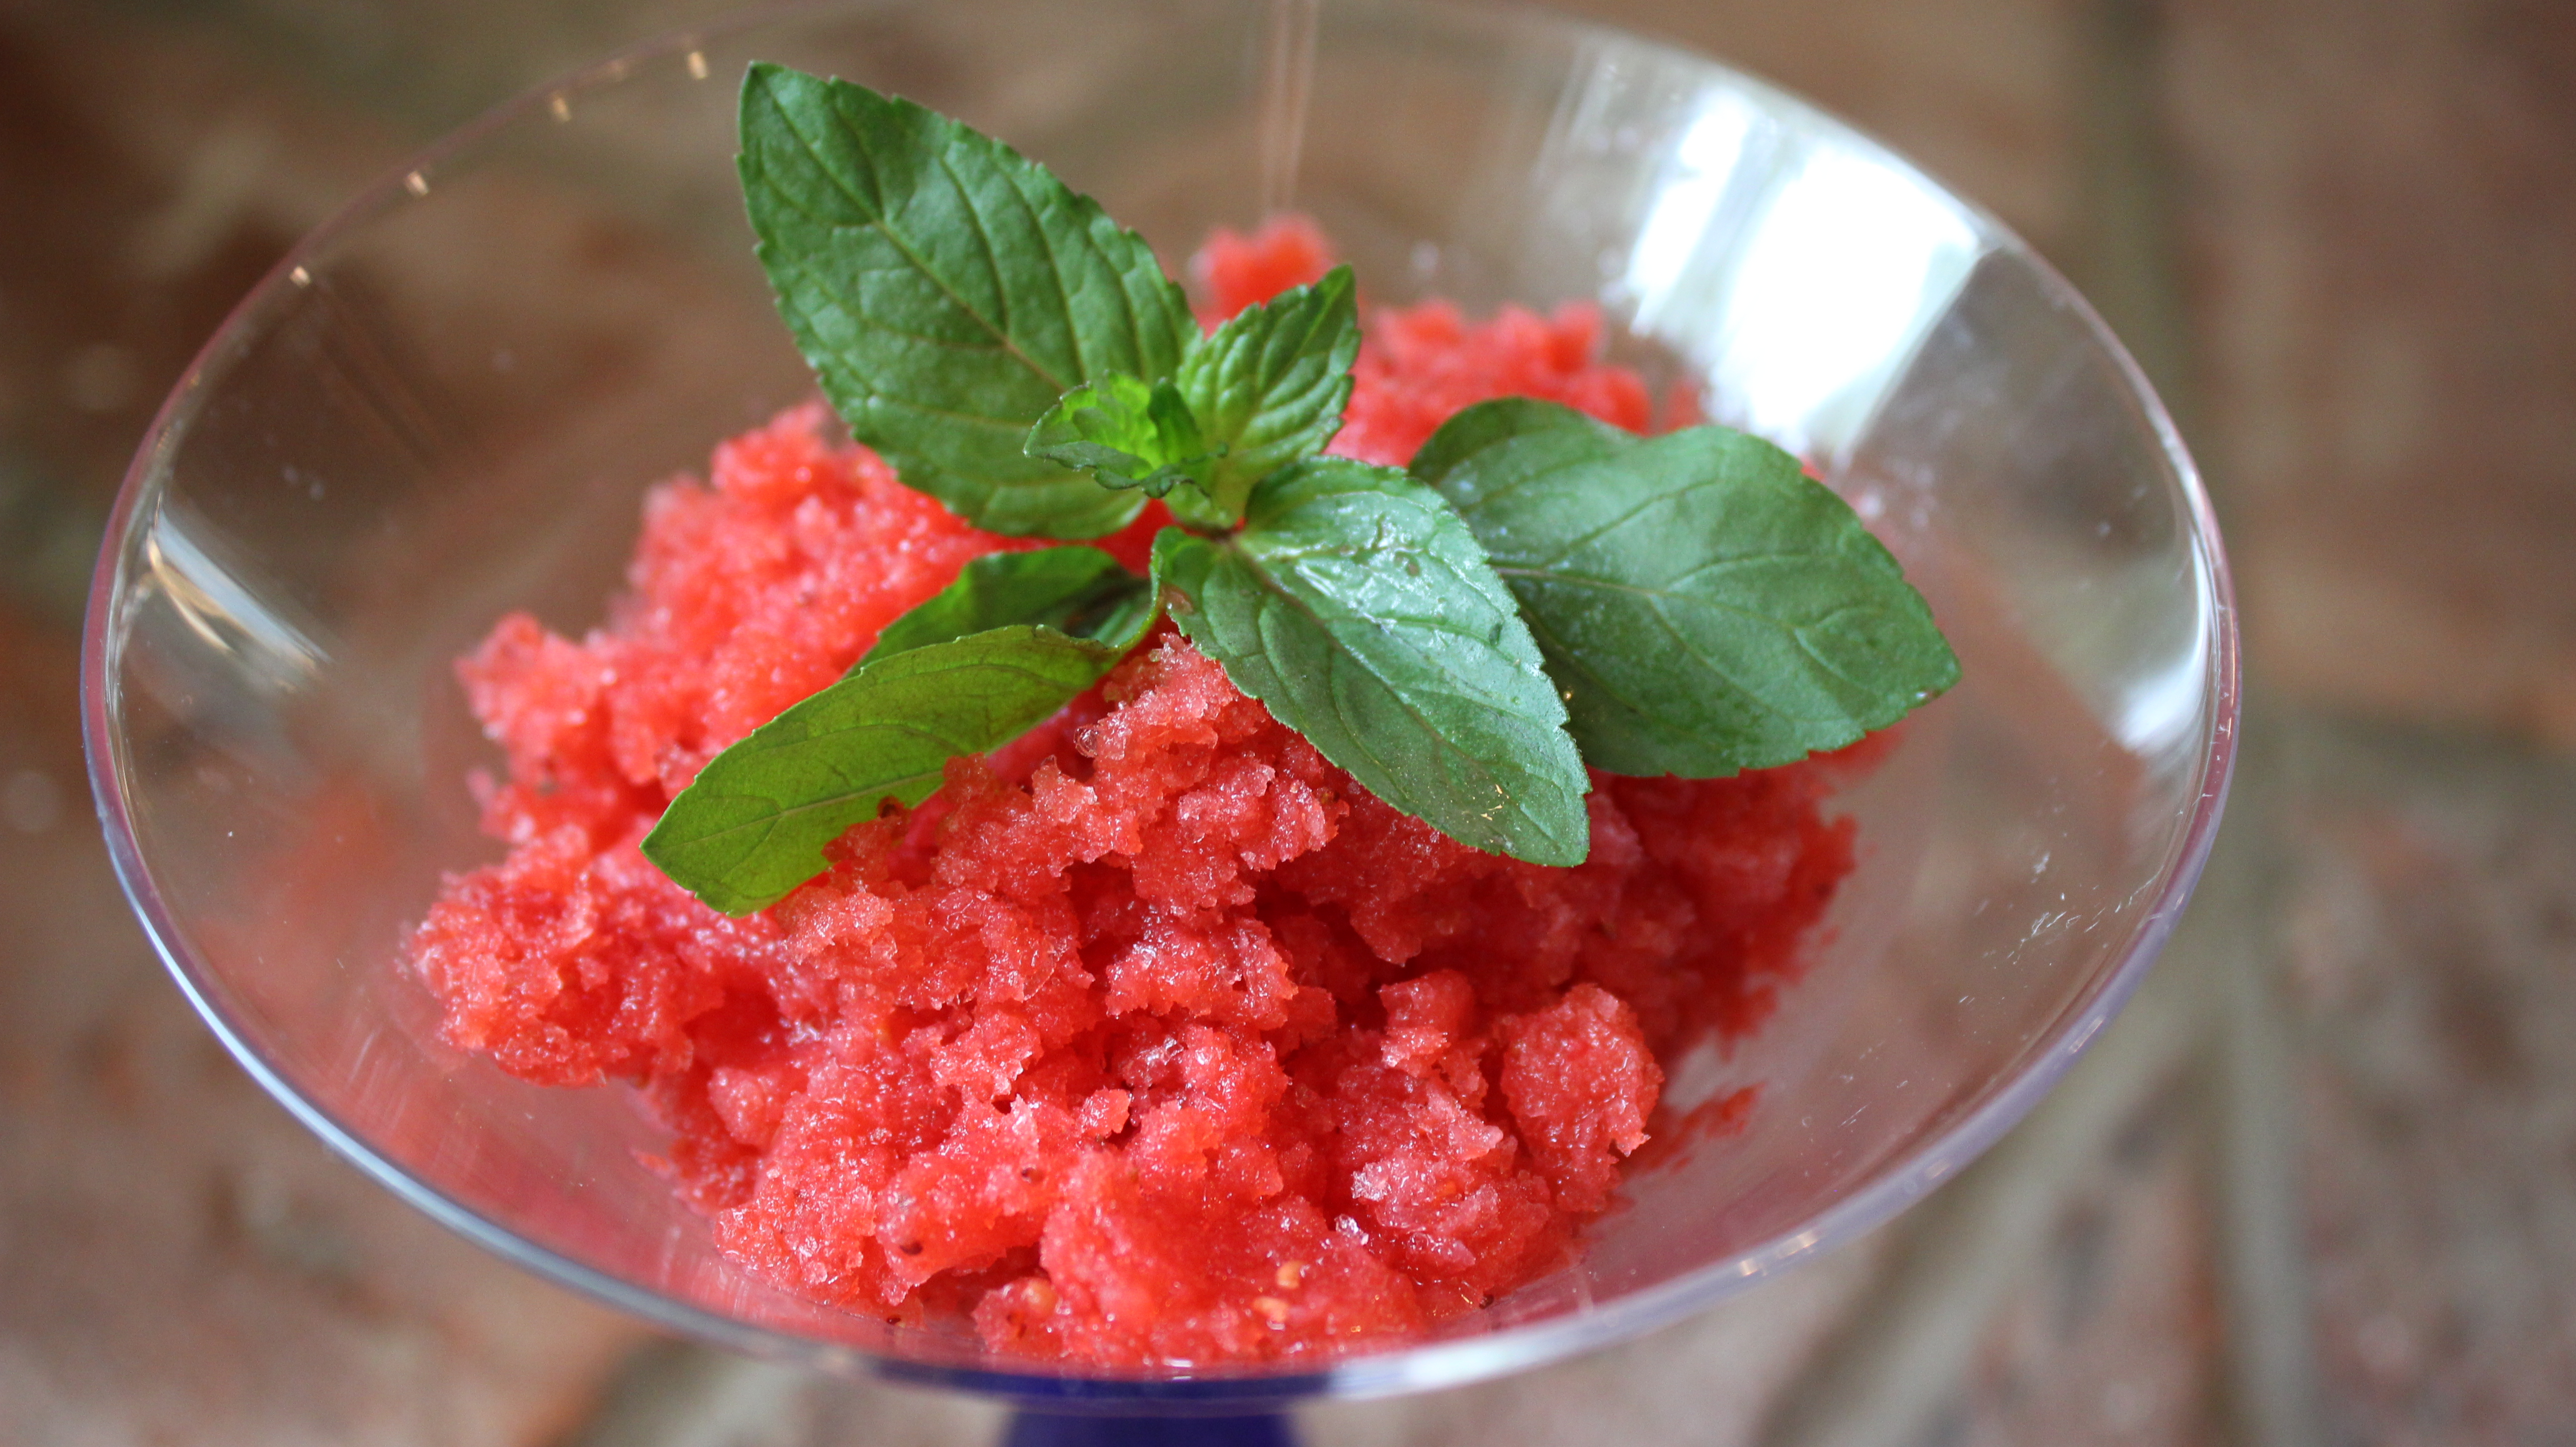
Homemade berry granita is similar to a sorbet or an Italian ice and gives you the same happy feeling as eating ice cream but can be made with out all that hard work. Granita is made in three simple steps – purée, freeze and scrape. How simple is that? Most recipes for granita have you making a simple syrup by boiling the water and melting the sugar but I find that unnecessary. Instead, I substitute the sugar with Agave Nectar this way you add it right to the berries in the blender! Yeah!
Granita actually originated in Sicily and is a frozen treat made all over the world. In Quebec they call it a slushy or a slurry. This frozen treat can also be made into a after dinner dessert for adults by adding in a jigger or two of rum to give it a little kick. Another great idea is serving granita between meals as a palate cleanser to clear the taste buds for next course as an elegant presentation to your dinner party.
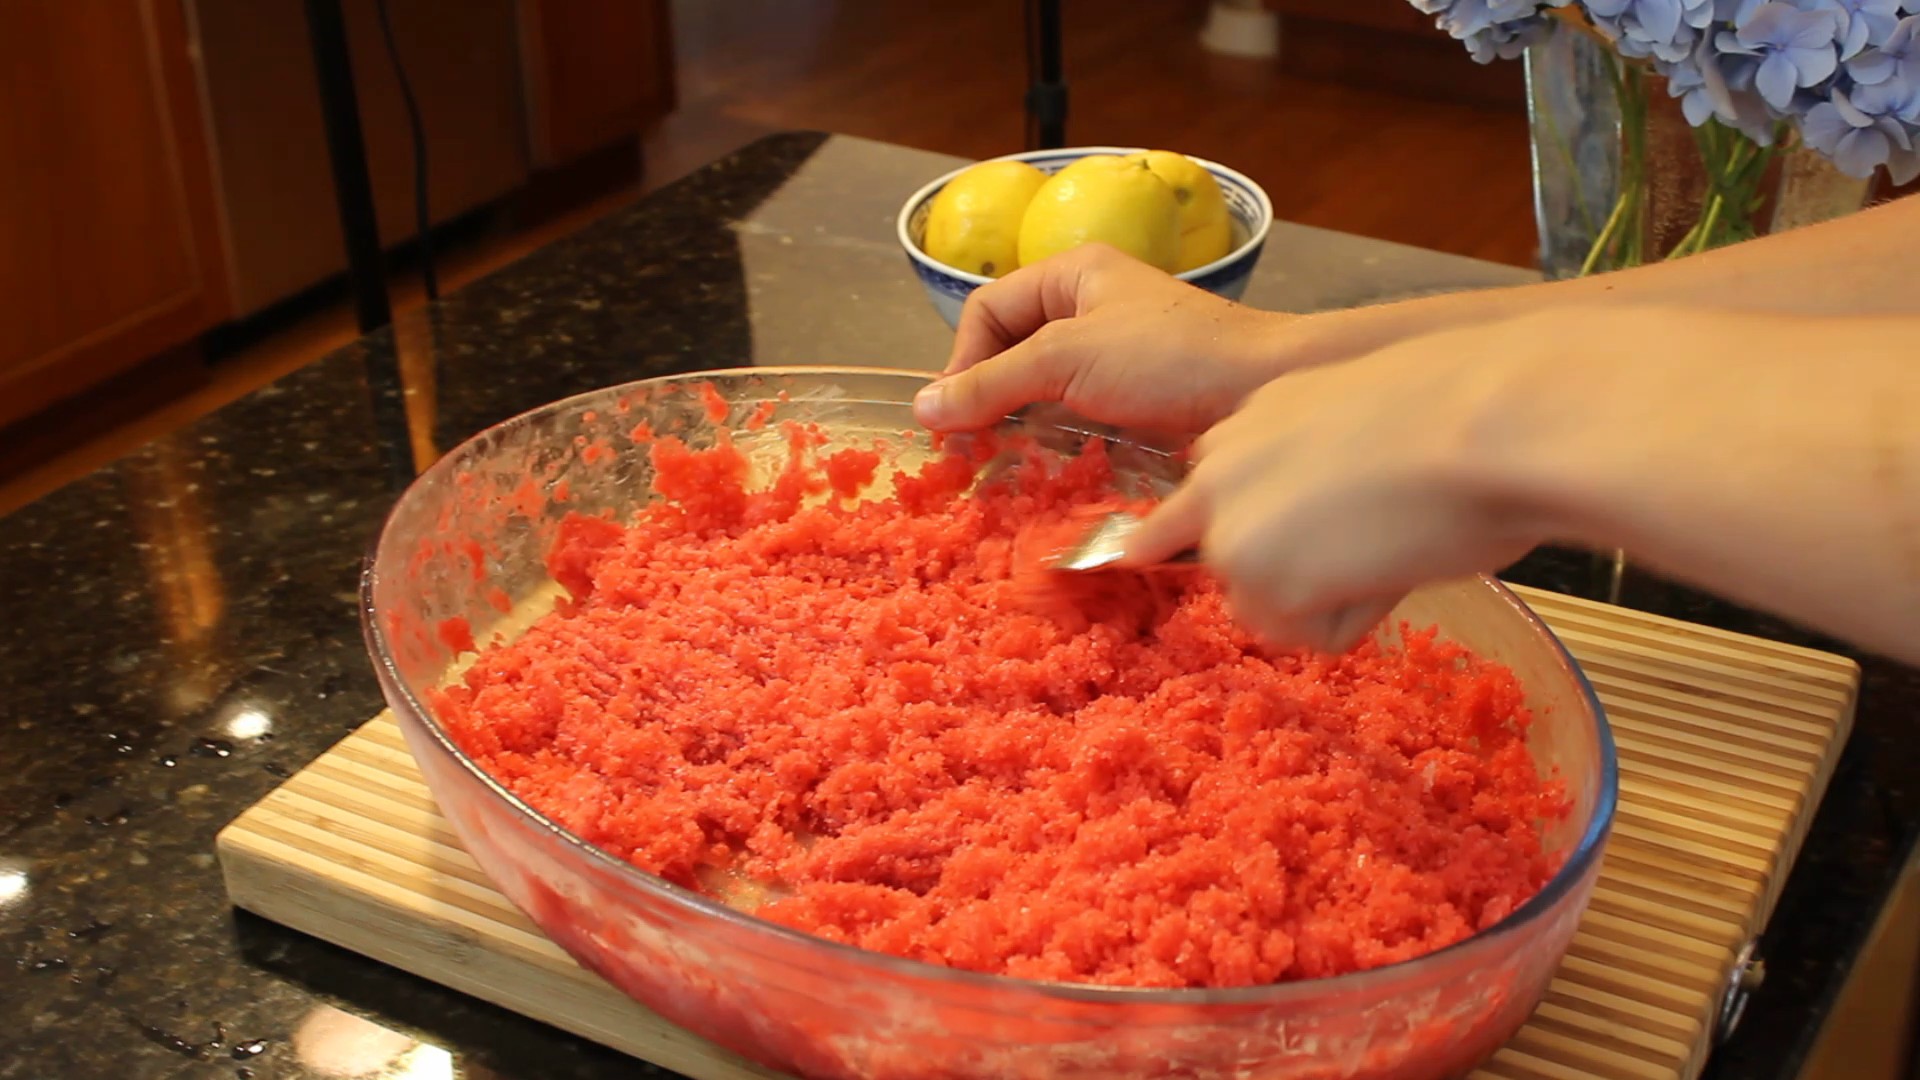
In my homemade granita recipe I have also simplified the freezing steps. Instead of scraping with a fork every 45 minutes just wait the three hours or so until the entire dish is frozen and then scrape with a fork at the end like we do in the show. This way it’s less time consuming and a smoother, easier surface to work with all awhile still coming out fluffy and delicious! I think you and your family and friends will really enjoy the simplicity of this delicious frozen treat.
Ingredients:
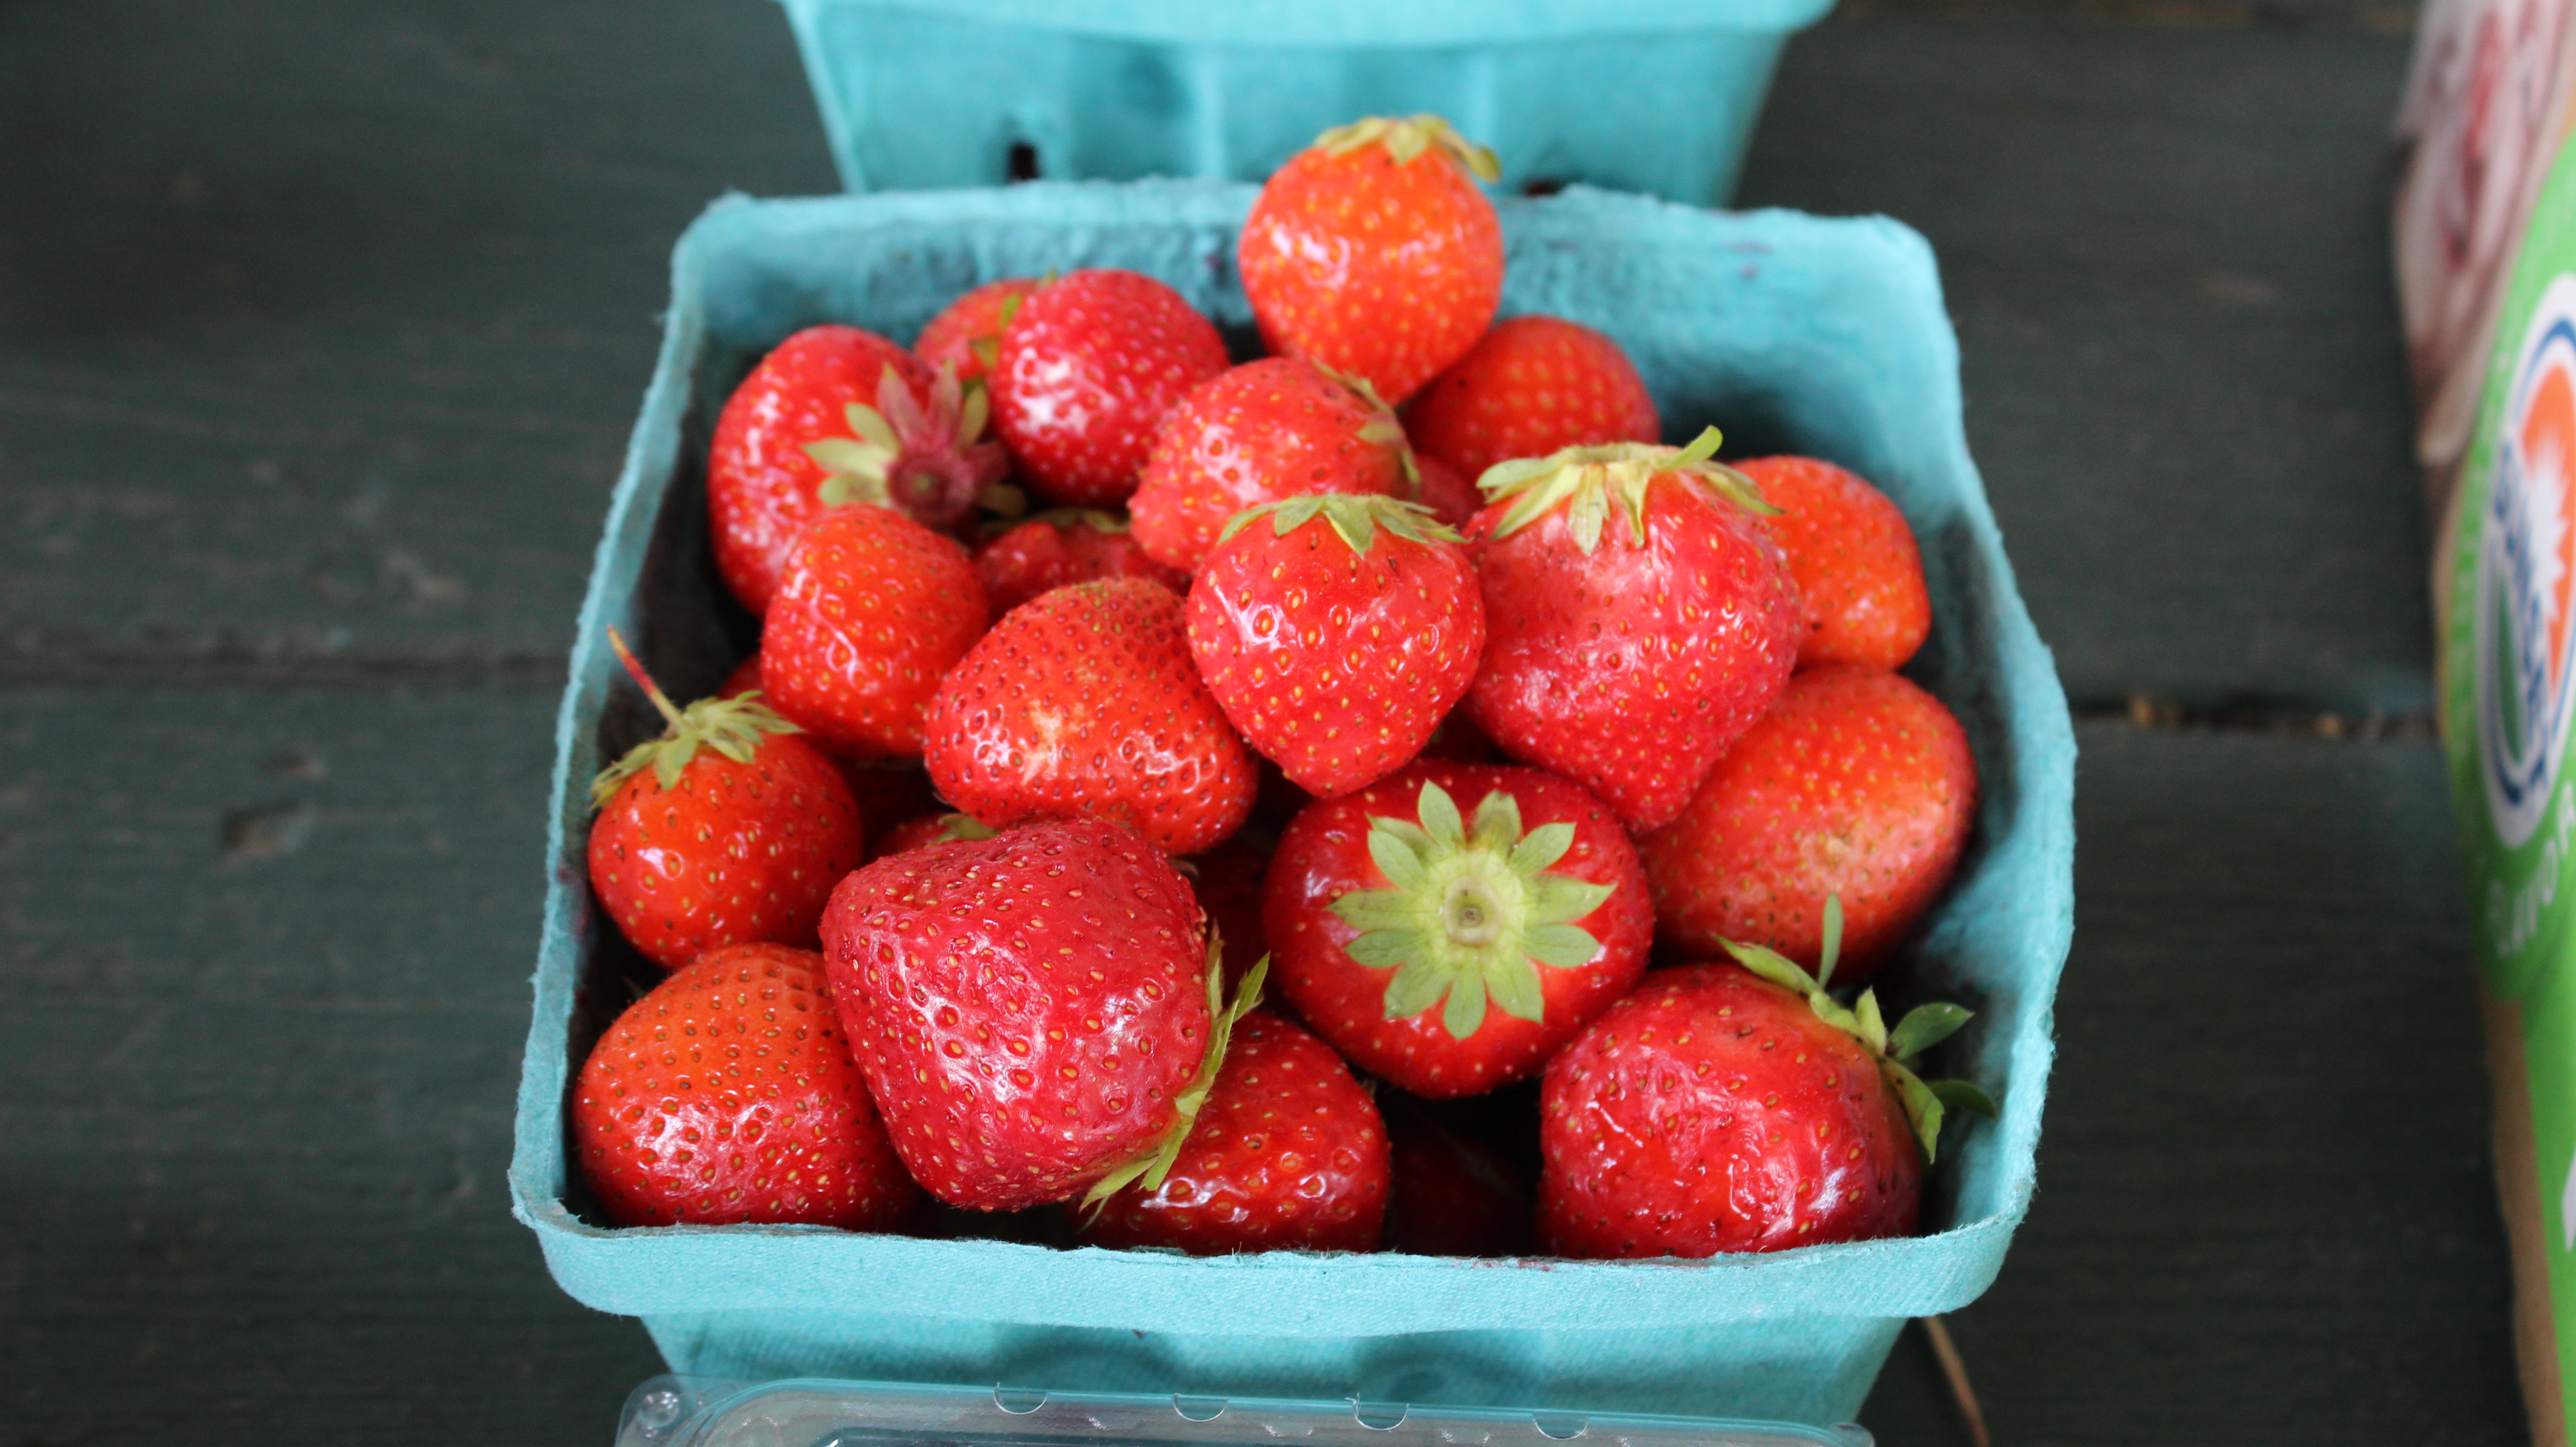
2 cups fresh strawberries
1 cup fresh raspberries
1 cup cold water
2 tbsp agave nectar or honey (Optional)
1/4 cup sugar
1/4 cup fresh squeezed lemon juice
Juice from 1 lime
1 bunch fresh peppermint leaves
Directions:
Wash and dry fruit
Squeeze juice from lemons and lime
Hull strawberries and slice in half
Place all berries into blender
Add citrus, H20 and agave
Blender for 20 seconds til pureed
Pour into a Pyrex dish
OPTIONAL: Add in 1-2 jiggers of rum, stir and freeze
OPTIONAL: You can give a stir before its frozen around the 45 minute mark BUT this is not a necessary step (as you see in the show we did not get around to this)
Freeze for approx. 3 hours
Pull out from freezer and begin to scrape with a fork until fluffy
Spoon into martini glasses and top with fresh mint

 Back on CT Style this week with Ryan Kristafer and Teresa Dufour making the perfect summer picnic dish, Asian Shrimp & Rice Noodle Salad, never gets dull with those two! I thoroughly enjoy every second on the WTNH set at Channel 8. There were several groups going on camera this week making it even more exciting then usual, if that’s at all possible.
 important for me to find out what recipes my followers and friends want to see so please feel free to make suggestions always. That’s how I came up with this Asian Shrimp & Noodle Salad… it was the #1 request, a picnic-beach salad that won’t spoil.
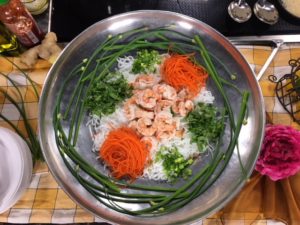 Here are some other summer dishes you may enjoy like my 2 minute Homemade PESTO on crostini with roasted cherry tomatoes and mozzarella, EGGPLANT BALLS, ZUCCHINI TORTA, Mediterranean Chicken Kabobs, or Dreamy Cream & Fresh Berries.


 Making shrimp & scallop ceviche really can’t get an easier then this! Ceviche is a South American dish that’s usually served as an appetizer. The fish cures/cooks in citrus juice for an hour or two while you get all your salsa ingredients in order. The citrus curing juices are drained from the fish, leaving a tender shrimp & scallops to be tossed with salsa and voilà. The base of the shrimp and scallop ceviche here is my