Showing you how to make summer sauces, a Bourbon BBQ & a Green Goddess Sauce, to go with Easy Pulled Pork Sliders topped with broccoli slaw is what I was doing today on CT Style! Teresa has that baby glow going on and Ryan always with the funny one liners, doing the cooking segment on CT Style is one of my favorite things about being The Traveling Epicurean.
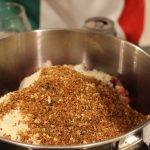
The Easy Pulled Pork Sliders are made with tenderloins instead of a giant pork shoulder. The reason I love to do this is it’s so darn EASY! The tenderloins are cut in 1/2 then coated with a mixture of light brown sugar, Colemans Dry Mustard, onion & garlic granules, s & P. Placed into a large baking dish with a small 7.5 oz. can of cola poured into the dish. The Coca-Cola helps to keep it moist and gives it a little caramel flavor. It’s baked for 1 1/2 – 1 3/4 hours, cooled and shredded apart. At that time the Bourbon BBQ Sauce has finished simmering and just waiting to be poured of all the pulled pork and warmed thru…YUM! This recipe can easily be duplicated in your crock-pot as well!
I featured my homemade BBQ sauce on CT Style today because I really wanted to emphasis how easy it is to make your own BBQ sauce at anytime and not have to worry about making a trip back to the store when you can whip it up yourself! Add in some Bourbon and wow, how great does that taste. It’s definitely an adult taste so if you need to you can easily divide up the sauce for the kids adding in bourbon to the adult sauce only.
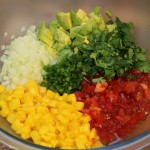
Now the green goddess sauce goes with out saying and once you taste it you’ll understand. This sauce will jazz up just about any dish you are making, grilled swordfish, salmon, chicken, beef, lamb, pork or veggies. It’s made all in a blender and when it sits in the frig for a few hours the flavors only get better.
The best way the make the broccoli slaw, in my opinion, is to buy the pre-packaged broccoli at the store and then just add mayo, cider vinegar (I also throw in some “seasoned” rice wine vinegar) and sugar and violá!
You’ll see how amazing these 4 recipes go together once to taste them in a slider…oh boy! Not to mention how gosh darn easy they are to make. You be the BBQ Slider King of the summer! Don’t forget to check out my oh so chocolatey homemade Hershey chocolate cake for dessert either…Enjoy!
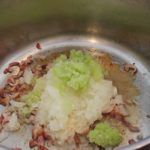
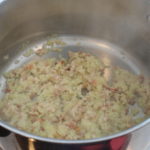
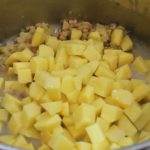
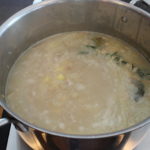
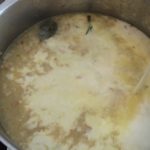
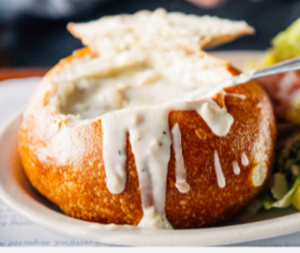
This Creamy New England Clam Chowder is bursting with clam broth flavor, tender clams, melt in your mouth potatoes and a hint of smokey from the bacon and best of all, I can make it 12 months of the year! My secret ingredients in this homemade New England Clam Chowder push it right over the top! My mother was whipping up creamy New England clam chowder when I was little so making homemade soups just comes naturally to me. My New England clam chowder recipe reminds me of my no-nonsense crab cake recipe, no extra fillers! Topped with a little dollop of butter, a few dashes of tabasco and some oyster crackers brings me to chowda heaven!
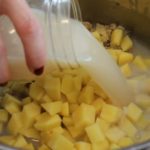
My first secret ingredient in this New England Clam Chowder is dry cream sherry. De-glazing and simmering with dry sherry brings it to a whole new level. It really gives the chowder that extra something special everyone will be trying to figure out! If you have the time you really ought to pick up the Savory & James Medium Dry Sherry-Blend of Amontillado for only $11 a bottle. It will last a while in your cupboard and help you to create amazing dishes. I would never not think of putting a big splash of dry sherry into my chowder! You will understand why once you try it this way …you’ll never go back to sherry-less chowder!
My second secret ingredient is Wondra Quick-Mixing Flour, it’s a godsend. You don’t have to bother with a roux and worrying about lumps in your soup, sauce or gravy ever. It will change the way you cook! You can add the Wondra at any time during the creation of your dish and it magically dissolves. Sometimes we need a roux, like for making a gumbo when you want to develop that nutty flavor working it into a dark golden color but we don’t need that in New England Clam Chowder!
How wonderful if it’s the right time of the year and you’ve set aside time to find and buy fresh whole clams for your chowder but my recipe can be made at the snap of your fingers, 12 months of the year. It tastes like restaurant quality chowder and it’s easy to do. I always stock my cabinets with snows clams and broth for chowder or linguine and clam sauce!
5 Bottles “Snows Clam Broth = 6 cups broth (5 cups bottle + 1 cup comes from the cans after you drain the clams)
2 cups heavy cream
1 cup half and half
3/4 cup good dry cream sherry -(the pink one) Savory & James Medium Dry Sherry -“Amontillado” is one of my favorites (1/4 cup to de-glaze onion/celery and 1/2 cup to simmer with broth base)
2 slices minced bacon (smokey flavor ONLY not maple)
3 extra lg potatoes or 4 small diced to 1/2″ size
2 celery stalk finely diced
1 whole sweet onion finely diced
1 bunch rosemary tied with string … just a flavor bundle – to be removed
1 large bay leaf
1 tsp salt
1/2 tsp finely ground pepper
3 sprinkles of “Wondra-Quick Dissolving Flour”
Directions:
Finely chop 1 whole onion
Finely chop 2 celery stalks
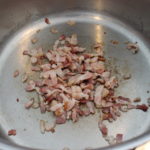
Slice 3 slice of smoked bacon, then dice that
Add diced bacon to large pot and begin to sauté on low, just want the bacon to become slightly crispy
Add in chopped onion and celery and sauté until lightly golden
De-glaze with 1/4 cup dry cream sherry
In 1 minute add in diced Yukon potatoes and all the clam broth from cans and bottles and 2 bay leaves and 1 tsp salt
Bring to a simmer and cook for 12-15 minutes until the potatoes are tender but FIRM because the potatoes will continue to cook even after you take them off the heat
Tie off a bundle of fresh rosemary with cotton string
At the 5 minute mark of simmering the potatoes ADD in the rosemary bundle and 1/2 cup of dry cream sherry and bring back to a low simmer
At the last 2 minutes of simmering the potatoes ADD in 3 cups of heavy cream, 1/4 tsp finely ground blk pepper and possibly 1 tsp more of salt (you need to taste here to see if your chowder needs this addition of salt) and bring back to a low simmer
Take the New England Clam Chowder base off the heat and gently stir in all the clams
Remove the the rosemary bundle and the bay leaves and serve with Tabasco and oyster crackers
If this is for the following day cool chowder completely at room temp allowing space with the cover for the soup to evaporate, place in frig
When re-heat the soup watch carefully not to bring to a boil…just heat thru…mmm! Enjoy!
Shop Ingredients HERE!
Cutiset 20 Ounces ceramic bowls set with handles for chowder, set of 4
San Francisco Boudin Bakery Sourdough Rounds 16 oz (2 Bread Rounds)
Baking Serving Ceramic Red 16 Oz Soup Bowls with Handles – Set of Four – Stoneware Chowder Bisque Pot Pie Crocks
SNOW’S BY BUMBLE BEE Chopped Clams, 6.5 Ounce Can (Case of 12), Canned Clams, Gluten Free, High Protein, Keto Food, Keto Snacks, Paleo Diet Food, Canned Food
SNOW’S BY BUMBLE BEE All Natural Clam Juice, 8 Ounce Bottle (Pack of 12), Pure Bottled Clam Juice
Double Smoked Bacon Slab by Schaller & Weber (11 ounce)
Rosemary, Locally Grown, 2 Bunches
2-Ounce Premium Whole Bay Leaves
Tabasco Original Flavor Pepper Sauce 2 oz (Pack of 4)
Wondra All Purpose Quick-Mixing Sauce ‘N Gravy Flour (Pack of 2) 13.5 oz Size by Gold Medal
New England Original Westminster Bakeries Oyster & Soup Crackers (3 Pack)
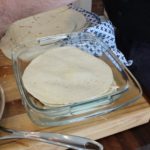
Torta de Pollo is a delicious and innovative way to change up the ole chicken pot pie not to mention it’s a down right fun thing to do! That’s what Chef Mark has done here layering tortilla’s with chicken and vegetables instead using a traditional pie crust. A Spanish Dry Sherry, called Amontillado, certainly takes this chicken pot pie version to a new level. Using these tortilla’s will save you time from making and fussing with a pie crust and who doesn’t love that.
Chef Mark has some wonderful flavor building steps going on here in his Torta de Pollo as he graces us with his truffle salt and Himalayan salt rock. Let’s not forget his de-glazing of the veggies with this Spanish Dry Sherry called Amontillado by Savory and James that every kitchen should carry for a mere $13 a bottle. It would be silly not to have this in your cubbard!
Using the tortilla’s instead of the pie crust gives this Torta de Pollo an almost creamy texture. Changing up a chicken pot pie recipe like this, swapping out the tortilla’s for the pie crust, is such a creative and easy thing to do. It reminds me of a couple other of my favorites like chicken enchiladas or chicken cordon blue because of the swiss cheese in with the layers.
No baking time is another wonderful feature of this recipe. Once you sauté the veggies and make the “special sauce” consisting of chicken stock, rosemary, heavy cream and Spanish sherry you then cover the torta with this delectable sauce and flash broil it for 3-5 minutes…voilà! You certainly won’t be disappointed with this one! Enjoy and have fun using your favorite vegetables!
9 x 13 baking dish (will be wider then the tortilla’s
fresh rosemary for “Special Sauce” – recipe below
1 cup heavy cream for “Special Sauce” – recipe below
Directions for Torta de Pollo:
Remove all the meat from the rotisserie chicken
Slice up the chicken to bite size pieces and set aside
Add remaining rotisserie chicken, the bones & the skin to a medium size pot and add 1 celery stalk, onion skin, and 1 carrot cover with water and bring to a simmer for 1/2-1 hr
Warm sliced de-boned chicken in a medium pan with 1 cup chicken stock on low heat
Put sliced mushrooms in a hot sauté pan and cook for 5 minutes, stir after a minute…don’t worry if they seem to stick it’s ok
Now add 1/4 tsp salt to mushrooms
Move sautéed mushrooms to the side and add in 2 tbsp olive oil with the slice potaotes
Sauté potatoes for 3 minutes
Then add parnips, peppers, celery, garlic, shallots and lemon zest
Add in broccoli, cauliflower, cook 1 minute
Deglaze with 1/3 cup dry sherry
Add in frozen peas, add 1 cup chicken stock, bring to a simmer
Stir in 1/2 tsp salt and 1/4 tsp Berbere spice
Let veggie reduce 5 minutes until most of the liquid has evaporated
Put wrapped 10-12 flour tortilla’s in foil in a warm oven
Begin to layer Torta de Pollo
Add 3 tbsp chicken chicken stock to bottom of baking dish
Begin with tortilla, then 1/2 cup chicken & 1/4 cup swiss, then a tortilla, 1/2 cup veggies (without any excess juice), tortilla, and repeat until 10 layers – 4 or 5 chicken layers & 4 or 5 veggie layers. Note: push down slightly as you are layering to keep shape flatter
Make “Special Sauce” -see below
Pour all the sauce over the Torta de Pollo and place under the broiler for 3-5 minutes, til slightly bubbly
Slice and serve with a drizzle of extra sauce over the top…mmm!
Ingredients & Directions for “Special Sauce”:
1 cup chicken stock
1/3 cup dry sherry
1 cup heavy cream
1/4 cup shredded Comte swiss cheese
1/4 cup shredded Emmentaler swiss cheese
1/2 tsp salt
1/4 tsp pepper
1 tsp fresh chopped rosemary
Using same veggie sauté pan add in first 3 ingredients, and bring to a simmer for 5 minutes
Reduce slightly and then stir in cheeses, rosemary, s & p
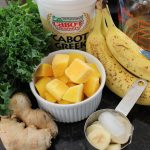
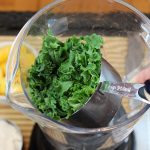
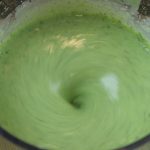
Giving my favorite “Mango-Kale Smoothie” demo for the staff and members at Funktion Fitness this past Thursday morning was tons of fun! The best part was seeing all their smiling faces after taking the first sip of my Mango-Kale Smoothie. They really loved how refreshing and fruity the smoothie was. Like I always say, if it wasn’t green you wouldn’t even know there was kale in it!
In my opinion, finding a balance is the key to everything in life. Getting my dose of endorphins thru spin class at my gym, Funktion Fitness, is just as important to me as having a healthy go to energy drink. And not just any old healthy energy drink but one that’s as delicious as my Mango-Kale Smoothie! The best thing is attaining these things and enjoying yourself to the point where it just doesn’t seem like work at all!
Having an awesome motivator, like my spin instructor Heather Theriault at Funktion Fitness, is half the battle. She has so much enthusiam for life and that work ethic of hers making your workout super tough but so gosh darn fun it goes by in a flash…can’t ask for anything better then that!
So it’s up to you to find some kind of exercise outlet that makes you happy, and gets you your weekly dose of mood boosters, endorphins. As for the healthy energy drinks, I’ve got you covered with my scrumptious smoothies to give you those weekly boosts helping you to keep powering thru your day with a smile…enjoy!
CLICK HERE TO FIND THE RECIPE, INGREDIENTS AND DIRECTIONS TO MY MANGO-KALE SMOOTHIE ! You can get really creative with your smoothies and I show you how in one of my other smoothie shows “My Energy Smoothies 101“. You’ll want to take a jump over to my Mango Salsa Recipe page as well and don’t forget to make my Best Guacamole Ever Recipe … never any left over where ever I take it!
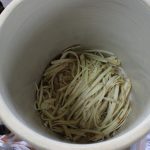
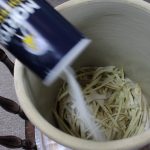
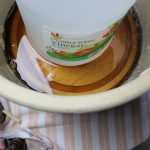
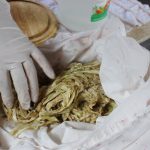
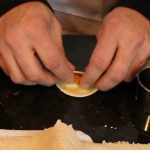
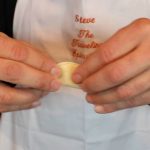
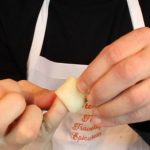
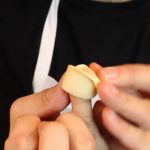
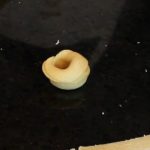
You know this labor of love is so worth the effort when you taste how tender and flavorful these homemade tortellini are! The delicate, circular shaped pasta are stuffed with a purée of sundried tomato, mozzarella, and Reggiano Parmesan and served in one of my all time favorites, a tomato-cream sauce. I introduced Steve to another easy and scrumptious sauce, Gorganzola Dolce-Cream Saucethat’s garnishedwith fresh thyme and a drizzle of truffle oil!
This past weekend I was at The Gulla’s house with Steve and his son Maximo making their homemade tortellini. Steve dedicates a few hours every Christmas Eve making these little gourmet bites for his family’s Christmas dinner. Making these tortellini is definitely a labor of love because you are creating each little amazing folded bundle of pasta by hand.
Having a Smart pasta machine like Steve’s really cuts down on the labor of making tortellini as the pasta comes out of the machine in long ready-made sheets in mere minutes. It’s a very cool process putting out smooth sheets of pasta in 3 minutes flat but you can also learn to make Steve’s tortellini using homemade pasta too if you don’t own an Smart pasta machine. I have a homemade pastarecipe below for all of us without a pasta machine who don’t want to miss out on learning how to make these incredible tortellini.
As Italian legend goes on how the shape of the tortellini came about dates back to the days when Venus, the Goddess of Love, was traveling to a small town in Italy between Modena and Bologna. She was staying at a tavern where the Innkeeper was so taken by her beauty he peeked thru the key to her room one night and got a glimse of her navel. He rushed to the kitchen and created a pasta in the likeness of her belly button. And that’s how the shape of the tortellini came about, the belly button pasta! Who Knew?
INGRDIENTS for making PASTA in The Smart Pasta Machine:
3 parts flour
1 part semolina
180 ml OR 3/4 cup of water for 2 lbs flour in pasta machine
1 egg and 1 tsp water whisked in a small bowl – set aside until ready to form tortellini
INGREDIENTS for Sun-dried Tomato FILLING: NOTE: THIS FILLING IS UNBELIEVEABLY DELICIOUS!…try it on crostini OR on crusty bread!
1/2 cup sun dried tomatoes
1/2 cup mozzarella – whole milk or part skim
1/4 cup grated Reggiano Parmesan
2-3 tbsp olive oil
Purée these ingredients with an immersion blender or add to food processor and pulse. Start with 2 tbsp of olive oil and add a little extra if needed to purée til smooth texture
DIRECTIONS FOR FORMING THE TORTELLINI WITH SHEETS OF PASTA MADE FROM THE PASTA MACHINE:
Begin to cut 2″ circles with your cookie cutter out of the machine made sheets of pasta
Brush top 1/2 of the circle edge with a whisked egg
Place 1/4 tsp of sun dried tomato filling in the middle of the circle pasta
Fold the circle in 1/2
Press to SEAL the 1/2 circle of pasta…VERY IMPORTANT to SEAL this edge!
Take 1/2 circle and wrap around your pinky having each end meet
Press these two ends together to seal and form one continous circular shape
Fold down top of circular pasta to form tortellini
Place in a bowl as you finish each one until you gone thru all the pasta sheets
Bring large pan of salted water to a boil and add fresh pasta
Cook pasta for 8 minutes, test pieces of pasta for proper doneness
Serve with tomato-cream sauce or Gorganzola Dolce-cream sauce, garnish with thyme and truffle oil … mmm!
INGREDIENTS FOR TOMATO-CREAM SAUCE:
2 cloves finely chopped garlic
1/2 tsp salt
1/4 tsp dried oregano
3 1/4 cup POMI “strained tomaotes” – 1 med box – 26 oz.
2 cups heavy cream
2 tbsp olive oil
Sauté finely chopped garlic in 2 tbsp olive oil for 3 minutes, add in POMI strained tomatoes, salt & oregano and simmer for 15 minutes. Add in 2 cups of heavy cream to tomato sauce. Bring to a simmer for 15 miutes more. Serve with cooked tortellini, garnish with fresh thyme (and truffle oil.
INGREDIENTS FOR GORGANZOLA DOLCE-CREAM SAUCE:
2 cups heavy cream
1/4 cup Gorganzola Dolce cheese
1/4 cup dry vermouth
fresh thyme leaves
truffle oil
Add heavy cream, Gorganzola, and vermouth to a small sauce pan and bring to a simmer. When it comes to a simmer whisk the melted cheese into the cream and simmer 10 minutes. Serve with tortellini, garnish with a sprinkle of fresh thyme leaves and a drizzle of truffle oil.
INGREDIENTS for Easy Homemade-Handmade Pasta- (Recipe from “Pasta at Vin’s“)
2 1/2 cups all purpose flour
1/4 cup olive oil
4 1/2 – 5 lg eggs
1/4 tsp salt
DIRECTIONS:
Put the kneading attachment on your food processor and add the flour
Add the salt and olive oil
Turn on the food processor to slow
Add in 1 tbsp of water
Begin adding in 1 egg at a time with the processor still on slow
Add in the rest of the eggs
Keep the food processor going on medium speed to begin kneading the dough
Let knead for about 8 minutes until the texture turns into a smooth consistency
Remove the pasta dough and place onto the counter
Knead briefly with your hands and let sit for 1/2 hr.
NOTE: Vin does not cover his pasta dough while it sits for the 1/2 so it can begin to dry out a little bit
Sprinkle some flour onto the counter or work surface and cut pasta dough into 8 pieces
Begin to roll out each piece of dough to your desired thickness, into long lasagna-like sheets
Sprinkle more flour on top of each thinly rolled out pasta piece and begin to cut out 2″ circles with your cookie cutter
Brush top 1/2 of the circle edge with a whisked egg
Place 1/4 tsp of sun dried tomato filling in the middle of the circle pasta
Fold the circle in 1/2
Press to SEAL the 1/2 circle of pasta…VERY IMPORTANT to SEAL this edge!
Take 1/2 circle and wrap around your pinky having each end meet
Press these two ends together to seal and form one continous circular shape
Fold down top of circular pasta to form tortellini
Place in a bowl as you finish each one until you gone thru all the pasta sheets
Bring large pan of salted water to a boil and add fresh pasta
Cook pasta for 8 minutes, test pieces of pasta for proper doneness
Serve with tomato-cream sauce or Gorganzola Dolce-cream sauce, garnish with thyme and truffle oil … mmm!
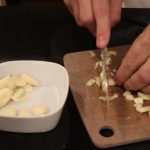
It was definitely worth the wait to find out how to make Kevin and Jori Smith’s oh so sucullent and flavorful meatballs! It took a little patience to sync our schedules thru this busy holiday season but we were finally able to tape these #1 Meatball winners from the recent competition, “Lisa & Vin’s 2016 Meatball Throw Down”! It’s a team effort between Kevin and Jori that produces one of the best meatball’s I have ever tasted. Watch out Dan Holzman from “The Meatball Shop” in NYC for these amazing meatballs will turn heads!
Come to find out Kevin and Jori won Lisa & Vin’s Meatball Competition the year before as well! Once you have your first bite into these melt-in-your-mouth meatballs you will know exactly why.
Not only were we eating Kevin and Jori’s amazing meatballs while taping the #1 Meatball show but Vin made is homemade pasta we call “The Trucals” from the show “Homemade Pasta at Vin’s”. Vin makes his pasta with a special roller called the trucal iron hence the name “The Trucals”. This trucal iron that belonged to his grandfather cuts thick strands of pasta as you roll over it making for a hardy, chewy, yet tender strand of pasta.
If it couldn’t get any better then that Kevin added in an incredible garlic-basil bread and Jori her luscious tomato-basil salad with fresh Burrata cheese! Talk about the perfect meal…OMG! I am truly excited that I am able to bring you Kevin and Jori’s winning meatball reicpe. I know you will love them as much as I do!
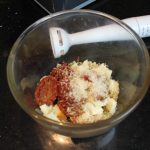
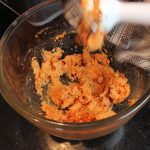
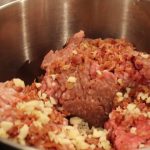
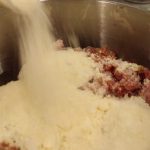
Ingredients for #1 Meatball Makes Approx 55 Meatballs: -Note: this is a large recipe… you can 1/2 the reicpe for a lesser amount of course and remember meatballs FREEZE really well, raw or cooked!
CT Style Making Crab Balls with Ryan Kristafer & Teresa Dufour
With Teresa Dufour & Ryan Kristafer on CT STYLE Set
Showing you some fun and refreshing foods to make for your “Big Game” or Super Bowl party was the first thing that came to mind when I was deciding what to cook on “CT Style” this week. I went with my Crab Cake Balls with Homemade Thousand Island Dressing, Mango Salsa, and Honey Dripping Greek Baklava because they are all scrumptious make ahead dishes! The key words here being “make ahead” are a huge deal when throwing a party because it helps to take the pressure off, let’s you enjoy your guests and maybe have time to whip up some specailty cocktails like yummy Metaxa Mojito’s!
Metaxa Mojito’s
The crab cake balls are actually from my crab cake recipe. We are just forming the crab into 1 1/2″ balls instead of disc’s. It’s a no nonsense kind of recipe without all the vegetable fillers. Chunks of crab, some seasoning and a few binder ingredients is all that make up this appetizer. Letting the crab cake balls set in the frig for a couple hours or even overnight let’s those flavors meld and the shape to really form making it easy to sauté. Then you briefly sauté them in a little butter and olive oil until golden and crispy on the outside.
The Bender Kitchen
You saw how easy it was to make my homemade thousand island when I had Teresa whisk together all the ingredients in just a few seconds. The secret ingredient in my dressing is adding in creamy horseradish to compliment the crab, like a “crab Louie”!
Make sure to buy a few mangoes a week before game day so they have time to ripen fully on your kitchen counter and they will make an amazing mango salsa. While you are at it check out the avocado’s to see how ripe they are and you may want to pick up a couple of those to leave on the counter as well.
Selfie Ritual w/Benny – CT Style Camera Man
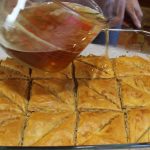
As for the authentic Honey Dripping Greek Baklava recipe that comes from my good friend Maria, it’s to die for! It make’s the perfect party dessert cause you cut them up into little triangles…it’s always a crowd pleaser and again you if make it the day before it’s ideal!
I know you’ll have as much fun making these party dishes as I did with Ryan Kristafer and Teresa Dufour on CT Style! Just click on the link above and it will take you to the exact recipe page’s! Enjoy and I hope your team wins!
Wow! What an impression 9 simmering trays of meatballs made when you walked into Lisa & Vin Esposito’s kitchen this past fall for their 2016 Annual Meatball Competition! There were meatball’s with sauce, meatball’s without sauce, and some topped with hot cherry peppers. All I know is the aroma’s of the meatball’s, tomato sauce, basil, and garlic had you salavating in mere minutes in anticipation of sampling these delectable little morsels.
The Esposito’s actually started this meatball competition about 4 years ago with 22 meatball entries! Realizing that it was difficult to judge with too many to try in order to submit an objective ballot they are now down to 9 meatball entries in the competition.
It took a little patience to get thru the holiday’s to coordinate next week’s show, the winner of “Lisa & Vin’s 2016 Annual Meatball Throw Down” but it was worth it! Everyone loves a great meatball and I’m happy to say I had voted for the winner’s meatball in this competition! I’m excited to get you the recipe!
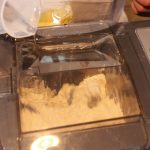
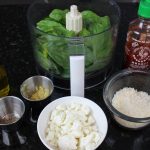
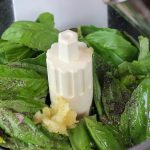
No doubt about it once you try this feta-basil pesto you will be hook! The creamy, French sheep’s milk feta pushes this pesto into a whole new arena! Combined with the fresh, floral basil leaves, Italian Reggiano Parmeggiano, extra-virgin olive oil and garlic are a creation that’s just born to go together! Done in mere minutes in a food processor there’s no excuse not to make this delectable sauce bursting with flavor every chance you get!
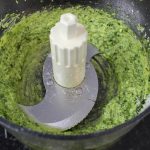
Making fresh feta-basil pesto can’t be any easier then the convenience of your food processor! There’s no need whatsoever lugging out the ole mortar and pestle making a huge project out of something that literally take’s 2 minutes to make. No cooking, no baking, no washing, NO FUSS, just load up the food processor and pulse. Voilà, you have a gourmet sauce that turns around any dish you add it to into gourmet.
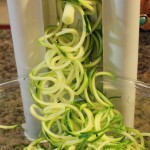
One of the appetizer’s I like to make with feta-basil pesto are Crostini with Fresh Mozzarella and Roasted tomatoes. Let’s not forget to try the feta-basil pesto on seared Scallops, Swordfishor even Sweet Potato Fries! And then there’s the obvious, top EASY PEASY pasta or Zucchini spaghettiwith the feta-basil pesto and you feel like a king. Any way you look at it this feta-basil pesto is a no brainer, a win-win situation! So get on it! lol … xoxo
Ingredients:
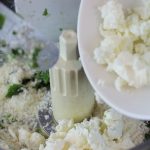
1/2 sheep’s milk feta cheese – from local cheese shop if you can! It’s the star of the show!
2 packed cups – fresh basil leaves
1/4 packed Reggiano Parmasan – freshly grated if you can
1 extra lg OR 2 medium garlic cloves put thru garlic press
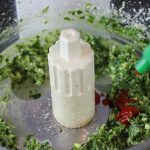
1/4 cup PLUS 1 tbsp extra-virgin olive oil
salt and pepper to taste
a few dashes of your fav hot sauce
Directions:
Place 2 packed cups of basil, 2 tbsp of olive oil, garlic thru garlic press, a sprinkle of s & p in food processor and pulse 6x
Scrape down sides and add in Reggiano Parmesan and sheep’s milk feta and pulse 4x more
Scrape down sides and add in a few dashes of hot sauce
Drizzle in thru top opening of food processor 3 more tbsp of extra-virgin olive oil and pulse 3x more …voila you have feta-basil pesto! It’s as easy as that! 🙂
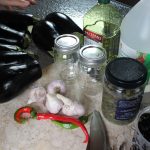
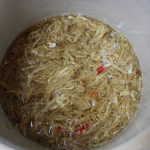
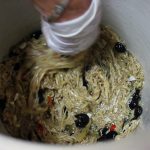
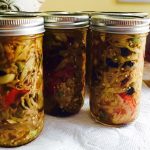
There’s nothing like homemade Pickled Eggplant with thinly sliced strands of eggplant delicately flavored by vinegar, garlic, red hot chili pepper’s, oil-cured black olives and capers all nestled in an olive oil bath. The oil-cured, black olives, add a burst of rich, meaty, sweetness and then there’s a little pucker from the capers. Similar to the oil-cured olives, the eggplant become’s sweet in the beginning of the pickling process when the salt pulls out all the moisture and bitterness.
When Nancy first gave me a jar of her delectable pickled eggplant I knew I would have to get the recipe. Not only is her pickled eggplant to die for but everything she cooks is of the same standard, absolutely delicious! Along with inspiring me in the kitchen, Nancy had the same effect on me on the golf course when I first started playing 8 years ago. She has such tenacity and determination when playing I call her the fiesty golfer! Considering how difficult the game of golf can be, she’s the perfect person to learn the game with.
I had so much fun at Nancy’s house last week making her pickled eggplant. It’s so worth the effort you put into making your own, a most rewarding process when you taste the final product. All of these incredible flavors come together to make an amazing eggplant appetizer like you’ve never had before! You just can’t buy this in the stores!
10 cups distilled white vinegar – 3/4 of gallon jug
10 cups water
4 cups olive oil
approx 1/2 container of Mortons salt… use 1/3 cup per eggplant
2 cups Italian black oil cured olives – seedless
1 long hot red pepper
2 tbsp capers
8 lg garlic cloves coarsely chopped
1 tbsp dried oregano OR 2 tbsp fresh oregano dried in the microwave
1 large pickling crock
2 clean white cotton pillow cases
1 extra large bowl to tranfer wet eggplant in pillow cases back and forth from washing machine
a case of canning jars
Directions:
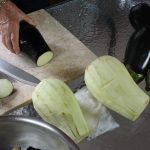
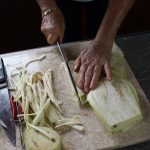
Peel and slice all 9 eggplants into 1/8″ thick pieces
Stack slices and cut into 1/8″ strips
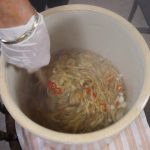
Place cut up strips into large pickling crock
After the addition of each cut up eggpant sprinkle in about 1/3 cup salt and mix strips around with salt by hand
Go thru all 9 eggplant making sure to spinkle 1/3 cup salt after addition
Place a small dish on top of all the sliced eggplant so that the dish fits into the crock
Place the gallon jug of vinegar onto dish and let sit 2-3 hours
Remove vinegar bottle weight and plate from crock – at this point there will be a lot of dark brown juice extracted from the eggplant
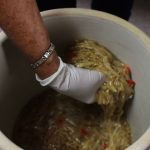
Transfer eggplant to a clean pillow case a handful at a time leaving behind the brown juice
Divide all the eggplant into 2 pillow cases and tie off the ends into knots so as the eggplant doesn’t come out when you “spin” it in the washer
Rinse out the pickling crock
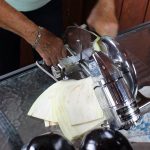
Take the two pillow cases full of eggplant to the washer and put on “spin” cycle only – NO WATER
After spin stops, remove eggplant from pillow cases & place back into crock (save pillow cases in a large bowl ready to use one more time before cleaning)
Add in chopped garlic cloves and sliced hot pepper
Bring 10 cups vinegar/10 cups water to a rapid boil
Pour vinegar/water mix over eggplant strands in crock
Stir breifly to mix and cover
Let ferment until cooled approx. for 3 hours giving the eggplant a stir at 1 1/2 hour mark
When the eggplant is cooled remove from crock back into pillow caeses
Divide up the eggplant and place back into the same two pillow cases you used on first spin
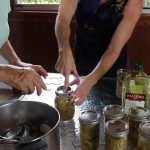
At this point run all the jars thru dishwasher – time it so they are hot ready to jar the pickled eggplant after 2nd spin (give it about 1/2 hour-depending on timing of your own dishwasher)
Put all the tops to the canning jars in a pan of water, bring to a boil to sterilze as well
Place the eggplant strands back in the washer on “spin” cylce only again – NO WATER
Rinse crock
Microwave fresh oregano in a microwave for 1 minute, crumble the oregano leaves off the stem and set aside
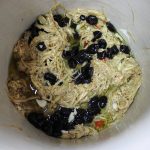
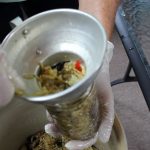
Add spun pickled eggplant back into the clean crock, add in 4 cups olive oil, 2 cups oil-cured black olives, 2 tbsps of caper and 2 tbsp of fresh microwaved oregano
Take hot jars out of the dishwasher and begin to fill with eggplant
Top off the pickled eggplant in the jars with a drizzle of olive oil keeping 1/2″ from the top
Wipe the top of the jars clean with a clean paper towel and seal with the hot tops you boiled on the stove – Be Careful Not To Burn yourself here
Approx 5 hours after putting the tops on the jars, gently push down on the middle circle to hear a small pop and complete the “seal” – NOTE: they may pop down completing that last seal all on their own
The pickled eggplant is done and will keep for months at room temp
I keep an opened jar in the fridge and bring to room temperature when ever I serve it…YUM!

 Showing you how to make summer sauces, a Bourbon BBQ & a Green Goddess Sauce, to go with Easy Pulled Pork Sliders topped with broccoli slaw is what I was doing today on CT Style! Teresa has that baby glow going on and Ryan always with the funny one liners, doing the cooking segment on CT Style is one of my favorite things about being The Traveling Epicurean.
 I featured my homemade BBQ sauce on CT Style today because I really wanted to emphasis how easy it is to make your own BBQ sauce at anytime and not have to worry about making a trip back to the store when you can whip it up yourself! Add in some Bourbon and wow, how great does that taste. It’s definitely an adult taste so if you need to you can easily divide up the sauce for the kids adding in bourbon to the adult sauce only.
 Now the green goddess sauce goes with out saying and once you taste it you’ll understand. This sauce will jazz up just about any dish you are making, grilled swordfish, salmon, chicken, beef, lamb, pork or veggies. It’s made all in a blender and when it sits in the frig for a few hours the flavors only get better.
 cider vinegar (I also throw in some “seasoned” rice wine vinegar) and sugar and violá!
 This Creamy New England Clam Chowder is bursting with clam broth flavor, tender clams, melt in your mouth potatoes and a hint of smokey from the bacon and best of all, I can make it 12 months of the year! My secret ingredients in this homemade New England Clam Chowder push it right over the top! My mother was whipping up creamy New England clam chowder when I was little so making homemade soups just comes naturally to me. My New England clam chowder recipe reminds me of my no-nonsense crab cake recipe, no extra fillers! Topped with a little dollop of butter, a few dashes of tabasco and some oyster crackers brings me to chowda heaven!
 Dry Sherry-Blend of Amontillado for only $11 a bottle. It will last a while in your cupboard and help you to create amazing dishes. I would never not think of putting a big splash of dry sherry into my chowder! You will understand why once you try it this way …you’ll never go back to sherry-less chowder!


 de like a


 Giving my favorite
  In my opinion, finding a balance is the key to everything in life. Getting my dose of endorphins thru spin class at my gym, Funktion Fitness, is just as important to me as having a healthy go to energy drink. And not just any old healthy energy drink but one that’s as delicious as my Mango-Kale Smoothie! The best thing is attaining these things and enjoying yourself to the point where it just doesn’t seem like work at all!


 Lisa & Vin’s 2016 Meatball Throw Down! In the mean time you can check out my


 There’s nothing like homemade Pickled Eggplant with thinly sliced strands of eggplant delicately flavored by vinegar, garlic, red hot chili pepper’s, oil-cured black olives and capers all nestled in an olive oil bath. The oil-cured, black olives, add a burst of rich, meaty, sweetness and then there’s a little pucker from the capers. Similar to the oil-cured olives, the eggplant become’s sweet in the beginning of the pickling process when the salt pulls out all the moisture and bitterness.